
Design Patterns 的实战应用纪录—In WKWebView with Builder, Strategy & Chain of Responsibility Pattern
封装 iOS WKWebView 时使用到的 Design Patterns 场景 (策略、责任链、建造模式)。

Photo by Dean Pugh
About Design Patterns
每次讲 Design Patterns 之前都要提一下,最经典的 GoF 23 种设计模式发表至今已过去 30 年 (1994 年发行),工具、语言的变化、软体开发模式的变迁已经不可同日而语,后续在不同领域也延伸出许多新的设计模式;Design Patterns 并不是万能解、也不是唯一解,他的存在更像是一种「语言代称」在适合的场景套用适合的设计模式,可以减少开发协作的障碍,例如:这边套用策略模式,后续维护扩充的人,就可以直接依照策略模式的架构进行迭代,并且设计模式多半都解耦的不错,对于扩充性、测试性也有显著的帮助。
Design Patterns 的使用心法
-
不是唯一解
-
不是万能解
-
不能硬套,需按照要解决问题的类型(创建?行为?结构?)、目的选择对应的设计模式
-
不能魔改,魔改容易造成后续维护的人误会,跟语言一样大家都用苹果都叫 Apple,如果自己定义叫 Banana 就会变成是一个需要特别知道的开发成本
-
尽可能避开关键字,例如 Factory Pattern 习惯命名为
XXXFactory,那如果不是工厂模式就不该使用此命名关键字 -
谨慎自己创造模式 ,同前述虽然经典的只有 23 种,但经历各个领域多年的演化也有很多新的模式,可以先参考网路资料找到适合的模式(毕竟三个臭皮匠胜过一个诸葛亮),真的没有再来提出新的设计模式并尽可能发表让不同领域、不同场境的人一起检视跟调整
-
程式终究是写给人维护的,只要好维护、好扩充,不一定要使用设计模式
-
团队要有 Design Patterns 的共识才适合使用
-
Design Pattern 可以再套 Design Pattern 组合技
-
Design Patterns 上手要经过实务不断地淬炼,才会越来越有什么场景适合或不适合套用的敏锐度
辅助神器 ChatGPT
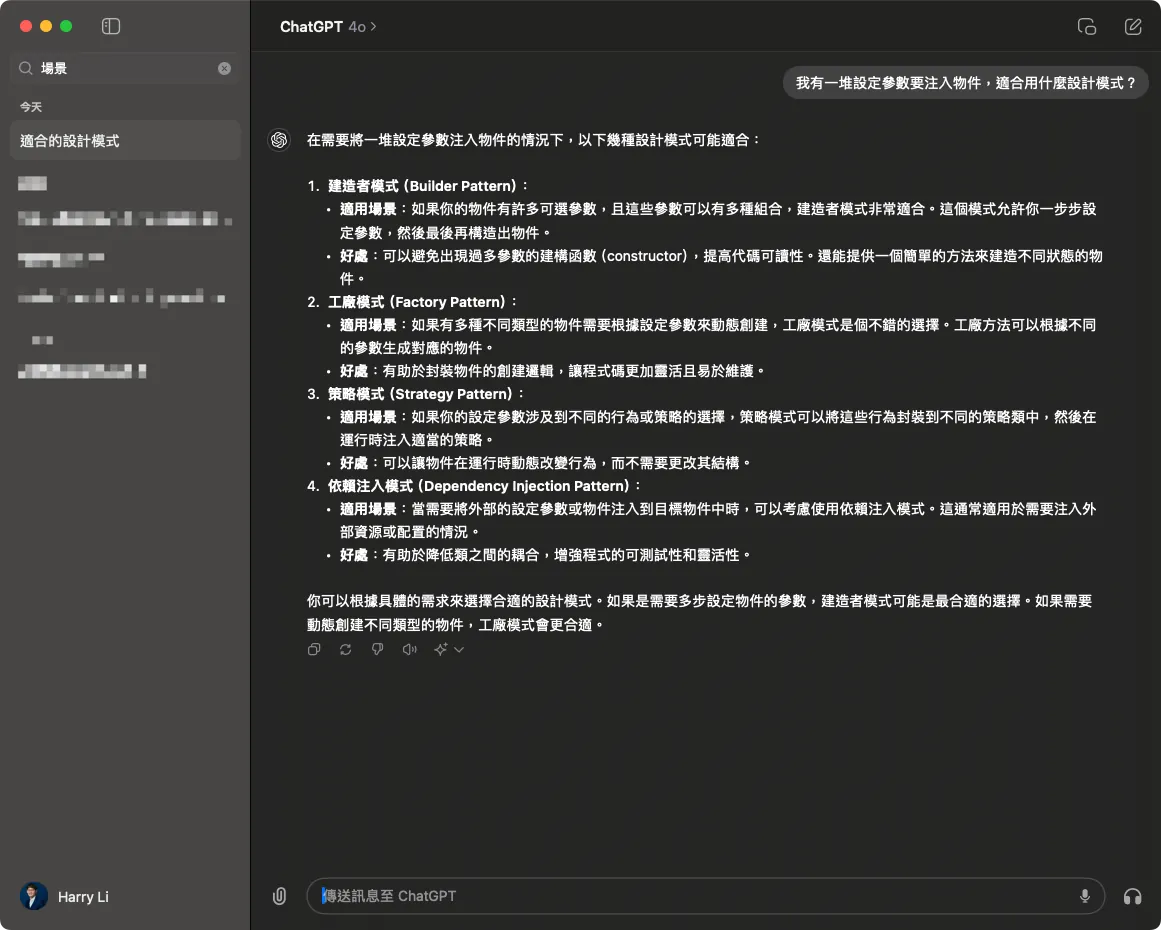
自从有了 ChatGPT 学习 Design Patterns 设计模式的实务应用就更容易,只要把你的问题具体的描述给他,问他有哪些设计模式适合这个场景,他都能给出几个可能适合的模式并且附上说明;虽然不是每个答案都那么适合,但他至少给出了几个可行方向,我们只要再深入这几个模式结合自己实务场景的问题,最后都能选到不错的解法!
WKWebView 的 Design Patterns 实战应用场景
这次的 Design Patterns 实战应用是在收敛目前 Codebase 中的 WKWebView 物件功能特性,并开发统一的 WKWebView 元件时在几个合适的逻辑抽象点套用 Design Patterns 的心得纪录分享。
完整 Demo 专案程式码会附在文末。
原始无抽象的写法
class WKWebViewController: UIViewController {

    // MARK - 定义一些变数、开关 让外部 init 时注入特性...

    // 模拟商业逻辑:开关 Match 特殊路径开原生页面
    let noNeedNativePresent: Bool
    // 模拟商业逻辑:开关 DeeplinkManager 检查
    let deeplinkCheck: Bool
    // 模拟商业逻辑:是开首页吗?
    let isHomePage: Bool
    // 模拟商业逻辑:要注入到 WKWebView 的 WKUserScript 的脚本
    let userScripts: [WKUserScript]
    // 模拟商业逻辑:要注入到 WKWebView 的 WKScriptMessageHandler 的脚本
    let scriptMessageHandlers: [String: WKScriptMessageHandler]
    // 是否允许从 WebView 取得 Title 复写 ViewController Title
    let overrideTitleFromWebView: Bool

    let url: URL

    // ...
}
// ...
extension OldWKWebViewController: WKNavigationDelegate {
    // MARK - iOS WKWebView 的 navigationAction Delegate,用于让我们决定即将载入的连结要怎么处理
    // 结束务必呼叫 decisionHandler(.allow) or decisionHandler(.cancel)
    // decisionHandler(.cancel) 将中断载入即将载入的页面

    // 这边模拟了不同的变数、开关会有不同的逻辑处理:

    func webView(_ webView: WKWebView, decidePolicyFor navigationAction: WKNavigationAction, decisionHandler: @escaping (WKNavigationActionPolicy) -> Void) {
        guard let url = navigationAction.request.url else {
            decisionHandler(.allow)
            return
        }

        // 模拟商业逻辑:WebViewController deeplinkCheck == true (代表需要过 DeepLinkManager 检查并开启页面)
        if deeplinkCheck {
            print("DeepLinkManager.open(\(url.absoluteString)")
            // 模拟 DeepLinkManager 逻辑,URL 能成功打开则打开并结束流程。
            // if DeepLinkManager.open(url) == true {
                decisionHandler(.cancel)
                return
            // }
        }

        // 模拟商业逻辑:WebViewController isHomePage == true (代表是开主页) & WebView 正在浏览首页,则切换 TabBar Index
        if isHomePage {
            if url.absoluteString == "https://zhgchg.li" {
                print("Switch UITabBarController to Index 0")
                decisionHandler(.cancel)
            }
        }

        // 模拟商业逻辑:WebViewController noNeedNativePresent == false (代表需要 Match 特殊路径开原生页面)
        if !noNeedNativePresent {
            if url.pathComponents.count >= 3 {
                if url.pathComponents[1] == "product" {
                    // match http://zhgchg.li/product/1234
                    let id = url.pathComponents[2]
                    print("Present ProductViewController(\(id)")
                    decisionHandler(.cancel)
                } else if url.pathComponents[1] == "shop" {
                    // match http://zhgchg.li/shop/1234
                    let id = url.pathComponents[2]
                    print("Present ShopViewController(\(id)")
                    decisionHandler(.cancel)
                }
                // more...
            }
        }

        decisionHandler(.allow)
    }
}
// ...
问题
-
设定变数、开关摊在 Class 当中,不清楚哪些是设定使用
-
直接暴露 WKUserScript 变数设定给外部,我们希望能管控注入的 JS,只允许注入特定行为
-
无法控制 WKScriptMessageHandler 的注册规则
-
如果要 init 差不多的 WebView 需要重复写注入参数的规则,参数规则无法复用
-
navigationAction Delegate内部靠变数控制流程,如果要删改流程或顺序都要动到整个 Code,也可能改坏本来就正常的流程
Builder Pattern 建造者模式
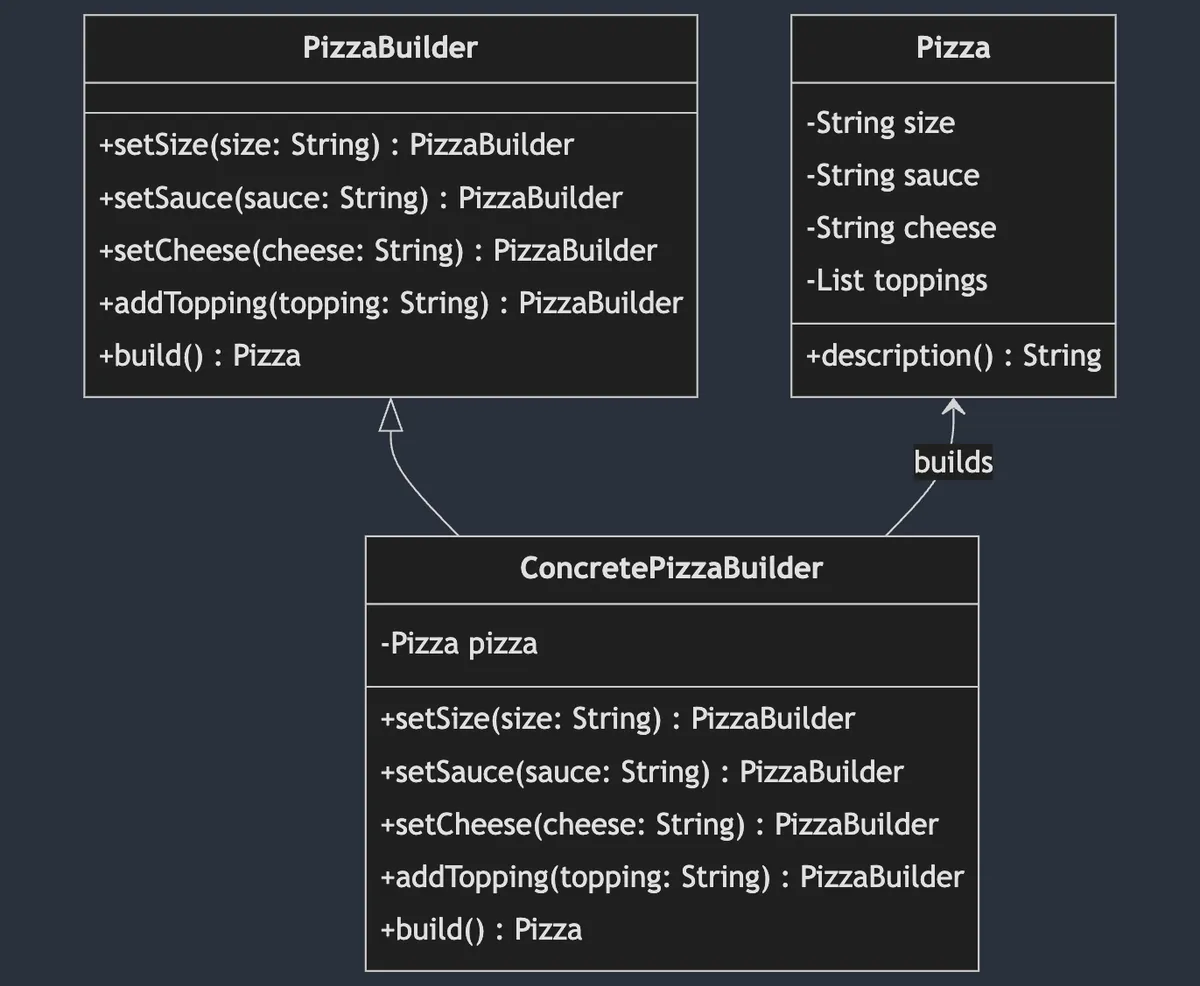
Builder Pattern(建造者模式) 属于 创建型 设计模式,将创建物件的步骤与逻辑分离,操作者可一步一步设定参数并且复用设定,并在最后创建出目标物件,另外同样的创建步骤也可以创建出不同的对象实现。
上图以制作 Pizza 为例,先将 Pizza 制作的步骤拆成好几个方法,并宣告在 PizzaBuilder 这个 Protocol (Interface), ConcretePizzaBuilder 为实际制作 Pizza 的物件,可能为 素食 PizzaBuilder & 荤食 PizzaBuilder ;不同的 Builder 原料可能不一样,但最终都会 build() 产出 Pizza 物件。
WKWebView 场景
回到 WKWebView 场景,我们的最终产出物件是 MyWKWebViewConfiguration ,我们把所有 WKWebView 会需要设定的变数全统一放到这个物件当中,并使用 Builder Pattern MyWKWebViewConfigurator 逐步完成 Configuration 的构建工作。
public struct MyWKWebViewConfiguration {
    let headNavigationHandler: NavigationActionHandler?
    let scriptMessageStrategies: [ScriptMessageStrategy]
    let userScripts: [WKUserScript]
    let overrideTitleFromWebView: Bool
    let url: URL
}
// 全部参数都只对 Module 内暴露 (Internal)
MyWKWebViewConfigurator (Builder Pattern)
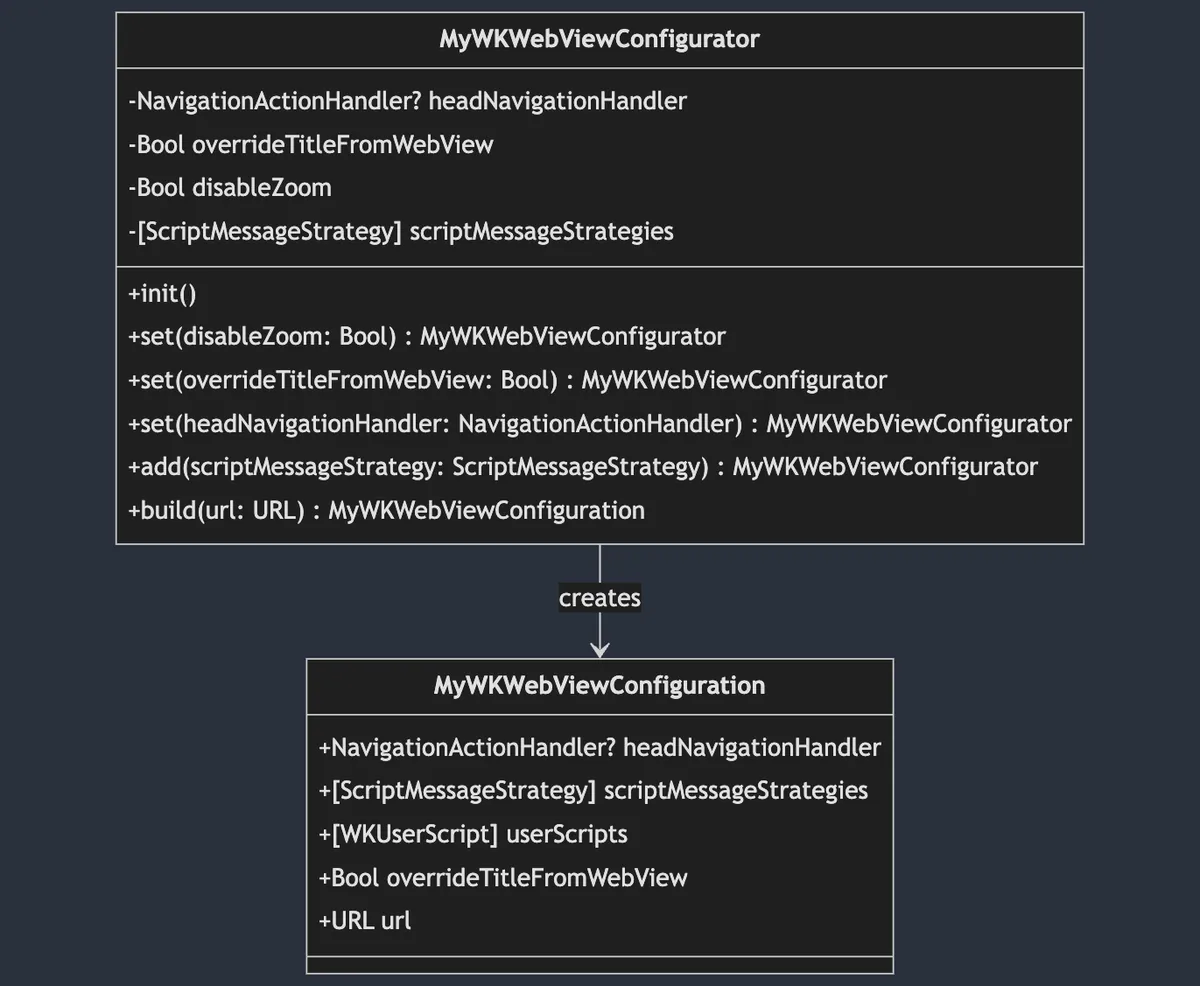
这边因为我只有 Build for MyWKWebView 的需求,因此没有再把
MyWKWebViewConfigurator多拆 Protocol(Interface)。
public final class MyWKWebViewConfigurator {

    private var headNavigationHandler: NavigationActionHandler? = nil
    private var overrideTitleFromWebView: Bool = true
    private var disableZoom: Bool = false
    private var scriptMessageStrategies: [ScriptMessageStrategy] = []

    public init() {

    }

    // 参数封装、内控
    public func set(disableZoom: Bool) -> Self {
        self.disableZoom = disableZoom
        return self
    }

    public func set(overrideTitleFromWebView: Bool) -> Self {
        self.overrideTitleFromWebView = overrideTitleFromWebView
        return self
    }

    public func set(headNavigationHandler: NavigationActionHandler) -> Self {
        self.headNavigationHandler = headNavigationHandler
        return self
    }

    // 可以把新增逻辑规则封装在里面
    public func add(scriptMessageStrategy: ScriptMessageStrategy) -> Self {
        scriptMessageStrategies.removeAll(where: { type(of: $0).identifier == type(of: scriptMessageStrategy).identifier })
        scriptMessageStrategies.append(scriptMessageStrategy)
        return self
    }

    public func build(url: URL) -> MyWKWebViewConfiguration {
        var userScripts:[WKUserScript] = []
        // 产生时才附加
        if disableZoom {
            let script = "var meta = document.createElement('meta'); meta.name='viewport'; meta.content='width=device-width, initial-scale=1.0, maximum-scale=1.0, user-scalable=no'; document.getElementsByTagName('head')[0].appendChild(meta);"
            let disableZoomScript = WKUserScript(source: script, injectionTime: .atDocumentEnd, forMainFrameOnly: true)
            userScripts.append(disableZoomScript)
        }

        return MyWKWebViewConfiguration(headNavigationHandler: headNavigationHandler, scriptMessageStrategies: scriptMessageStrategies, userScripts: userScripts, overrideTitleFromWebView: overrideTitleFromWebView, url: url)
    }
}
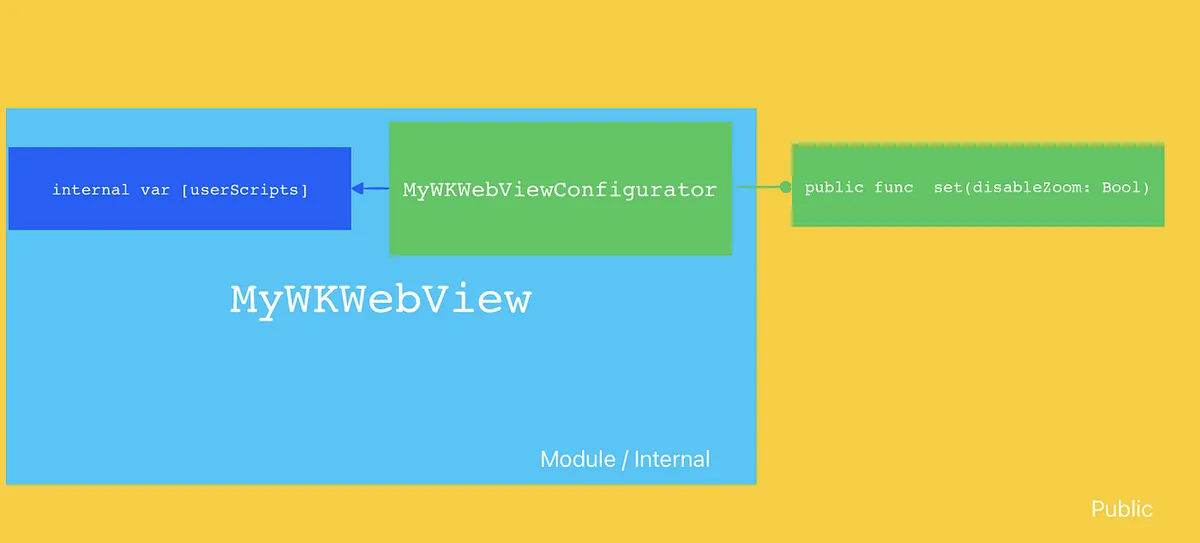
多拆了一层也可以更好的使用 Access Control 隔离参数的使用权限,以本场景为例就是我们希望依然可以直接注入 WKUserScript 到 MyWKWebView 当中,但我们又不希望把开口开的这么大让使用的人可以随意注入,因此结合 Builder Pattern + Swift Access Control,当 MyWKWebView 已经被放 Module 中后 MyWKWebViewConfigurator 对外封装成操作方法 func set(disableZoom: Bool) ,对内在产生 MyWKWebViewConfiguration 时再附加上 WKUserScript , MyWKWebViewConfiguration 所有参数对外都是不可更改并且只能透过 MyWKWebViewConfigurator 产生。
MyWKWebViewConfigurator + Simple Factory 简单工厂
当有了 MyWKWebViewConfigurator Builder 之后我们可以再建立一个简单工厂封装、复用建立步骤。
struct MyWKWebViewConfiguratorFactory {
    enum ForType {
        case `default`
        case productPage
        case payment
    }

    static func make(for type: ForType) -> MyWKWebViewConfigurator {
        switch type {
        case .default:
            return MyWKWebViewConfigurator()
                .add(scriptMessageStrategy: PageScriptMessageStrategy())
                .set(overrideTitleFromWebView: false)
                .set(disableZoom: false)
        case .productPage:
            return Self.make(for: .default).set(disableZoom: true).set(overrideTitleFromWebView: true)
        case .payment:
            return MyWKWebViewConfigurator().set(headNavigationHandler: paymentNavigationActionHandler)
        }
    }
}
Chain of Responsibility Pattern 责任链模式
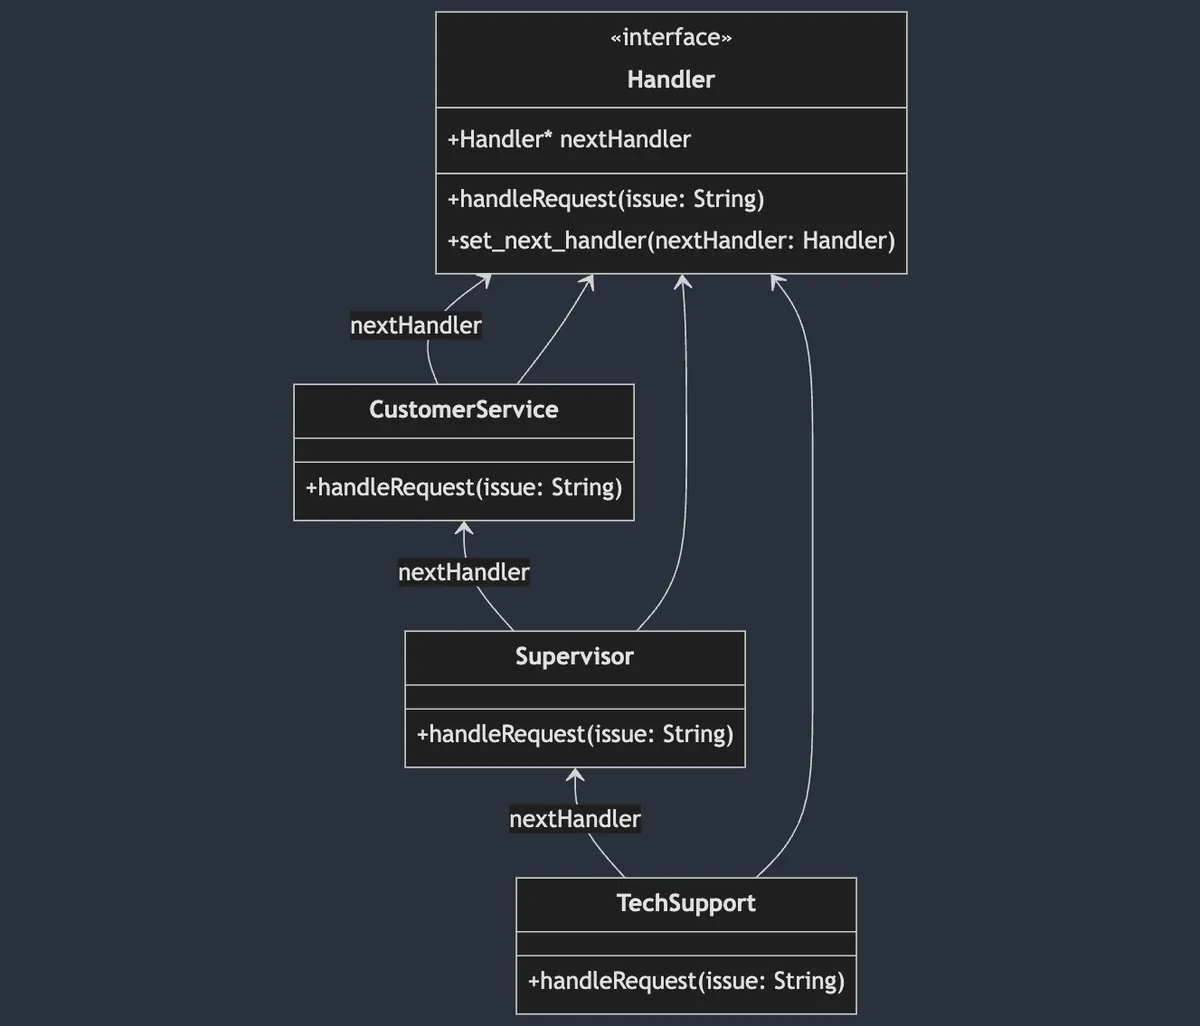
责任链模式(Chain of Responsibility Pattern)属于 行为型 设计模式,它将对象处理的操作封装并使用链式结构串联起来,请求操作会沿著链条传递,直到有被处理为止;串联的操作封装可以自由弹性的组合、更改顺序。
责任链专注在东西进来你有没有要处理,没有就 Skip ,因此不能处理一半或是修改了输入物件然后丢给下一个;如果是这种需求那是另一个 Interceptor Pattern 。
上图是以 Tech Support (or OnCall. . ) 为例,问题物件进来之后会先经过 CustomerService 如果他不能处理就往下一层 Supervisor 丢,如果还是不能处理再继续往下到 TechSupport ;另外也可以针对不同问题组成不同的责任链,例如如果是大客户的问题会直接从 Supervisor 开始处理;在 Swift UIKit 的 Responder Chain 也是使用了责任链模式,回应使用者在 UI 上的操作。
WKWebView 场景
在我们 WKWebView 的场景中,主要是套用在 func webView(_ webView: WKWebView, decidePolicyFor navigationAction: WKNavigationAction, decisionHandler: @escaping (WKNavigationActionPolicy) -> Void) 这个 Delegate 方法。
当系统收到网址请求时会经过这个方法让我们决定是否要允许跳转,并在结束处理后呼叫
decisionHandler(.allow)ordecisionHandler(.cancel)告知结果。
在 WKWebView 的实作上就会出现很多判断或是有的页面处理跟别人不一样要绕开:
// 原始写法...
func webView(_ webView: WKWebView, decidePolicyFor navigationAction: WKNavigationAction, decisionHandler: @escaping (WKNavigationActionPolicy) -> Void) {
        guard let url = navigationAction.request.url else {
            decisionHandler(.allow)
            return
        }

        // 模拟商业逻辑:WebViewController deeplinkCheck == true (代表需要过 DeepLinkManager 检查并开启页面)
        if deeplinkCheck {
            print("DeepLinkManager.open(\(url.absoluteString)")
            // 模拟 DeepLinkManager 逻辑,URL 能成功打开则打开并结束流程。
            // if DeepLinkManager.open(url) == true {
                decisionHandler(.cancel)
                return
            // }
        }

        // 模拟商业逻辑:WebViewController isHomePage == true (代表是开主页) & WebView 正在浏览首页,则切换 TabBar Index
        if isHomePage {
            if url.absoluteString == "https://zhgchg.li" {
                print("Switch UITabBarController to Index 0")
                decisionHandler(.cancel)
            }
        }

        // 模拟商业逻辑:WebViewController noNeedNativePresent == false (代表需要 Match 特殊路径开原生页面)
        if !noNeedNativePresent {
            if url.pathComponents.count >= 3 {
                if url.pathComponents[1] == "product" {
                    // match http://zhgchg.li/product/1234
                    let id = url.pathComponents[2]
                    print("Present ProductViewController(\(id)")
                    decisionHandler(.cancel)
                } else if url.pathComponents[1] == "shop" {
                    // match http://zhgchg.li/shop/1234
                    let id = url.pathComponents[2]
                    print("Present ShopViewController(\(id)")
                    decisionHandler(.cancel)
                }
                // more...
            }
        }

        // more...
        decisionHandler(.allow)
}
随著时间推移功能越来越复杂,这边的逻辑也会越来越多,如果又扯到处理顺序也要不一样就会变成一场灾难。
NavigationActionHandler (Chain of Responsibility Pattern)
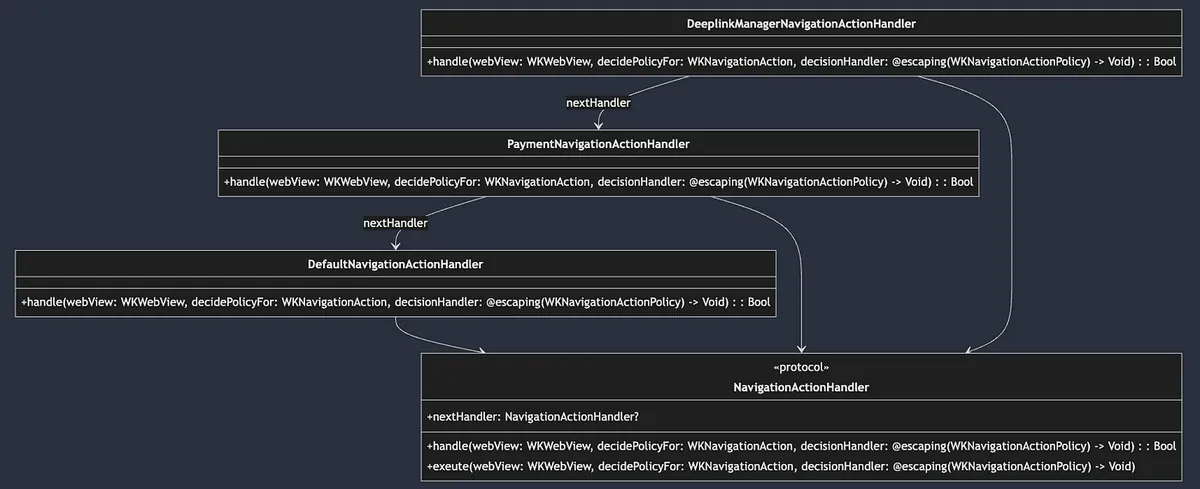
先定义好 Handler Protocol:
public protocol NavigationActionHandler: AnyObject {
    var nextHandler: NavigationActionHandler? { get set }

    /// Handles navigation actions for the web view. Returns true if the action was handled, otherwise false.
    func handle(webView: WKWebView, decidePolicyFor navigationAction: WKNavigationAction, decisionHandler: @escaping (WKNavigationActionPolicy) -> Void) -> Bool
    /// Executes the navigation action policy decision. If the current handler does not handle it, the next handler in the chain will be executed.
    func exeute(webView: WKWebView, decidePolicyFor navigationAction: WKNavigationAction, decisionHandler: @escaping (WKNavigationActionPolicy) -> Void)
}

public extension NavigationActionHandler {
    func exeute(webView: WKWebView, decidePolicyFor navigationAction: WKNavigationAction, decisionHandler: @escaping (WKNavigationActionPolicy) -> Void) {
        if !handle(webView: webView, decidePolicyFor: navigationAction, decisionHandler: decisionHandler) {
            self.nextHandler?.exeute(webView: webView, decidePolicyFor: navigationAction, decisionHandler: decisionHandler) ?? decisionHandler(.allow)
        }
    }
}
-
操作会在
func handle()实现,如果有接下来处理则回传true否则回传false -
func exeute()是预设的链访问实现,会从这边执行遍历整个操作链,预设行为是当func handle()为false(代表此节点无法处理) 则自动呼叫下一个nextHandler的execute()继续处理,直到结束。
实现:
// 预设实现,通常放到最后
public final class DefaultNavigationActionHandler: NavigationActionHandler {
    public var nextHandler: NavigationActionHandler?

    public init() {

    }

    public func handle(webView: WKWebView, decidePolicyFor navigationAction: WKNavigationAction, decisionHandler: @escaping (WKNavigationActionPolicy) -> Void) -> Bool {
        decisionHandler(.allow)
        return true
    }
}

//
final class PaymentNavigationActionHandler: NavigationActionHandler {
    var nextHandler: NavigationActionHandler?

    func handle(webView: WKWebView, decidePolicyFor navigationAction: WKNavigationAction, decisionHandler: @escaping (WKNavigationActionPolicy) -> Void) -> Bool {
        guard let url = navigationAction.request.url else {
            return false
        }

        // 模拟商业逻辑:Payment 付款相关、两阶段验证 WebView...etc
        print("Present Payment Verify View Controller")
        decisionHandler(.cancel)
        return true
    }
}

//
final class DeeplinkManagerNavigationActionHandler: NavigationActionHandler {
    var nextHandler: NavigationActionHandler?

    func handle(webView: WKWebView, decidePolicyFor navigationAction: WKNavigationAction, decisionHandler: @escaping (WKNavigationActionPolicy) -> Void) -> Bool {
        guard let url = navigationAction.request.url else {
            return false
        }


        // 模拟 DeepLinkManager 逻辑,URL 能成功打开则打开并结束流程。
        // if DeepLinkManager.open(url) == true {
            decisionHandler(.cancel)
            return true
        // } else {
            return false
        //
    }
}

// More...
使用:
extension MyWKWebViewController: WKNavigationDelegate {
    public func webView(_ webView: WKWebView, decidePolicyFor navigationAction: WKNavigationAction, decisionHandler: @escaping (WKNavigationActionPolicy) -> Void) {
       let headNavigationActionHandler = DeeplinkManagerNavigationActionHandler()
       let defaultNavigationActionHandler = DefaultNavigationActionHandler()
       let paymentNavigationActionHandler = PaymentNavigationActionHandler()

       headNavigationActionHandler.nextHandler = paymentNavigationActionHandler
       paymentNavigationActionHandler.nextHandler = defaultNavigationActionHandler

       headNavigationActionHandler.exeute(webView: webView, decidePolicyFor: navigationAction, decisionHandler: decisionHandler)
    }
}
这样当请求收到后,就会照著我们定义的处理链依序处理。
结合前面的 Builder Pattern MyWKWebViewConfigurator 将 headNavigationActionHandler 开成参数出去,就能从外部决定这个 WKWebView 的处理需求、顺序:
extension MyWKWebViewController: WKNavigationDelegate {
    public func webView(_ webView: WKWebView, decidePolicyFor navigationAction: WKNavigationAction, decisionHandler: @escaping (WKNavigationActionPolicy) -> Void) {
        configuration.headNavigationHandler?.exeute(webView: webView, decidePolicyFor: navigationAction, decisionHandler: decisionHandler) ?? decisionHandler(.allow)
    }
}

//...
struct MyWKWebViewConfiguratorFactory {
    enum ForType {
        case `default`
        case productPage
        case payment
    }

    static func make(for type: ForType) -> MyWKWebViewConfigurator {
        switch type {
        case .default:
            // 模拟预设情况有这些 handler
            let deplinkManagerNavigationActionHandler = DeeplinkManagerNavigationActionHandler()
            let homePageTabSwitchNavigationActionHandler = HomePageTabSwitchNavigationActionHandler()
            let nativeViewControllerNavigationActionHandlera = NativeViewControllerNavigationActionHandler()
            let defaultNavigationActionHandler = DefaultNavigationActionHandler()

            deplinkManagerNavigationActionHandler.nextHandler = homePageTabSwitchNavigationActionHandler
            homePageTabSwitchNavigationActionHandler.nextHandler = nativeViewControllerNavigationActionHandlera
            nativeViewControllerNavigationActionHandlera.nextHandler = defaultNavigationActionHandler

            return MyWKWebViewConfigurator()
                .add(scriptMessageStrategy: PageScriptMessageStrategy())
                .add(scriptMessageStrategy: UserScriptMessageStrategy())
                .set(headNavigationHandler: deplinkManagerNavigationActionHandler)
                .set(overrideTitleFromWebView: false)
                .set(disableZoom: false)
        case .productPage:
            return Self.make(for: .default).set(disableZoom: true).set(overrideTitleFromWebView: true)
        case .payment:
            // 模拟付款页面只需要这些 handler,并且 paymentNavigationActionHandler 优先权最高
            let paymentNavigationActionHandler = PaymentNavigationActionHandler()
            let deplinkManagerNavigationActionHandler = DeeplinkManagerNavigationActionHandler()
            let defaultNavigationActionHandler = DefaultNavigationActionHandler()

            paymentNavigationActionHandler.nextHandler = deplinkManagerNavigationActionHandler
            deplinkManagerNavigationActionHandler.nextHandler = defaultNavigationActionHandler

            return MyWKWebViewConfigurator().set(headNavigationHandler: paymentNavigationActionHandler)
        }
    }
}
Strategy Pattern 策略模式
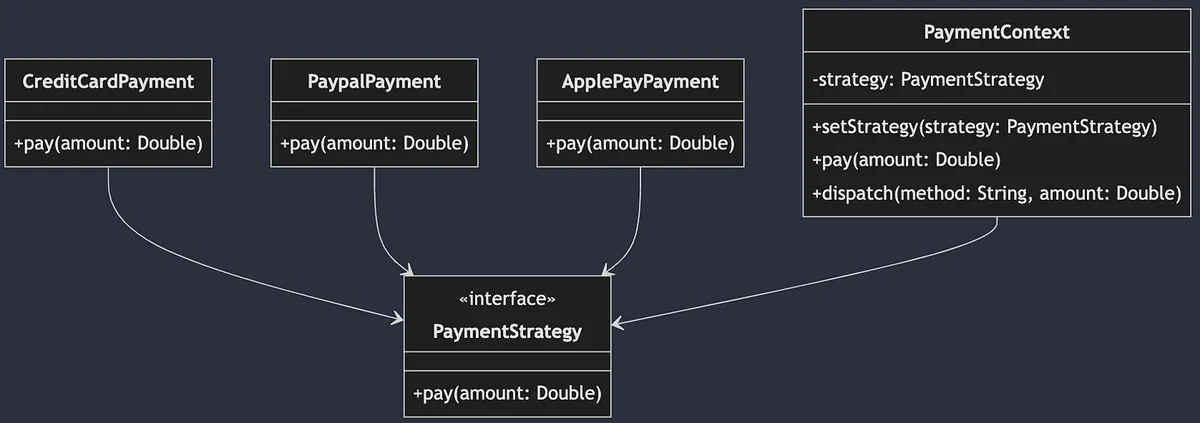
策略模式(Strategy Pattern)属于 行为型 设计模式,它将实际操作抽象出来,我们可以实现多种不同的操作,让外部可以根据不同场境弹性的替换使用。
上图以不同支付方式为例,我们把支付抽象为 Payment Protocol (Interface),然后各种支付方式去实现自己的实作,在 PaymentContext (模拟外部使用)时 依据使用者选择的付款方式,产生对应的 Payment 实体并统一呼叫 pay() 进行支付。
WKWebView 场景
在 WebView 与 前端页面的交互中使用。
当前端 JavaScript 呼叫:
window.webkit.messageHandlers.Name.postMessage(Parameters);
就会进到 WKWebView 找到对应
Name的WKScriptMessageHandlerClass 进入执行操作。
系统已经有定义好的 Protocol 跟相应的 func add(_ scriptMessageHandler: any WKScriptMessageHandler, name: String) 方法,我们只需要定义好自己的 WKScriptMessageHandler 实现,并加入到 WKWebView,系统就会依照 Strategy Pattern 策略模式,根据收到的 name 派发给对应的 具体策略 执行。
这边只做简单的 Protocol extend WKScriptMessageHandler ,多一个 identifier:String for add(.. name:) 使用:
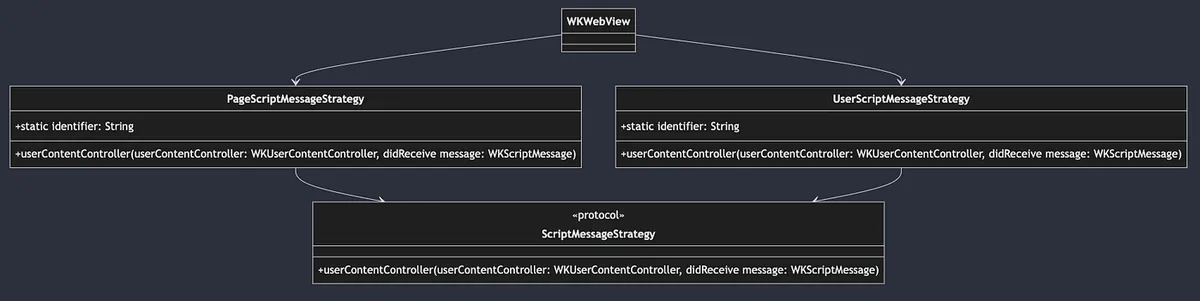
public protocol ScriptMessageStrategy: NSObject, WKScriptMessageHandler {
    static var identifier: String { get }
}
实现:
final class PageScriptMessageStrategy: NSObject, ScriptMessageStrategy {
    static var identifier: String = "page"

    func userContentController(_ userContentController: WKUserContentController, didReceive message: WKScriptMessage) {
        // 模拟 called from js: window.webkit.messageHandlers.page.postMessage("Close");
        print("\(Self.identifier): \(message.body)")
    }
}

//

final class UserScriptMessageStrategy: NSObject, ScriptMessageStrategy {
    static var identifier: String = "user"

    func userContentController(_ userContentController: WKUserContentController, didReceive message: WKScriptMessage) {
        // 模拟 called from js: window.webkit.messageHandlers.user.postMessage("Hello");
        print("\(Self.identifier): \(message.body)")
    }
}
WKWebView 注册使用:
var scriptMessageStrategies: [ScriptMessageStrategy] = []
scriptMessageStrategies.forEach { scriptMessageStrategy in
  webView.configuration.userContentController.add(scriptMessageStrategy, name: type(of: scriptMessageStrategy).identifier)
}
结合前面的 Builder Pattern MyWKWebViewConfigurator 从外部管理 ScriptMessageStrategy 的注册:
public final class MyWKWebViewConfigurator {
    //...

    // 可以把新增逻辑规则封装在里面
    public func add(scriptMessageStrategy: ScriptMessageStrategy) -> Self {
        // 这边只有实现重复 identifier 时会先删除旧的的逻辑
        scriptMessageStrategies.removeAll(where: { type(of: $0).identifier == type(of: scriptMessageStrategy).identifier })
        scriptMessageStrategies.append(scriptMessageStrategy)
        return self
    }
    //...
}

//...

public class MyWKWebViewController: UIViewController {
    //...
    public override func viewDidLoad() {
        super.viewDidLoad()

        //...
        configuration.scriptMessageStrategies.forEach { scriptMessageStrategy in
            webView.configuration.userContentController.add(scriptMessageStrategy, name: type(of: scriptMessageStrategy).identifier)
        }
        //...
    }
}
Question: 这个场景也可以改用 Chain of Responsibility Pattern 责任链模式吗?
到这边有朋友可能会想问,那这边的 Strategy Pattern 可以用 Chain of Responsibility Pattern 取代吗?
这两个设计模式同样是行为型,可以取代;但实际要看需求场景,在这边是很典型的 Strategy Pattern,WKWebView 依照 Name 去决定要进入的不同 Strategy;如果我们的需求是不同的 Strategy 之间可能有链式依赖或是 recover 关系,例如 AStrategy 如果不做要丢给 BStrategy 做,这时候才会考虑使用 Chain of Responsibility Pattern。
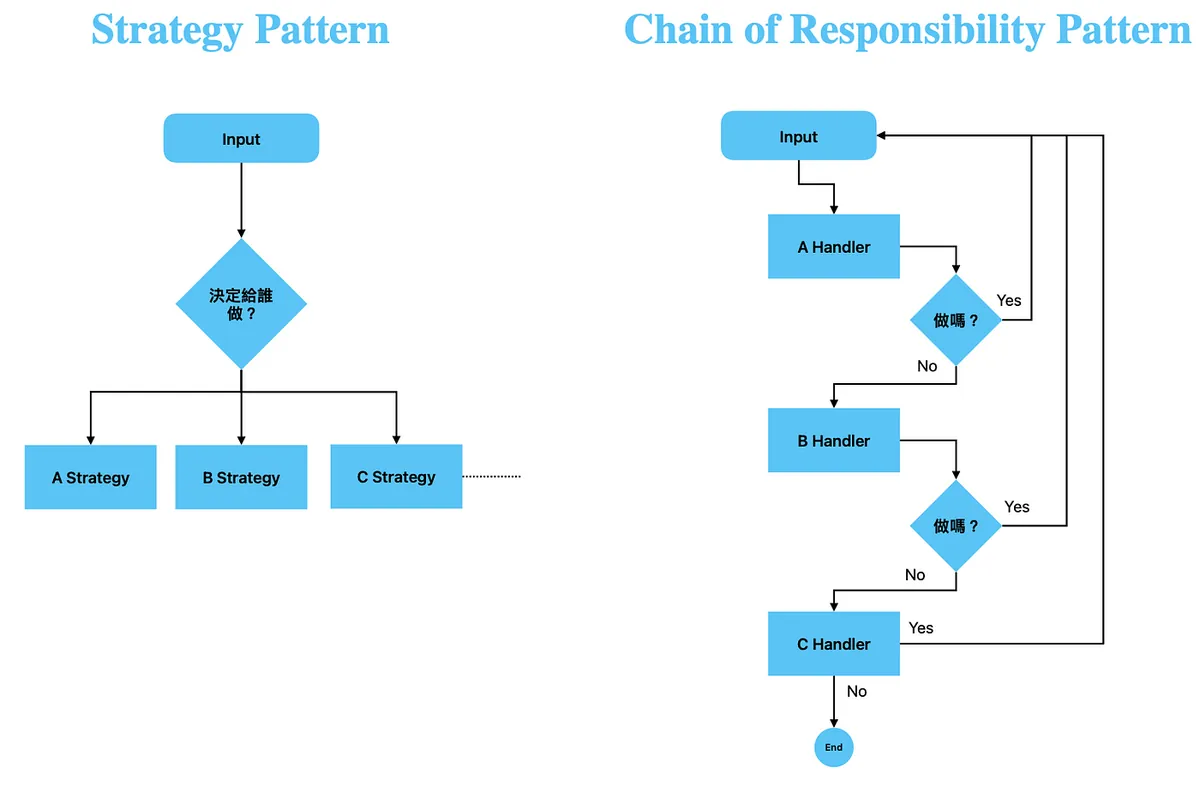
Strategy v.s. Chain of Responsibility
-
Strategy Pattern:已有明确派发执行策略且策略与策略之间没有关系。
-
Chain of Responsibility Pattern:执行策略是在个别实现中决定,如果无法处理则往下丢给下一个实现。
复杂场景可以用 Strategy Pattern 里面再套用 Chain of Responsibility Pattern 组合达成。
最终组合
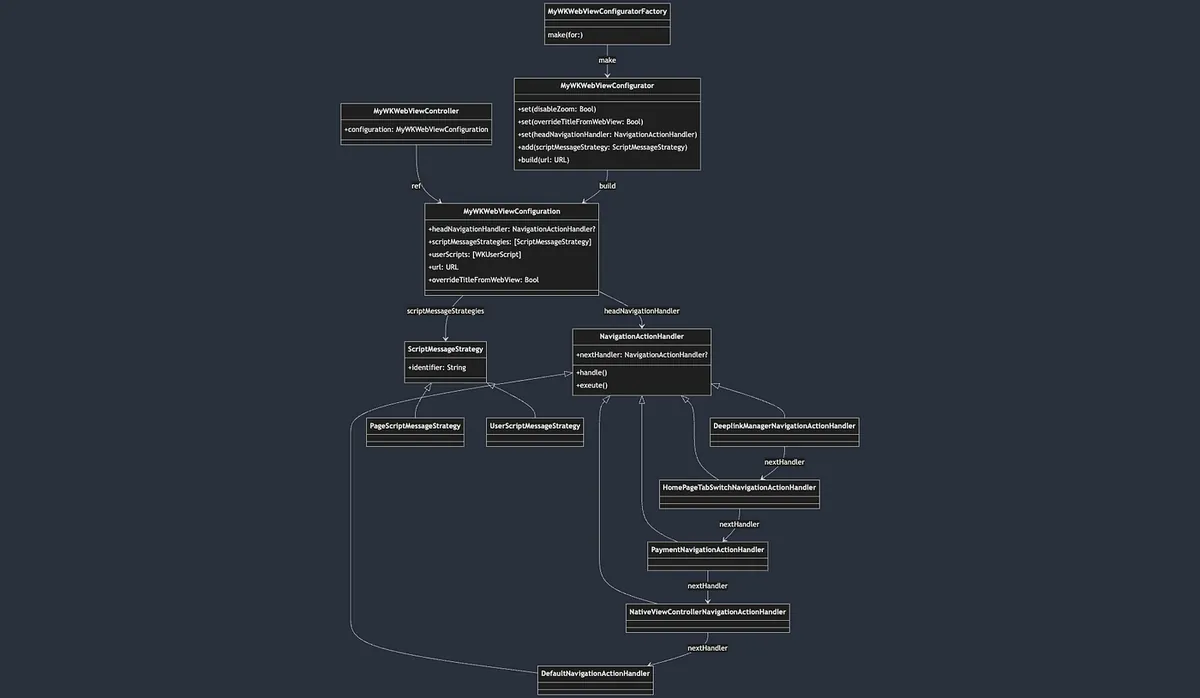
-
Simple Factory 简单工厂模式
MyWKWebViewConfiguratorFactory-> 封装MyWKWebViewConfigurator产生步骤 -
Builder Pattern 建造者模式
MyWKWebViewConfigurator-> 封装MyWKWebViewConfiguration参数、构建步骤 -
MyWKWebViewConfiguration注入 -> 给MyWKWebViewController使用 -
Chain of Responsibility Pattern 责任链模式
MyWKWebViewController的func webView(_ webView: WKWebView, decidePolicyFor navigationAction: WKNavigationAction, decisionHandler: @escaping (WKNavigationActionPolicy) -> Void)-> 呼叫headNavigationHandler?.exeute(webView: webView, decidePolicyFor: navigationAction, decisionHandler: decisionHandler)链执行处理 -
Strategy Pattern 策略模式
MyWKWebViewController的webView.configuration.userContentController.addUserScript(XXX)派发对应的 JS Caller 到对应处理的策略中

留言 · Comments