
[POC] App End-to-End Testing Local Snapshot API Mock Server
为现成 App 及现有 API 架构实现 E2E Testing 的可能性验证

Photo by freestocks
前言
作为一个已在线上运作多年的专案,如何持续提升稳定性是一件极具挑战的问题。
Unit Testing

App 因开发语言 Swift/Kotlin 静态+编译+强型别 或 Objective-C to Swift 动态转静态,在开发时没考虑到可测试性把介面依赖切干净,后面要补 Unit Testing 几乎不可能;但在重构的过程也会带来不稳定因素,会陷入一个鸡生蛋蛋生鸡问题。
UI Testing
对 UI 交互、按钮测试;新开发或旧有的画面稍微解耦资料依赖就可以实现。
SnapShot Testing
验证调整前后的 UI 显示内容、样式是否一致;同 UI Testing,新开发或旧有的画面稍微解耦资料依赖就可以实现。
用在 Storyboard/XIB 转 Code Layout or UIView from OC to Swift 很实用;可以直接导入 pointfreeco / swift-snapshot-testing 快速实现。
虽然我们可以后期补上 UI Testing、SnapShot Testing,但能涵盖的测试范围很有限;因为多半的错误不会是 UI 样式,而是流程或是逻辑问题,导致使用者中断操作, 如果出现在结帐流程,牵涉到营收,问题层级就很严重 。
End-to-End Testing
如前述,无法在现行专案简易的补上单元测试也无法聚拢单元做整合测试,对于逻辑、流程的防护,还剩下从外部做 End-to-End 黑箱测试的方法,直接以使用者角度出发,操作流程检查重要的流程(注册/结帐…)是否正常。
对重大功能的重构也能先建立重构前的流程测试,重构后重新验证,确保重构后功能如预期。
重构中一并补上 Unit Testing、Integration Testing 增加稳定性,打破鸡生蛋蛋生鸡的问题。
QA Team
End-to-End Testing 最直接暴力的方式就是请一组 QA Team 依照 Test Plan 进行手动测试,然后再持续优化或引入自动化操作;计算了一下成本至少需要 2 位工程师 + 1 位 Leader 花费至少半年一年时间才能看到成果。
评估时间与成本,有没有什么是现况我们能做的或是能为未来 QA Team 做好准备,当有 QA Team 时能直接跳到优化与自动化操作甚至导入 AI(?)。
Automation
现阶段以导入自动化 End-to-End Testing 为目标,放在 CI/CD 环节自动检查,测试内容可以不用太完整、只要能防止重大流程问题就已经很有价值了;后面再慢慢迭代 Test Plan 逐步补齐守备范围。
End-to-End Testing —技术难点
UI 操作问题
App 的原理比较像是透过另一个测试 App 去操作我们的被测试 App,然后从 View Hierarchy 去找寻目标物件;并且在测试时无法取得被测试 App 的 Log 或 Output,因为本质上就是两个不同 App。
iOS 需要完善 View Accessibility Identifier 增加效率与准确性还有要处理 Alert (e.g. 推播请求)。
Android 在之前的实作上有遇到混用 Compose 与 Fragment 时会找不到目标物件的问题,但据 Teammate 表示,新版的 Compose 已经解决。
除以上传统常见问题外,更大的问题是双平台难以整合(写一个测试跑两个平台);目前我们在尝试使用新的测试工具 mobile-dev-inc / maestro :
可以用 YAML 写 Test Plan 然后在双平台执行测试,细节使用方式、试用心得,静待另一位 Teammate 的文章分享 cc’ed Alejandra Ts. 😝。
API 资料问题
对于 App E2E Testing 最大的测试变量就是 API 资料,如果无法提供保证确定的资料,会增加测试的不稳定性,导致误报,最后大家对 Test Plan 也不再有信心了。
例如测试结帐流程,如果商品有可能被下架或消失,且这些状态改变不是 App 可控的就很有可能出现以上状况。
解决资料问题的方式有很多种,可以建立干净的 Staging 或 Testing 环境;或是基于 Open API 的 Auto-Gen Mock API Server;但都需要依赖后端、依赖 API 的外部因素,加上后端 API 同 App 一样是在线上运作多年的专案,部份规格也还在重构 Migrate 暂时无法有 Mock Server。
基于以上因素,如果就卡在这,那问题一样不会改变、鸡生蛋蛋生鸡问题也无法突破,真的就只能「挺而走险」的直接先改、出问题再说了。
Snapshot API Local Mock Server
「只要思想不滑坡,方法总比困难多」
我们可以换一个想法,如果 UI 可以用 Snapshot 快照成图片下来 Replay 进行验证测试,那 API 是否也可以? 我们是否可以把 API Request & Response 存下来,在后续 Replay 进行验证测试?
借此引入本篇文章的重点:建立「Snapshot API Local Mock Server」Record API Request & Replay Response 剥离与 API 资料的依赖。
本文只做了 POC 概念验证,还没有真正全面实现高覆盖率的 End To End Testing,因此做法仅供参考, 希望对大家在现有环境下有新的启发 。
Snapshot API Local Mock Server
核心概念 — Record & Replay API Data
[Record] — End-to-End Testing Test Case 开发完成后,打开录制参数,执行一次测试,过程中所有 API Request & Response 会存下来放在各个 Test Case 目录内。
[Replay] — 后面在跑 Test Case 时,依照请求从 Test Case 目录中找到对应录制下来的 Response Data,完成测试流程。
示意图
假设我们要测试加入购买流程,使用者打开 App 后在首页点击商品卡进入商品详细页,按底部购买,跳出登入匡完成登入,完成购买,跳出购买成功提示:
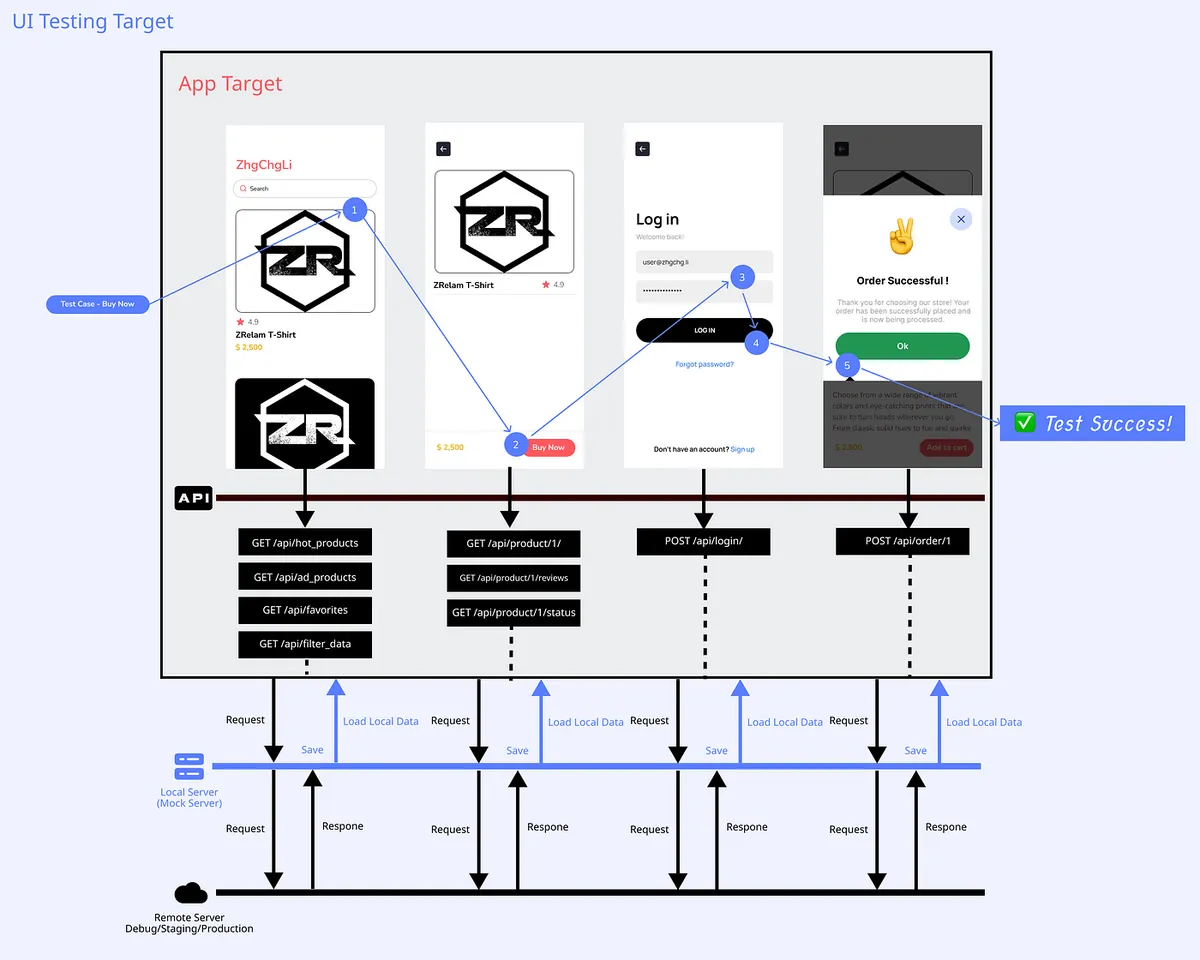
UI Testing 如何控制按钮点击、输入匡输入…等等,不是本文主要研究重点;可参考现有的测试框架直接使用。
Regular Proxy or Reverse Proxy
要达成 Record & Replay API 需要在 App 与 API 之间加上 Proxy 做中间人攻击,可参考我早期的文章「 APP有用HTTPS传输,但资料还是被偷了。 」
简单来说就是在 App 与 API 之间多了一个代理的传递者,如同传纸条一样,双方传递的请求与回应都会经过他,他可以打开来纸条的内容,也可以伪造纸条内容给彼此,双方不会察觉你从中做梗。
正向代理 Regular Proxy:
正向代理是客户端向代理伺服器发送请求,代理伺服器再将请求转发给目标伺服器,并将目标伺服器的回应返回给客户端。在正向代理模式下,代理伺服器代表客户端发起请求。客户端需要明确指定代理伺服器的位址和埠号,并将请求发送给代理伺服器。
反向代理 Reverse Proxy:
反向代理与正向代理相反,它位于目标伺服器和客户端之间。客户端向反向代理伺服器发送请求,反向代理伺服器根据一定的规则将请求转发给后端的目标伺服器,并将目标伺服器的回应返回给客户端。对于客户端来说,目标伺服器看起来就像是反向代理伺服器,客户端不需要知道目标伺服器的真实位址。
对我们的需求来说正向或反向都可以达成目的,唯一要考虑的事是代理设置的方式:
正向代理需要在电脑上或手机、模拟起的网路设置中挂上 Proxy 代理:
-
Android 能在模拟器中个别直接设置 Proxy 代理
-
iOS Simulator 同电脑的网路环境,无法个设置 Proxy,变成要去改电脑的设置才能挂上 Proxy,电脑的所有流量也都会经过这个 Proxy 并且如果同时开启 Proxyman 或 Charles 等等其他网路工具,有机会会强制更改 Proxy 设置成该软体的,导致失效。
反向代理需要改 Codebase 中的 API Host 并且要宣告要代理的所有 API Domains:
-
Codebase 中的 API Host 要在测试时替换成 Proxy Server IP
-
在启用 Reverse Proxy 时要宣告哪些 Domain 要挂上 Proxy
-
只有宣告的 Domain 才会走 Proxy,没宣告的会直通出去
配合 iOS App,以下以 iOS & 使用 Reverse Proxy 反向代理为例做 POC,Android 一样可以使用。
让 iOS App 知道现在正在跑 End-to-End Testing
我们需要让 App 知道现在正在跑 End-to-End Testing 才能在 App 程式里加上 API Host 替换逻辑:
// UI Testing Target:
let app = XCUIApplication()
app.launchArguments = ["duringE2ETesting"]
app.launch()
我们在 Network 层做判断抽换。
这是不得已的调整,尽量还是不要为了测试而去改 App 的 Code。
使用 MITMProxy 实现 Reverse Proxy Server
亦可使用 Swift 自行开发 Swift Server 达成,本文只是 POC 因此直接使用 MITMProxy 工具。
[2023–09–04 Update] Mitmproxy-rodo 已开源
以下实作内容已经开源到 mitmproxy-rodo 专案,欢迎直接前往对照使用。
部份结构与本文章内容有所调整,开源时后续调整了:
-
储存目录的结构,改为
host / requestPath / method / hash -
修正 Header 资讯储存,应该为 Bytes Data 而非纯 JSON String
-
修正部份错误
-
增加自动延长 Set-Cookie 时效功能
⚠️ 以下脚本仅共 Demo 参考,后续脚本调整将移至开源专案维护。
⚠️ 以下脚本仅共 Demo 参考,后续脚本调整将移至开源专案维护。
⚠️ 以下脚本仅共 Demo 参考,后续脚本调整将移至开源专案维护。
⚠️ 以下脚本仅共 Demo 参考,后续脚本调整将移至开源专案维护。
⚠️ 以下脚本仅共 Demo 参考,后续脚本调整将移至开源专案维护。
MITMProxy
照著 MITMProxy 官网 完成安装:
brew install mitmproxy
MITMProxy 细节用法可参考我早期的文章「 APP有用HTTPS传输,但资料还是被偷了。 」
-
mitmproxy提供一个互动式的命令行界面。 -
mitmweb提供基于浏览器的图形用户界面。 -
mitmdump提供非互动的终端输出。
实现 Record & Replay
因 MITMProxy Reverse Proxy 原生没有 Record (or dump) request & Mapping Request Replay 的功能,因此我们需要自行撰写脚本实现此功能。
mock.py :
"""
Example:
    Record: mitmdump -m reverse:https://yourapihost.com -s mock.py --set record=true --set dumper_folder=loginFlow --set config_file=config.json
    Replay: mitmdump -m reverse:https://yourapihost.com -s mock.py --set dumper_folder=loginFlow --set config_file=config.json
"""

import re
import logging
import mimetypes
import os
import json
import hashlib

from pathlib import Path
from mitmproxy import ctx
from mitmproxy import http

class MockServerHandler:

    def load(self, loader):
        self.readHistory = {}
        self.configuration = {}

        loader.add_option(
            name="dumper_folder",
            typespec=str,
            default="dump",
            help="Response Dump 目录,可以 by Test Case Name 建立",
        )

        loader.add_option(
            name="network_restricted",
            typespec=bool,
            default=True,
            help="本地没有 Mapping 资料...设置 true 会 return 404、false 会去打真实请求拿资料。",
        )

        loader.add_option(
            name="record",
            typespec=bool,
            default=False,
            help="设置 true 录制 Request's Response",
        )

        loader.add_option(
            name="config_file",
            typespec=str,
            default="",
            help="设置档案路径,范例档案在下面",
        )

    def configure(self, updated):
        self.loadConfig()

    def loadConfig(self):
        configFile = Path(ctx.options.config_file)
        if ctx.options.config_file == "" or not configFile.exists():
            return

        self.configuration = json.loads(open(configFile, "r").read())

    def hash(self, request):
        query = request.query
        requestPath = "-".join(request.path_components)

        ignoredQueryParameterByPaths = self.configuration.get("ignored", {}).get("paths", {}).get(request.host, {}).get(requestPath, {}).get(request.method, {}).get("queryParamters", [])
        ignoredQueryParameterGlobal = self.configuration.get("ignored", {}).get("global", {}).get("queryParamters", [])

        filteredQuery = []
        if query:
            filteredQuery = [(key, value) for key, value in query.items() if key not in ignoredQueryParameterByPaths + ignoredQueryParameterGlobal]

        formData = []
        if request.get_content() != None and request.get_content() != b'':
            formData = json.loads(request.get_content())

        # or just formData = request.urlencoded_form
        # or just formData = request.multipart_form
        # depends on your api design

        ignoredFormDataParametersByPaths = self.configuration.get("ignored", {}).get("paths", {}).get(request.host, {}).get(requestPath, {}).get(request.method, {}).get("formDataParameters", [])
        ignoredFormDataParametersGlobal = self.configuration.get("ignored", {}).get("global", {}).get("formDataParameters", [])

        filteredFormData = []
        if formData:
            filteredFormData = [(key, value) for key, value in formData.items() if key not in ignoredFormDataParametersByPaths + ignoredFormDataParametersGlobal]

        # Serialize the dictionary to a JSON string
        hashData = {"query":sorted(filteredQuery), "form": sorted(filteredFormData)}
        json_str = json.dumps(hashData, sort_keys=True)

        # Apply SHA-256 hash function
        hash_object = hashlib.sha256(json_str.encode())
        hash_string = hash_object.hexdigest()

        return hash_string

    def readFromFile(self, request):
        host = request.host
        method = request.method
        hash = self.hash(request)
        requestPath = "-".join(request.path_components)

        folder = Path(ctx.options.dumper_folder) / host / method / requestPath / hash

        if not folder.exists():
            return None

        content_type = request.headers.get("content-type", "").split(";")[0]
        ext = mimetypes.guess_extension(content_type) or ".json"


        count = self.readHistory.get(host, {}).get(method, {}).get(requestPath, {}) or 0

        filepath = folder / f"Content-{str(count)}{ext}"

        while not filepath.exists() and count > 0:
            count = count - 1
            filepath = folder / f"Content-{str(count)}{ext}"

        if self.readHistory.get(host) is None:
            self.readHistory[host] = {}
        if self.readHistory.get(host).get(method) is None:
            self.readHistory[host][method] = {}
        if self.readHistory.get(host).get(method).get(requestPath) is None:
            self.readHistory[host][method][requestPath] = {}

        if filepath.exists():
            headerFilePath = folder / f"Header-{str(count)}.json"
            if not headerFilePath.exists():
                headerFilePath = None

            count += 1
            self.readHistory[host][method][requestPath] = count

            return {"content": filepath, "header": headerFilePath}
        else:
            return None


    def saveToFile(self, request, response):
        host = request.host
        method = request.method
        hash = self.hash(request)
        requestPath = "-".join(request.path_components)

        iterable = self.configuration.get("ignored", {}).get("paths", {}).get(request.host, {}).get(requestPath, {}).get(request.method, {}).get("iterable", False)

        folder = Path(ctx.options.dumper_folder) / host / method / requestPath / hash

        # create dir if not exists
        if not folder.exists():
            os.makedirs(folder)

        content_type = response.headers.get("content-type", "").split(";")[0]
        ext = mimetypes.guess_extension(content_type) or ".json"

        repeatNumber = 0
        filepath = folder / f"Content-{str(repeatNumber)}{ext}"
        while filepath.exists() and iterable == False:
            repeatNumber += 1
            filepath = folder / f"Content-{str(repeatNumber)}{ext}"

        # dump to file
        with open(filepath, "wb") as f:
            f.write(response.content or b'')


        headerFilepath = folder / f"Header-{str(repeatNumber)}.json"
        with open(headerFilepath, "wb") as f:
            responseDict = dict(response.headers.items())
            responseDict['_status_code'] = response.status_code
            f.write(json.dumps(responseDict).encode('utf-8'))

        return {"content": filepath, "header": headerFilepath}

    def request(self, flow):
        if ctx.options.record != True:
            host = flow.request.host
            path = flow.request.path

            result = self.readFromFile(flow.request)
            if result is not None:
                content = b''
                headers = {}
                statusCode = 200

                if result.get('content') is not None:
                    content = open(result['content'], "r").read()

                if result.get('header') is not None:
                    headers = json.loads(open(result['header'], "r").read())
                    statusCode = headers['_status_code']
                    del headers['_status_code']


                headers['_responseFromMitmproxy'] = '1'
                flow.response = http.Response.make(statusCode, content, headers)
                logging.info("Fullfill response from local with "+str(result['content']))
                return

            if ctx.options.network_restricted == True:
                flow.response = http.Response.make(404, b'', {'_responseFromMitmproxy': '1'})

    def response(self, flow):
        if ctx.options.record == True and flow.response.headers.get('_responseFromMitmproxy') != '1':
            result = self.saveToFile(flow.request, flow.response)
            logging.info("Save response to local with "+str(result['content']))

addons = [MockServerHandler()]
可以自行参考 官方文件 ,依照需求调整脚本内容。
此脚本设计逻辑如下:
-
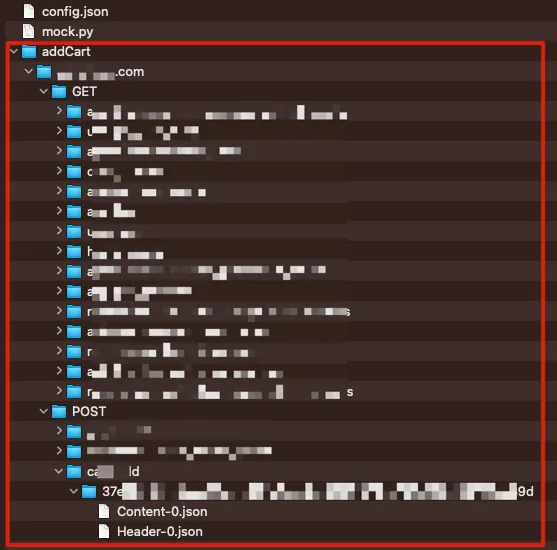
档案路径逻辑:
dumper_folder(a.k.a Test Case Name)/Reverse's api host/HTTP Method/Path join with -(e.g.app/launch->app-launch) /Hash(Get Query & Post Content)/ -
档案逻辑:回应的内容:
Content-0.xxx、Content-1.xxx(同个请求打第二次)…以此类推;回应的 Header 资讯:Header-0.json(同Content-x逻辑)
-
储存时会依照路径、档案逻辑依序储存;在 Replay 时同样依序取出
-
如果次数不匹配,例如 Replay 时同个路径打了 3 次,但 Record 储存的资料只存到第 2 次;则还是会持续回应第 2 次,也就是最后一次的结果
-
record为True时,会去打目标 Server 取得回应并依照上述逻辑储存下来;False时则只会从本地读资料 (等于 Replay Mode) -
network_restricted为False时,本地没 Mapping 资料会直接回应404;为True时会去打目标 Server 拿资料。 -
_responseFromMitmproxy用于告知 Response Method 当前回应来自 Local,可以忽略不管、_status_code借用 Header.json 栏位储存 HTTP Response 状态码。
config_file.json 设置档案逻辑设计如下:
{
  "ignored": {
    "paths": {
      "yourapihost.com": {
        "add-to-cart": {
          "POST": {
            "queryParamters": [
              "created_timestamp"
            ],
            "formDataParameters": []
          }
        },
        "api-status-checker": {
          "GET": {
            "iterable": true
          }
        }
      }
    },
    "global": {
      "queryParamters": [
        "timestamp"
      ],
      "formDataParameters": []
    }
  }
}
queryParamters & formDataParameters :
因部分 API 参数可能会随呼叫改变,例如有的 Endpoint 会带上时间参数,此时依照 Server 的设计, Hash(Query Parameter & Body Content) 的值就会在 Replay Request 时不一样,导致 Mapping 不到 Local Response,因此多开了一个 config.json 处理这个情况,可以 by Endpoint Path or Global 设定某个参数应该在排除 Hash 时排除,就能取得同样的 Mapping 结果。
iterable :
因部分轮询检查的 API 可能会重复定时不断呼叫,照 Server 的设计会产出很多 Content-x.xxx & Header-x.json 档案;但假设我们不在意则可设定为 True ,Response 会持续储存覆盖到 Content-0.xxx & Header-0.json 第一个档案内。
启用 Reverse Proxy Record Mode:
mitmdump -m reverse:https://yourapihost.com -s mock.py --set record=true --set dumper_folder=loginFlow --set config_file=config.json
启用 Reverse Proxy Replay Mode:
mitmdump -m reverse:https://yourapihost.com -s mock.py --set dumper_folder=loginFlow --set config_file=config.json
组装 & Proof Of Concept
0. 完成 Codebase 中 Host 的抽换
并确认在跑测试时,API 已改用 http://127.0.0.1:8080
1. 启动 Snapshot API Local Mock Server (a.k.a Reverse Proxy Server) Record Mode
mitmdump -m reverse:https://yourapihost.com -s mock.py --set record=true --set dumper_folder=addCart --set config_file=config.json
2. 执行 E2E Testing UI 操作
以 Pinkoi iOS App 为例,测试以下流程:
Launch App -> Home -> Scroll Down -> Similar to Wish List Items Section -> First Product -> Click First Product -> Enter Product Page -> Click Add to Cart -> UI Response Added to Cart -> Test Successful ✅
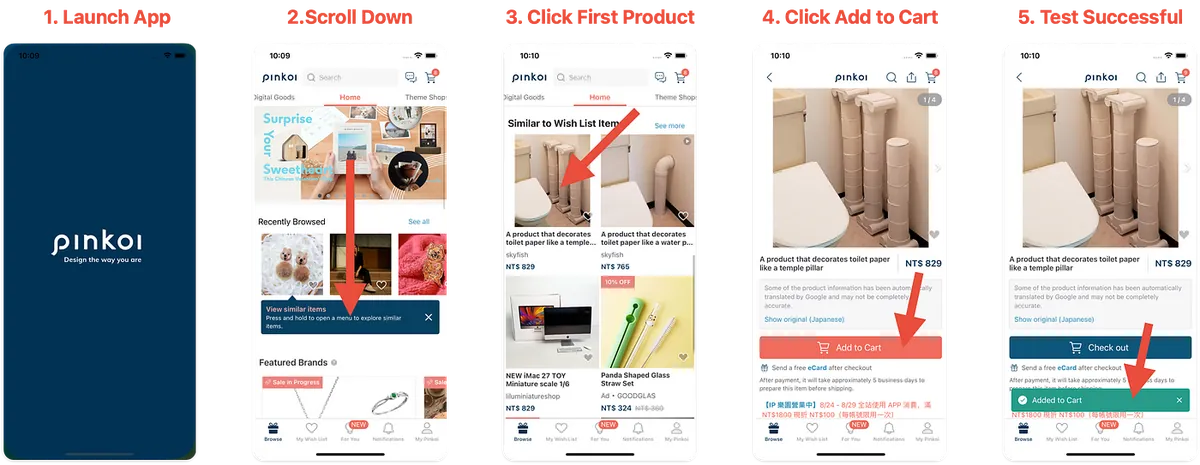
UI 自动化操作方式前面有提到,这边先手动测试相同的流程验证结果。
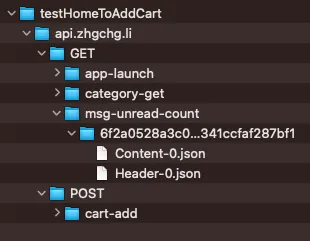
3. 取得 Record 结果
操作完成后可以下 ^ + C 终止 Snapshot API Mock Server,到档案目录查看录制结果:
4. Replay 验证同个流程,启动 Server & Using Replay Mode
mitmdump -m reverse:https://yourapihost.com -s mock.py --set dumper_folder=addCart --set config_file=config.json
5. 再次执行刚刚的 UI 操作验证结果
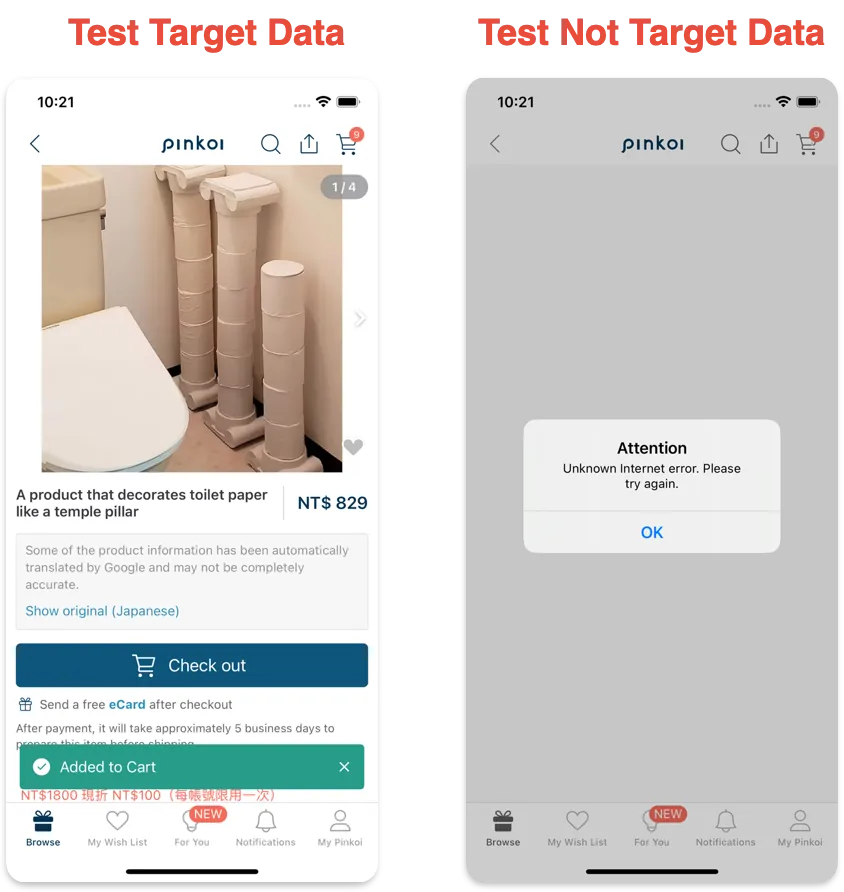
-
左:Test Successful ✅
-
右:测试点击录制以外的商品,此时会出现 Error (因本地没资料 +
network_restricted预设是False本地没资料直接传 404,不会从网路拿资料)
6. Proof Of Concept ✅
概念验证通过,我们确实能透过实现 Reverse Proxy Server 来自行储存 API Request & Response 并作为 Mock API Server 在测试时回应资料给 App 🎉🎉🎉。
[2023–09–04] mitmproxy-rodo 已开源
后续和杂记
本文只探讨了概念验证,后续还有许多地方要补齐也还有更多功能可以实现。
-
与 maestro UI Testinga 工具整合
-
CI/CD 流程整合设计 (怎么自动起 Reverse Proxy? 起在哪里? )
-
怎么把 MITMProxy 封装在开发工具内?
-
验证更复杂的测试场景
-
针对发送的 Tracking Request 做验证,需多实现存 Request Body,然后从中取得打了哪些 Tracking Event Data、是否符合流程该送的事件
Cookie 问题
#...
    def response(self, flow):
        setCookies = flow.response.headers.get_all("set-cookie")
        # setCookies = ['ad=0; Domain=.xxx.com; expires=Wed, 23 Aug 2023 04:59:07 GMT; Max-Age=1800; Path=/', 'sessionid=xxxx; Secure; HttpOnly; Domain=.xxx.com; expires=Wed, 23 Aug 2023 04:59:07 GMT; Max-Age=1800; Path=/']

        # OR Replace Cookie Domain From .xxx.com To 127.0.0.1
        setCookies = [re.sub(r"\s*\.xxx\.com\s*", "127.0.0.1", s) for s in setCookies]

        # AND 移除安全性相关限制
        setCookies = [re.sub(r";\s*Secure\s*", "", s) for s in setCookies]
        setCookies = [re.sub(r";\s*HttpOnly;\s*", "", s) for s in setCookies]

        flow.response.headers.set_all("Set-Cookie", setCookies)

        #...
如果有遇到 Cookie 方面的问题,例如 API 有回应 Cookie 但 App 没接到,可参考以上的调整。
在 Pinkoi 的最后一篇文章
在 Pinkoi 900 多天的日子里,实现了许多我职涯上还有 iOS / App 开发、流程的想像,感谢所有队友,一起走过疫情、经历风雨;告别的勇气如同当初追寻梦想入职的勇气。
正在启航找寻新的人生挑战(包括但不限于工程),如果您有合适的机会(iOS or 工程管理 or 新创产品)欢迎与我联络。 🙏🙏🙏

留言 · Comments