iOS Certificates、Identifiers与Profiles详解|Fastlane Match统一管理凭证与CI/CD整合实战
针对iOS开发者与团队,解决凭证混乱与管理困难问题,透过Fastlane Match统一管理Certificates、Profiles并安全同步至Git私有库,搭配GitHub Actions实现CI/CD自动化,提升开发效率与凭证安全性。
基于 SEO 考量,本文标题与描述经 AI 调整,原始版本请参考内文。
文章目录
iOS Certificates, Identifiers & Profiles 是什么及 Fastlane Match 统一 管理 凭证与 CI/CD 的一些笔记
介绍 Certificates, Identifiers & Profiles 之间的关系与使用 Fastlane Match 统一管理签发凭证并整合进 CI/CD 工作流程的纪录。
{:target="_blank"}](/assets/823ac523ccc8/1*-OS8G9xu0CFpnlAQRgnGAg.webp)
Photo by marcos mayer
前言
2025 年中时写过一系列从 0 到 1 使用 GitHub Actions 建置 App CI/CD 完整流程的文章:
最近到新环境又重新跑了一次,每次都有学习到新的东西,这次聚焦在 iOS Codesigning:Certificates / Profiles / Devices 的关系,与我如何用 Fastlane Match 把凭证管理与 CI/CD 串起来。
Certificates, Identifiers & Profiles, Devices 是什么?
在 Apple 生态系中,App 开发是基于凭证与描述档控管的,跟 Android 只要有 .apk 就能安装使用不同;Apple 有严格的凭证对应管制,不符合规则就不能安装、使用。
主要项目组成及功能:
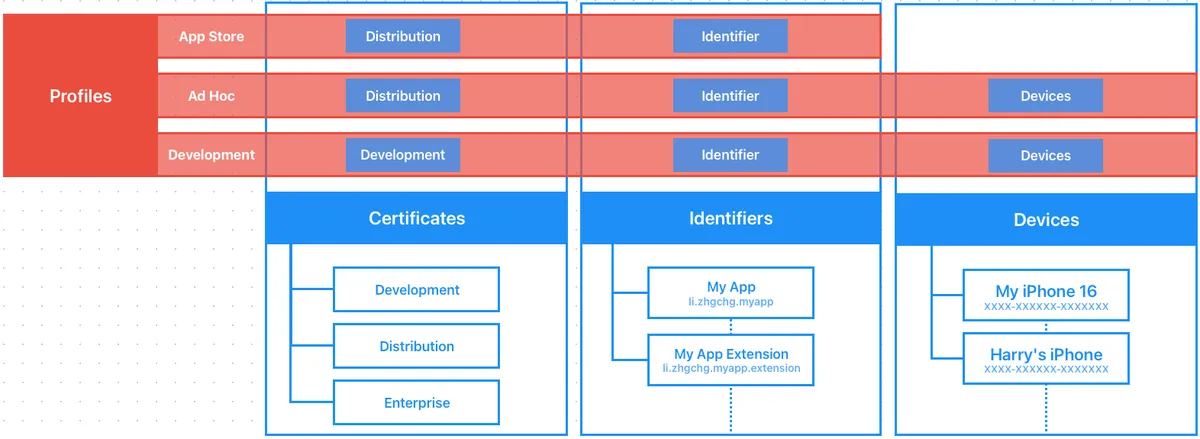
Certificates: 签署 App 的身分 (Signing Identity)
Development — 开发阶段跑在实体机上使用(只跑模拟器不用凭证),所属是人或 API Key (有数量限制)。
Distribution — 打包上 AppStore, TestFlight 或是 Ad Hoc 内测(限定已注册装置)使用,有数量限制,所属是 Team。
Enterprise — 企业内部 App 使用。
格式 :需要有
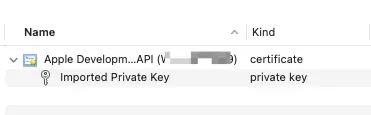
Private Key (私钥)加Certificate .cer (公钥凭证)才能使用,或是在原创建电脑上的 Keychain 汇出成.p12档案就会同时包含。
Identifiers: 哪一个 App/Extension (Bundle ID)
App 的 Bundle ID 注册跟需要启用的 Capabilities(例如启用 Push Notifications, App Groups…)、App Services。
Extension 也会有自己的 Identifier。
Devices: 已注册装置 (iPhone/iPad. . )
Development 跑在实体机上跟 Distribution Ad Hoc 内测只有注册的装置才能使用。
上限:100 个;包含取消,要等到每年付费周期才会重新刷新释出额度。
Provisioning Profile (以下简称 Profile): 描述档
组合 Certificates+Identifiers+Devices 关系。
Development — 开发阶段使用的描述档,如果要跑实体机测试就必须使用,描述档包含 Certificates+Identifiers+Devices 之间的关系。
Ad Hoc —打包给内部测试使用(e.g. Deploy to Firebase App Distribution)的描述档,描述档包含 Certificates+Identifiers+Devices 之间的关系。
App Store — 打包上传到 App Store / TestFlight 使用的描述档,描述档包含 Certificates+Identifiers 之间的关系。
格式:
.mobileprovision
要注意:Profile 只是描述档,描述关系,不会包含凭证本体。
小结
综合以上,如果要在一台干净的机器、不登入 Xcode Apple Account 的情况下要能 Build 实体机 (Development Certificate) 或是执行 Archive 打包 (Distribution Certificate), 必须要有两个档案 :
.mobileprovisionProvisioning Profile 描述档: 描述Certificates+Identifiers+Devices 关系。.p12Certificate: 凭证的实体 (从原创建 Certificate 的电脑汇出)。
另外 macOS ≥ 15 后的 Keychain 移动到:
1
open /System/Library/CoreServices/Applications/Keychain\ Access.app
找了超久. .
常见错误
⚠️⚠️⚠️ 确定凭证、Profile 都正确但怎么样都报错:
多半是你还残存有之前的凭证、多张凭证,Xcode 会错乱。
这问题很常会遇到!
关闭 Xcode
打开 macOS keychain:
open /System/Library/CoreServices/Applications/Keychain\ Access.applogin keychain -> All items -> 搜寻
apple development-> 删除所有 Certificates 凭证Finder -> Go -> Go to ->
~/Library/MobileDevice/Provisioning\ Profiles-> 删除所有 Profiles 描述档重新拉取凭证
重开 Xcode 应该就正常了
No signing certificate “iOS Distribution” found / No signing certificate “iOS Development” found.:
No "iOS Distribution" signing certificate matching team ID "" with a private key was found.
No "iOS Development" signing certificate matching team ID "" with a private key was found.
原因:
缺少 iOS Distribution/iOS Development Certificate 凭证
有 iOS Distribution/iOS Development Certificate 凭证 但是 没有对应的 Private Key 私钥
解决办法:
删除 Keychain 里的所有旧 Certificates 凭证、Profiles 描述档
在当初创建 Certificate 的电脑 Keychain 上找到该凭证,汇出成
.p12格式,在有问题电脑上安装。到 Certificates, Identifiers & Profiles Revoke 旧的 Certificate,重新产生 (放心,不影响线上版 App;只影响开发与打包阶段)
Provisioning profile “” doesn’t include signing certificate “Apple Development: XXX”. / Provisioning profile “” doesn’t include signing certificate “Apple Distribution: XXX”.:
原因:
- 目前选择的 Provisioning profile 描述档跟当前的 Certificate 没有对应关系
解决办法:
删除 Keychain 里的所有旧 Certificates 凭证、Profiles 描述档
到 Certificates, Identifiers & Profiles Profiles 确认描述档有勾选对应凭证或重产 Profile 使用
No profile for team ‘’ matching ‘’ found: Xcode couldn’t find any provisioning profiles matching ‘’.:
原因:
- 找不到指定的 Provisioning profile 描述档
解决办法:
删除 Keychain 里的所有旧 Certificates 凭证、Profiles 描述档
到 Certificates, Identifiers & Profiles Profiles 下载对应的 Profile 使用
Provisioning profile “” has app ID “”, which does not match the bundle ID “”. / Provisioning profile doesn’t match the bundle identifier:
原因:
- Provisioning profile 不包含目前的 Bundle Identifier
解决办法:
删除 Keychain 里的所有旧 Certificates 凭证、Profiles 描述档
到 Certificates, Identifiers & Profiles Identifiers 确认 Bundle Identifier 已注册
到 Certificates, Identifiers & Profiles Profiles 下载对应的 Profile 使用
Provisioning profile “” doesn’t include the currently selected device “” (identifier ) .:
原因:
- Provisioning profile 不包含选择的实体机 Device Identifier
解决办法:
到 Certificates, Identifiers & Profiles Devices 确认实体机的 Identifier 已注册
到 Certificates, Identifiers & Profiles Profiles 对应的 Profile 该 实体机 有勾选启用。
重新下载 Profile 使用
Could not create another Development/Distribution certificate, reached the maximum number of available Development/Distribution certificates. :
原因:
代表建立的 Development/Distribution Certificate 已达上限数量。
解决办法:
- 到 Certificates, Identifiers & Profiles 删除不使用的凭证。
Xcode 凭证正确且可以正常打包但是用 CLI (Fastlane) 执行打包命令会出现签名错误:
原因:
这边还有踩到另一个雷,就是我手贱把专案放在 iCloud 同步目录下,不知道为何Fastlane 会一直出现凭证问题 (疑似 keychain 存取有问题)。
解决办法:
移出 iCloud 同步目录即可。
日常使用的问题场景
Development Certificate
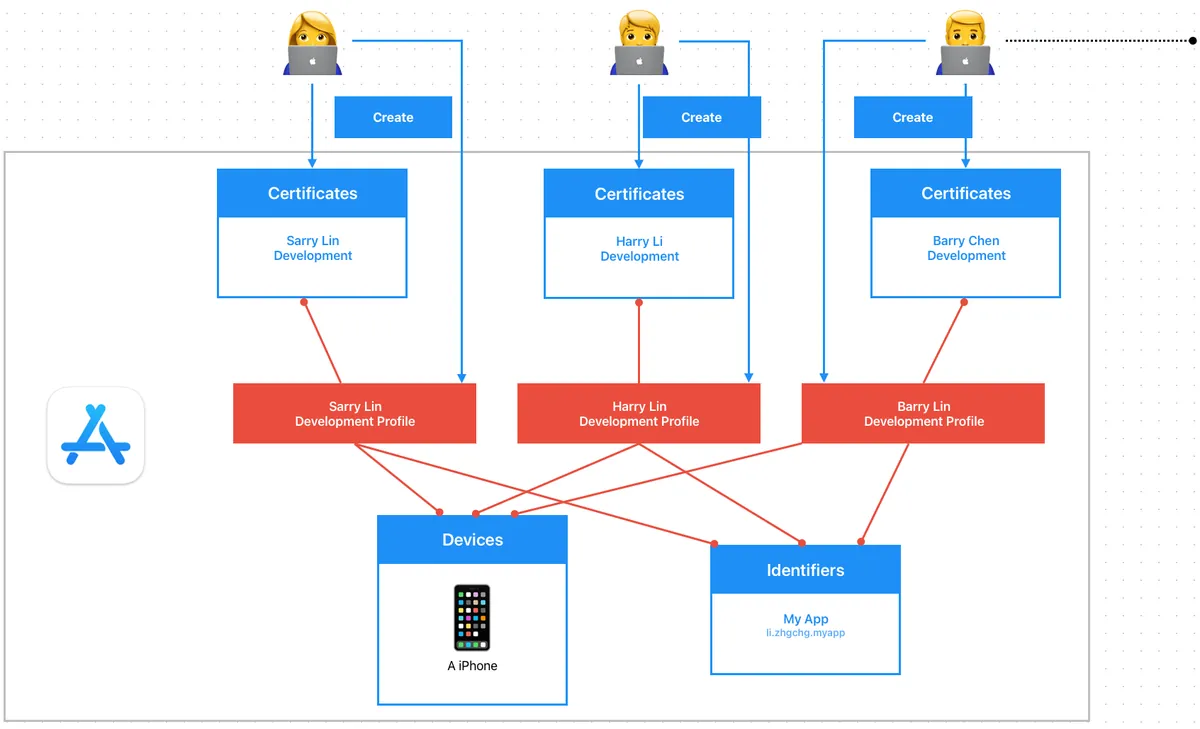
在导入 Match 统一管理凭证之前,每位开发者都会建立自己的
Development Certificate和Development Profile;假设组织内有 1,000+ 位开发者,在 Certificates, Identifiers & Profiles, Devices 后台会非常的混乱可怕。如果有外包团队,只负责开发工作,还是需要把他加入到 Apple Developer Program 后台,让他产自己的开发凭证跟 Profile。
Distribution Certificate
Distribution Certificate 是 by Team 建立,因此每个开发者计划的 Team 只能建立有限数量的发行凭证。
常见做法是由一位工程师建立产生 Distribution Certificate 再汇出 .p12 档案给其他需要上架的开发者或是放到 CI/CD 机器上使用。
团队大、App 数量多时要寄来寄去的会很麻烦,而且 每年都要更新一次
打包 Ad Hoc 时,当有新装置注册;所有人、CI/CD 都需要重新下载 Profile 才能让新装置生效。
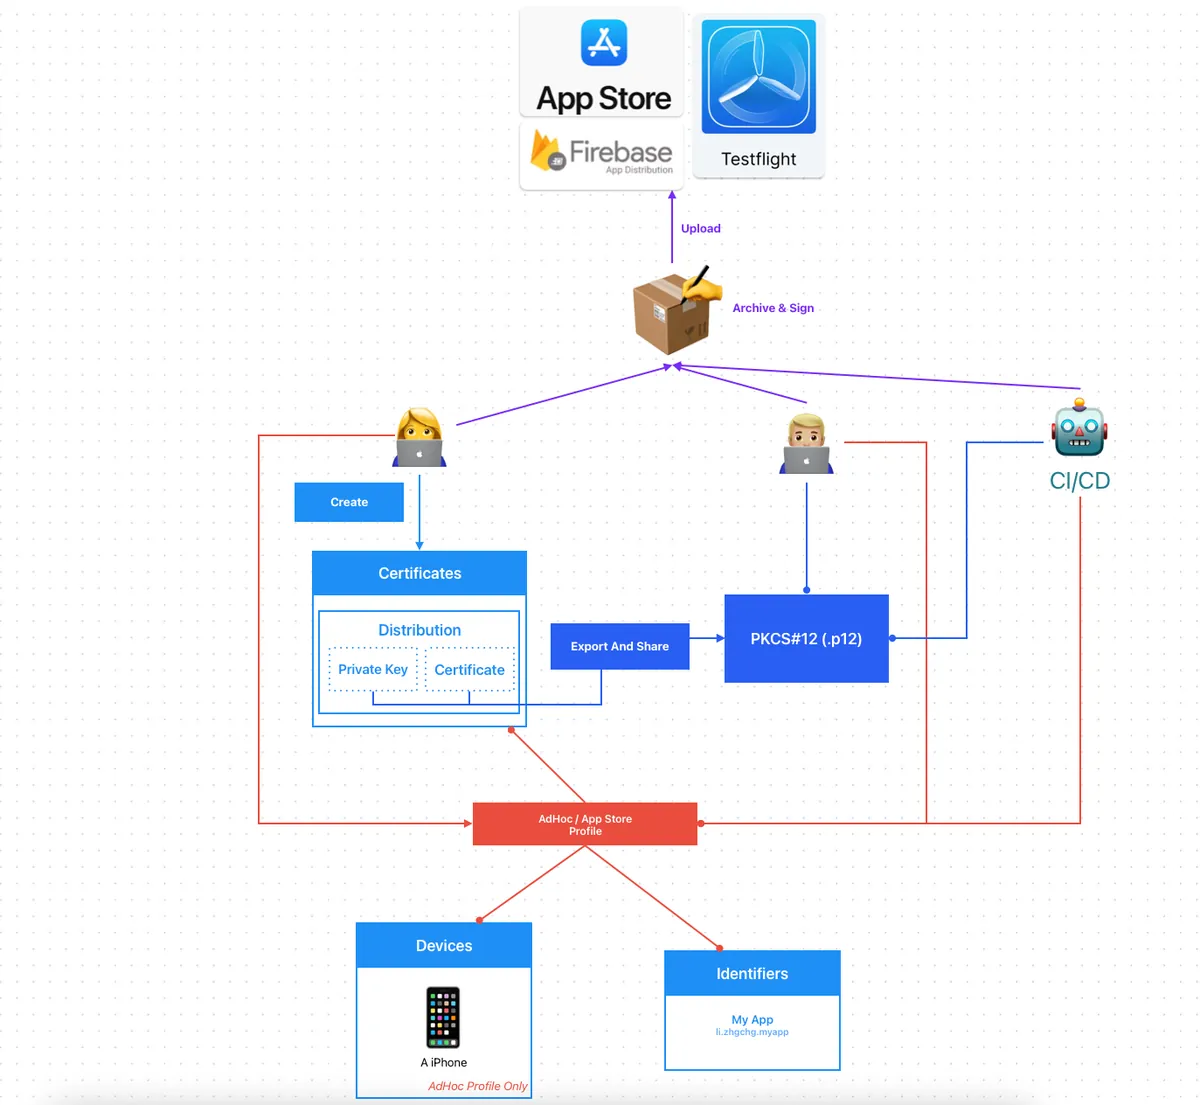
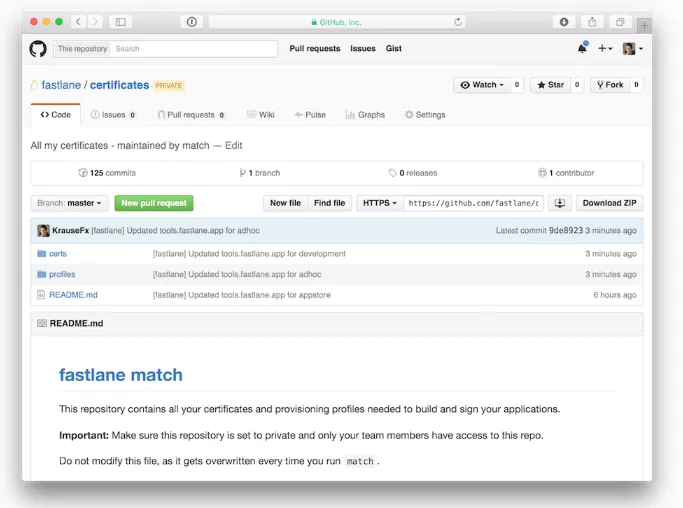
Fastlane Match
基于以上问题我们希望能有一个平台帮我们代为管理所有跟凭证有关的事物,所有开发者跟 CI/CD 服务都是统一对这个平台拉取、更新资料,这个平台的储存必须安全,这就是 — Fastlane Match 。
Easily sync your certificates and profiles across your team
A new approach to iOS and macOS code signing: Share one code signing identity across your development team to simplify your codesigning setup and prevent code signing issues.
match is the implementation of the codesigning.guide concept . match creates all required certificates & provisioning profiles and stores them in a separate git repository, Google Cloud, or Amazon S3. Every team member with access to the selected storage can use those credentials for code signing. match also automatically repairs broken and expired credentials. It’s the easiest way to share signing credentials across teams

Fastlane Match:
跟 App Store Connect 做交互 (透过 App Store Connect API or Apple Developer Login Session),产生或是更新凭证
把凭证结果 (
.mobileprovisionProfiles,.p12Certificate,.cerCertificate) 三个档案加密上传到 Git Repo (也可以用其他 Storage).cerCertificate 也会独立存,因为这样才能知道凭证是否有效如果要细分权限可以分两个 Repos,一个管理 Development 凭证、一个管理 Distribution 凭证。
The
certsfolder contains all certificates with their private keysThe
profilesfolder contains all provisioning profiles
https://docs.fastlane.tools/actions/match/
加密算法: AES-256-GCM
开发者、CI/CD 服务:
统一使用 Fastlane match 指令操作凭证。
Fastlane Match 会优先拉回 Git Repo 的凭证档案、解密回来使用,如果发现过期或是无法使用,有权限(Create/Write)的情况下会自动重新产生并 Push 回去 Repo;若只有 Read 权限则报错。
Create/Write:
只有负责管理凭证的人可以产生/更新、Push 上传凭证
重要的 Distribution Certificate 最好放在独立 Repo 且只有 CI/CD 服务或管理者可以使用
Read:
其他开发者、CI/CD 服务都 只有读取 Pull 凭证权限
CI/CD 服务会在每次执行任务前拉取最新凭证
所有人共用同一张 Development & Distribution Certificate
人员异动后会失去 Match Repo 权限,可以 Revoke 旧的凭证重新产生,其他人在重新 Pull 就好(如果有整合到 make project script 那更无痛)
Fastlane Match 设定与使用
我们以 Git Storage 为例,所有凭证。
1.建立一个空的储存凭证的 Git Private Match Repo 虽然所有 Certificates, Profiles 都会加密储存,但还是要设定好该 Repo 的存取权限。
2.确认本地有设定好 Git SSH 存取权限,可以使用 git clone [email protected]:xxx/certificates.git
这边建议 统一都使用 SSH Git Clone Repo ,因为 CI/CD 也会使用相同的方式。
如果执行 fastlane match 一直卡在
If cloning the repo takes too long, you can use theclone_branch_directlyoption in match.多半就是遇到 SSH 权限问题。
- 在专案目录执行
bundle exec fastlane match init完成设定
1
2
3
4
5
6
7
8
9
10
11
12
13
14
15
16
17
[21:54:32]: fastlane match supports multiple storage modes, please select the one you want to use:
1. git
2. google_cloud
3. s3
4. gitlab_secure_files
# 输入 1 用 git
?   1

[22:04:40]: Please create a new, private git repository to store the certificates and profiles there
[22:04:40]: URL of the Git Repo: git@github.com:xxx/certificates.git
# 输入你建立的 Git Private Match Repo SSH URL

[22:04:47]: Successfully created './fastlane/Matchfile'. You can open the file using a code editor.
[22:04:47]: You can now run `fastlane match development`, `fastlane match adhoc`, `fastlane match enterprise` and `fastlane match appstore`
[22:04:47]: On the first run for each environment it will create the provisioning profiles and
[22:04:47]: certificates for you. From then on, it will automatically import the existing profiles.
[22:04:47]: For more information visit https://docs.fastlane.tools/actions/match/
4.完成后会产生一个 fastlane/Matchfile :
1
2
3
4
5
6
7
8
9
10
11
12
13
14
# 你的 Git Private Match Repo SSH URL
git_url("[email protected]:xxxx/certificates.git")

storage_mode("git")

type("development") # The default type, can be: appstore, adhoc, enterprise or development

# app_identifier(["tools.fastlane.app", "tools.fastlane.app2"])
# username("[email protected]") # Your Apple Developer Portal username

# For all available options run `fastlane match --help`
# Remove the # in the beginning of the line to enable the other options

# The docs are available on https://docs.fastlane.tools/actions/match
5. 产生 App Store Connect API .p8 Key , 统一使用 API Key 产生凭证:
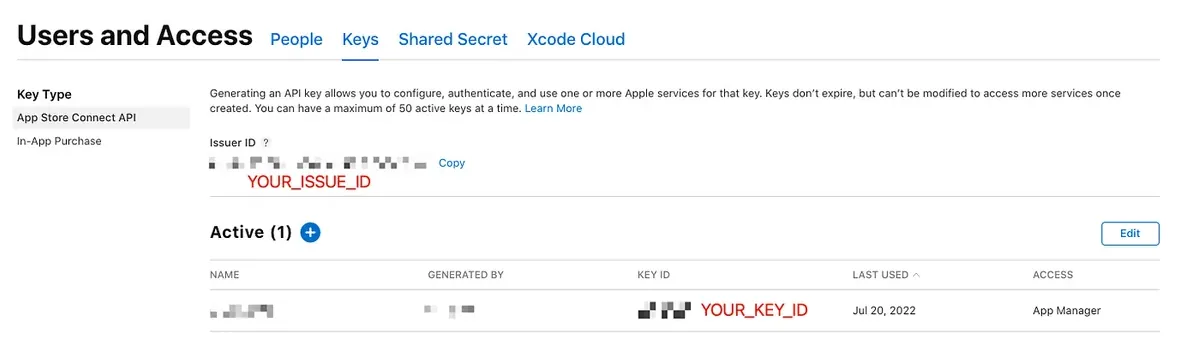
⚠️️️️ App Store Connect API .p8 Key 的权限很大 ,除了可以管理凭证、也可以管理 App 的上架、送审,还有后台使用者跟评论、财务数据报表。
要不要进到团队的 .git 让大家都能存取,可依照团队情境自行决定。
比较高风控的方式是只有负责管理的人跟加密储存在 CI/CD 上使用(文后会介绍)。
这边为了 Demo 方便直接放进 fastlane 目录下存取。
另外本篇的 Fastlane Script 为了方便展示,不考虑重复程式码与程式结构。
凭证管理
1
2
3
4
5
6
7
8
9
10
11
12
13
14
15
16
17
18
19
20
21
22
23
24
25
26
27
28
29
30
31
32
platform :ios do
  lane :match_development do \\|options\\|
    # 换成你的 App Identifier ID
    app_identifier = "li.zhgchg.myApp"

    type = options.fetch(:type, "development")
    isRead = options.fetch(:isRead, true)
    if isRead
      readonly = true
      force = false
    else
      readonly = false
      force = true

      # 需要 App Store Connect API Key 才有权限去 Apple 后台管理凭证
      # 假设 App Store Connect API .p8 Key 在 ./fastlane/ 目录内
      app_store_connect_api_key(
        key_id: "XXXXXX",
        issuer_id: "XXXXXX-XXXXXX-XXXXXX-XXXXXX-XXXXXX",
        key_filepath: "./fastlane/AuthKey_XXXXXX.p8",
      )
    end

    # 拉取 app_identifier 的 Development 凭证
    match(
      type: type,
      app_identifier: app_identifier,
      readonly: readonly, # 能否从有需要时,更新、上传 cert / profile
      force: force # 要不要无条件重建 provisioning profile
    )
  end
end
建立 Development Certificate & Profile 并上传到 Match Repo:
1
bundle exec fastlane match_development type:development isRead:false
- 没有错误就代表 Development Certificate & Profile 产生、安装成功并同步 Push 上传到 Match Repo 成功。
首次建立会需要你设定 Passphrase :
1
2
3
4
[23:29:12]: Enter the passphrase that should be used to encrypt/decrypt your certificates
[23:29:12]: This passphrase is specific per repository and will be stored in your local keychain
[23:29:12]: Make sure to remember the password, as you'll need it when you run match on a different machine
[23:29:12]: Passphrase for Match storage:
这个值就是用来加密你的所有 Match Repo 上的档案的会需要用到的参考 (passphrase + random salt)
建议产生一个 随机字串 设定并记录下来
日后更新或是其他人拉取 Match Repo 凭证都需要输入这个 字串 解密回原始档案。
团队其他成员统一从 Match Repo Pull 拉取 Development Certificate & Profile:
1
bundle exec fastlane match_development type:development
首次使用会询问你的登入密码 (login keychain),因为要把凭证安装到 keychain 中,输入两次确认即可:
1
2
3
4
5
6
7
8
9
10
[16:52:59]: Installing certificate...
[16:53:00]: There are no local code signing identities found.
You can run security find-identity -v -p codesigning to get this output.
This Stack Overflow thread has more information: https://stackoverflow.com/q/35390072/774.
(Check in Keychain Access for an expired WWDR certificate: https://stackoverflow.com/a/35409835/774 has more info.)
[16:53:00]: Enter the password for /Users/zhgchgli/Library/Keychains/login.keychain-db
[16:53:00]: This passphrase will be stored in your local keychain with the name fastlane_keychain_login and used in future runs
[16:53:00]: This prompt can be avoided by specifying the 'keychain_password' option or 'MATCH_KEYCHAIN_PASSWORD' environment variable
[16:53:00]: Password for login keychain: ********
[16:53:24]: Type password for login keychain again: ********
如果 Match Development 拉完凭证,但 Xcode 一直显示有错误或无效:
可参考前文提到的常见错误,多半是有旧的脏凭证,清除所有凭证再重新拉取,应该就可以了。
—
建立 AdHoc Distribution Certificate & Profile 并上传到 Match Repo:
1
bundle exec fastlane match_development type:adhoc isRead:false
建立 AppStore Distribution Certificate & Profile 并上传到 Match Repo:
1
bundle exec fastlane match_development type:appstore isRead:false
CI/CD 服务统一从 Match Repo Pull 拉取 Distribution Certificate & Profile ( isRead:true ),然后再执行打包发布任务。
注册新装置
1
2
3
4
5
6
7
8
9
10
11
12
13
14
15
16
17
18
19
20
21
22
23
24
25
26
27
28
29
30
31
32
33
34
35
36
37
38
39
40
platform :ios do
  desc "Register a new device and refresh profiles"
  lane :registerDevice do \\|options\\|
    # 换成你的 App Identifier ID
    app_identifier = "li.zhgchg.myApp"

    # 需要 App Store Connect API Key 才有权限去 Apple 后台管理凭证
    # 假设 App Store Connect API .p8 Key 在 ./fastlane/ 目录内
    app_store_connect_api_key(
      key_id: "XXXXXX",
      issuer_id: "XXXXXX-XXXXXX-XXXXXX-XXXXXX-XXXXXX",
      key_filepath: "./fastlane/AuthKey_XXXXXX.p8",
    )
    # Input: UDID and device name
    udid = options[:udid] \\|\\| UI.input("Enter device UDID:")
    device_name = options[:name] \\|\\| UI.input("Enter device name:")
    UI.message("📱 Registering device #{device_name} (#{udid})")
    register_device(
      name: device_name,
      udid: udid,
      platform: 'ios'
    )

    # 更新 app_identifier 的 Development 凭证
    match(
      type: "development",
      app_identifier: app_identifier,
      readonly: false, # 如果有需要,更新、上传 cert / profile
      force_for_new_devices: true # 如果为新装置则重建 provisioning profile
    )

    # 更新 app_identifier 的 AdHoc 凭证
    match(
      type: "adhoc",
      app_identifier: app_identifier,
      readonly: false, # 如果有需要,更新、上传 cert / profile
      force_for_new_devices: true # 如果为新装置则重建 provisioning profile
    )
  end
end
注册完之后其他开发者或 CI/CD 服务再从 Match Repo 拉 Profile (Development or AdHoc) 就会包含新的装置了。
Fastlane Match x CI/CD 工作流程整合
大致介绍完 Fastlane Match 怎么产生 Push / 拉取 Pull 凭证后,再来要讲怎么整合进 CI/CD 流程。
问题1 — 怎么 Clone Private Match Repo
第一个最常见的问题就是在 CI/CD 上怎么 Clone Private Match Repo 专案,在本机开发上因为我们统一都使用 ssh git clone 并且是用我们自己帐号的 ssh key 所以不会遇到问题;但是 CI/CD 上没有这个 key,当然也可以用个人的 key 但是很不保险。
GitHub — Repo Deploy Key:
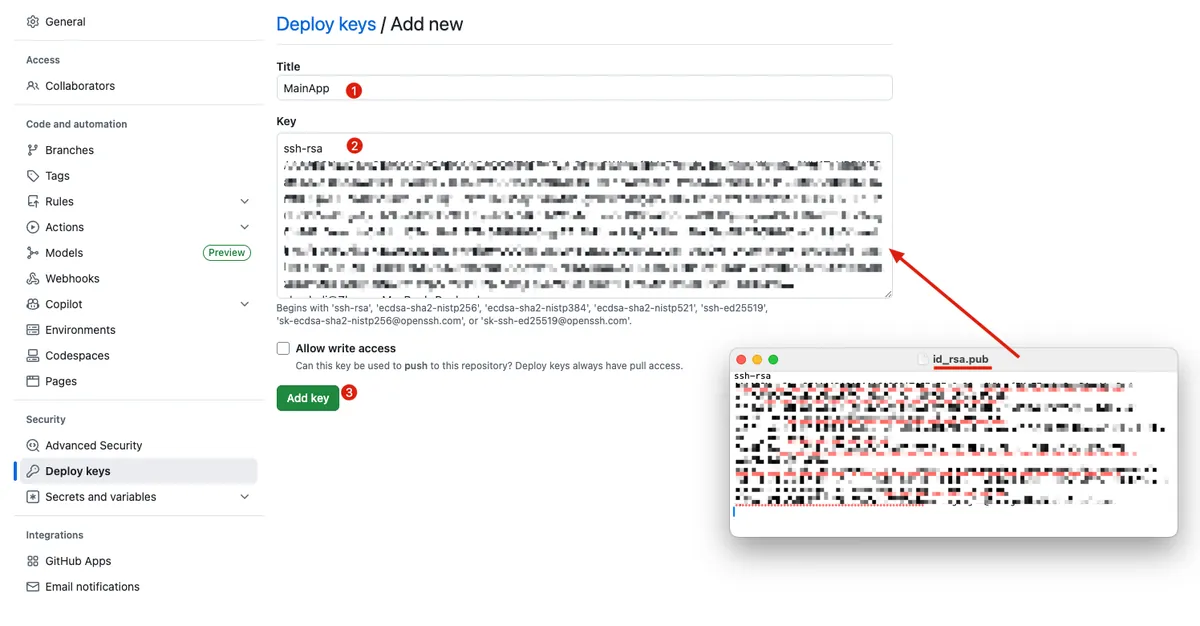
1.我们先在本地产生 private/public key: ssh-keygen -t rsa -b 4096 -f ./id_rsa ( 不要输入 passphrase )
2.到 Match Private Repo -> Settings -> Security -> Deploy keys -> Add deploy key:
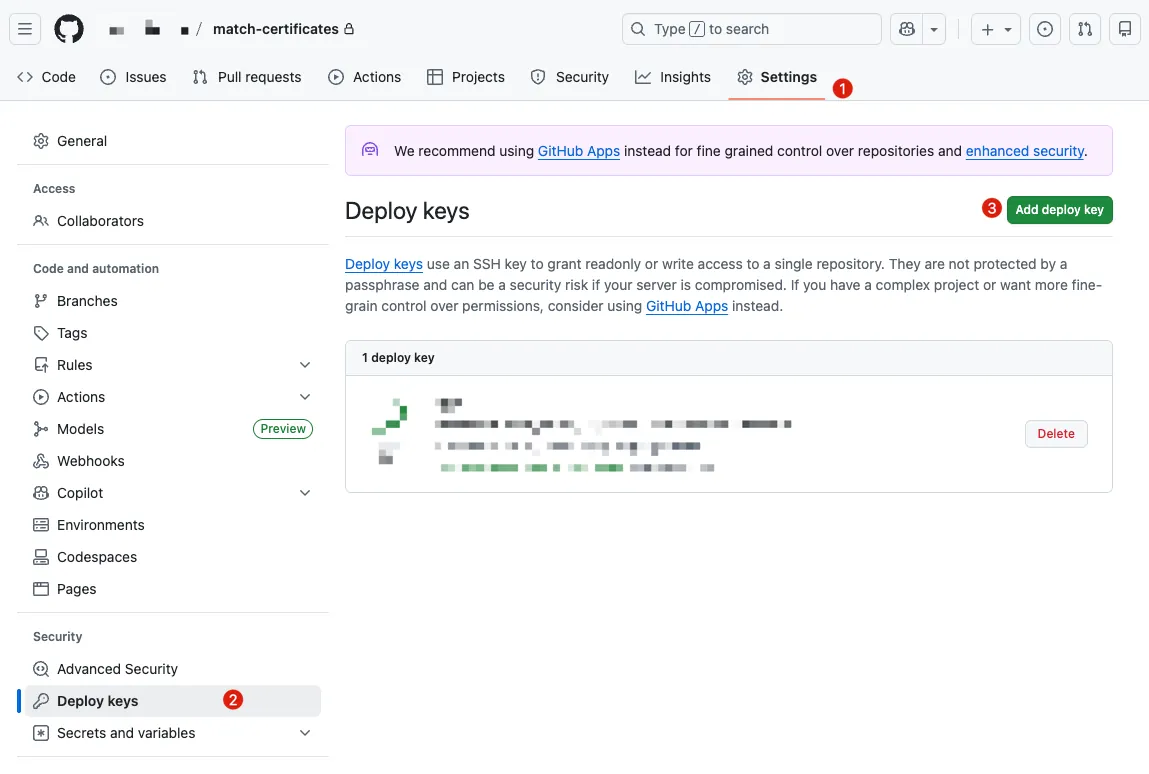
- 用文字编辑器打开「
id_rsa.pub」复制内容贴上到 Key ->「Add key」
- 回到主要 Repo -> Settings -> Security -> Secrets and variables
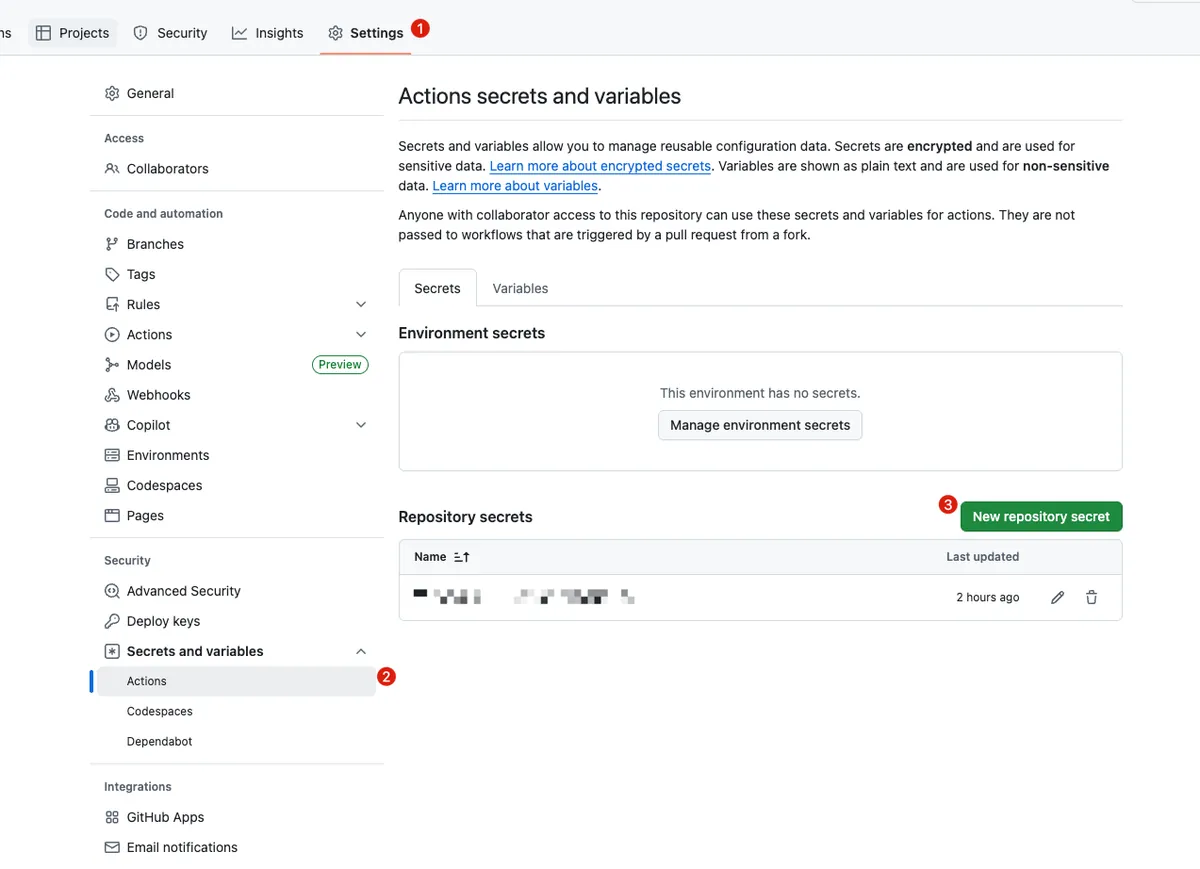
- 新增 SSH Private Key Content 到 Secret:
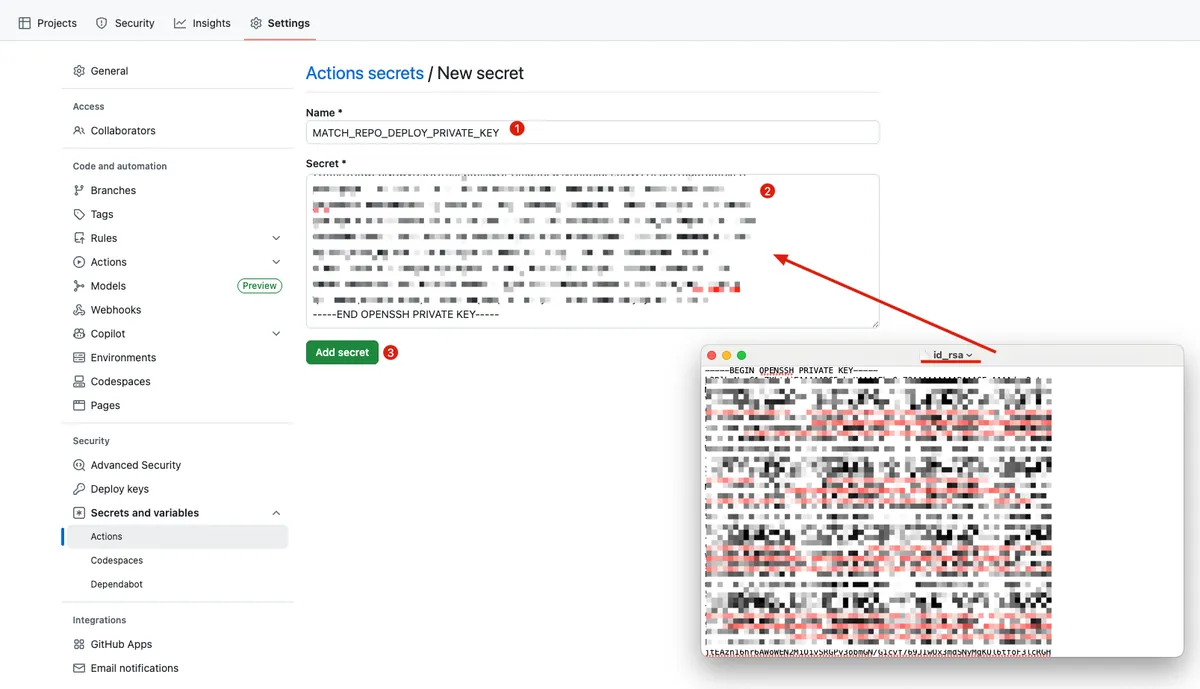
- Name:
MATCH_REPO_DEPLOY_PRIVATE_KEY
- 回到主要 Repo 的 GitHub Actions 设定 SSH Key:
1
2
3
4
5
6
7
8
9
10
11
12
13
14
15
16
17
18
19
20
21
22
23
24
25
26
name: CI - Deploy

on:
  push:
    branches: [ main ]
  pull_request:

jobs:
  build:
    runs-on: ubuntu-latest
    steps:
      - name: Checkout current repo (Repo A)
        uses: actions/checkout@v4

      - name: Setup SSH for Deploy Key
        run: \\|
          mkdir -p ~/.ssh
          echo "${{ secrets.MATCH_REPO_DEPLOY_PRIVATE_KEY }}" > ~/.ssh/id_ed25519
          chmod 600 ~/.ssh/id_ed25519
          ssh-keyscan github.com >> ~/.ssh/known_hosts

      - name: Test Clone
        run: \\|
          git clone [email protected]:xxxx/match-certificates.git
# Success!
# .. do deploy job...
- 设定成功!
问题2— App Store Connect API .p8 Key 安全存放使用
因为 GitHub Actions 不能存档案,所以只能先存成字串,然后写入档案。
同问题 1 步骤,在主要 Repo 新增一个
APP_STORE_CONNECT_API_KEY_CONTENTSecret用文字编辑器打开
AuthKey_XXXXXX.p8复制并贴上内容主要 Repo 的 GitHub Actions 加上一个步骤读出内容写入档案:
1
2
3
4
5
6
7
8
9
10
11
12
13
14
15
16
17
18
19
20
21
22
23
24
25
26
27
28
29
30
31
32
33
34
35
36
37
38
39
name: CI - Deploy
on:
  push:
    branches: [ main ]
  pull_request:
jobs:
  build:
    runs-on: ubuntu-latest
    steps:
      - name: Checkout current repo (Repo A)
        uses: actions/checkout@v4

      - name: Setup SSH for Deploy Key
        run: \\|
          mkdir -p ~/.ssh
          echo "${{ secrets.MATCH_REPO_DEPLOY_PRIVATE_KEY }}" > ~/.ssh/id_ed25519
          chmod 600 ~/.ssh/id_ed25519
          ssh-keyscan github.com >> ~/.ssh/known_hosts

      - name: Write Secret Key to File
        env:
          APP_STORE_CONNECT_API_KEY_CONTENT: ${{ secrets.APP_STORE_CONNECT_API_KEY_CONTENT }}
        run: \\|
          # ensure fastlane directory exists
          mkdir -p ./fastlane

          # create file path
          APP_STORE_CONNECT_API_KEY_PATH=./fastlane/AuthKey_XXXXXX.p8

          # write content to file (keep newline)
          echo "$APP_STORE_CONNECT_API_KEY_CONTENT" > "$APP_STORE_CONNECT_API_KEY_PATH"

          # (optional) restrict permissions
          chmod 600 "$APP_STORE_CONNECT_API_KEY_PATH"

      - name: Deploy to Firebase
        env:
          MATCH_PASSWORD: "${{ secrets.MATCH_PASSWORD }}"
        run: bundle exec fastlane deploy_to_firebase
问题3 — 设定 Private Match Repo 的 Passphrase,防止 Match 时跳 Prompt 中断
同问题 1 步骤,在主要 Repo 新增
MATCH_PASSWORD到 Secret内容输入你设定的 Fastlane Match Repo
Passphrase主要 Repo 的 GitHub Actions 加上
env: secret.MATCH_PASSWORD:
1
2
3
4
5
6
7
8
9
10
11
12
13
14
15
16
17
18
19
20
21
22
23
24
25
26
27
28
29
30
31
32
33
34
35
36
37
38
39
name: CI - Deploy
on:
  push:
    branches: [ main ]
  pull_request:
jobs:
  build:
    runs-on: ubuntu-latest
    steps:
      - name: Checkout current repo (Repo A)
        uses: actions/checkout@v4

      - name: Setup SSH for Deploy Key
        run: \\|
          mkdir -p ~/.ssh
          echo "${{ secrets.MATCH_REPO_DEPLOY_PRIVATE_KEY }}" > ~/.ssh/id_ed25519
          chmod 600 ~/.ssh/id_ed25519
          ssh-keyscan github.com >> ~/.ssh/known_hosts

      - name: Write Secret Key to File
        env:
          APP_STORE_CONNECT_API_KEY_CONTENT: ${{ secrets.APP_STORE_CONNECT_API_KEY_CONTENT }}
        run: \\|
          # ensure fastlane directory exists
          mkdir -p ./fastlane

          # create file path
          APP_STORE_CONNECT_API_KEY_PATH=./fastlane/AuthKey_XXXXXX.p8

          # write content to file (keep newline)
          echo "$APP_STORE_CONNECT_API_KEY_CONTENT" > "$APP_STORE_CONNECT_API_KEY_PATH"

          # (optional) restrict permissions
          chmod 600 "$APP_STORE_CONNECT_API_KEY_PATH"

      - name: Deploy to Firebase
        env:
          MATCH_PASSWORD: "${{ secrets.MATCH_PASSWORD }}"
        run: bundle exec fastlane deploy_to_firebase
问题4 — Self-hosted Runner 上的 Keychain 处理
跟云端机器每次都是干净全新的不同,如果是用 Self-hosted Runner 我们可以在 Fastlane 指定 derived_data_path 、 output_directory 、 buildlog_path 、 reinstall_app 让每次执行的环境都是干净的;但是 Certificates, Profiles 是安装到系统的 Keychain 应用中,该如何处理?
其实 Fastlane 也帮我们考虑到了,可以在 Match 之前先建立一个干净的 Keychain:
1
2
3
4
5
6
7
8
9
10
11
12
13
14
15
16
17
18
19
20
21
22
23
24
25
26
27
28
29
30
31
32
33
34
35
36
37
38
39
40
41
42
43
44
45
46
47
48
49
50
51
52
53
54
55
56
57
58
59
60
61
name: CI - Deploy
on:
  push:
    branches: [ main ]
  pull_request:
jobs:
  build:
    runs-on: ubuntu-latest
    steps:
      - name: Checkout current repo (Repo A)
        uses: actions/checkout@v4

      - name: Setup SSH for Deploy Key
        run: \\|
          mkdir -p ~/.ssh
          echo "${{ secrets.MATCH_REPO_DEPLOY_PRIVATE_KEY }}" > ~/.ssh/id_ed25519
          chmod 600 ~/.ssh/id_ed25519
          ssh-keyscan github.com >> ~/.ssh/known_hosts

      - name: Write Secret Key to File
        env:
          APP_STORE_CONNECT_API_KEY_CONTENT: ${{ secrets.APP_STORE_CONNECT_API_KEY_CONTENT }}
        run: \\|
          # ensure fastlane directory exists
          mkdir -p ./fastlane

          # create file path
          APP_STORE_CONNECT_API_KEY_PATH=./fastlane/AuthKey_XXXXXX.p8

          # write content to file (keep newline)
          echo "$APP_STORE_CONNECT_API_KEY_CONTENT" > "$APP_STORE_CONNECT_API_KEY_PATH"

          # (optional) restrict permissions
          chmod 600 "$APP_STORE_CONNECT_API_KEY_PATH"

      - name: Create fastlane keychain
        env:
          KEYCHAIN_NAME: "${{ runner.name }}"
          MATCH_PASSWORD: "${{ secrets.MATCH_PASSWORD }}"
        run: \\|
          bundle exec fastlane run create_keychain \
            name:"$KEYCHAIN_NAME" \
            password:"$MATCH_PASSWORD" \
            unlock:true \
            timeout:0 \
            lock_when_sleeps:false

      - name: Deploy to Firebase
        env:
          MATCH_PASSWORD: "${{ secrets.MATCH_PASSWORD }}"
          KEYCHAIN_NAME: "${{ runner.name }}"
        run: bundle exec fastlane deploy_to_firebase

      # 🔥 不管前面成功或失败,一定会执行
      - name: Delete fastlane keychain
        if: always()
        env:
          KEYCHAIN_NAME: ${{ runner.name }}
        run: \\|
          bundle exec fastlane run delete_keychain \
            name:"$KEYCHAIN_NAME"
每个 Runner 同时只会执行一个,因此我们用 Runner Name 当成 Keychain Name,每个 Runner 都会有自己的 Keychain
执行完毕,不管成功或失败都会删除
keychain_password我就没特别另外设定了,统一用MATCH_PASSWORD
Fastlane/Fastfile 里的 match 方法多加上 keychain parameters:
1
2
3
4
5
6
7
8
9
10
#...
    match(
      type: "adhoc",
      app_identifier: app_identifier,
      readonly: false, # 如果有需要,更新、上传 cert / profile
      force_for_new_devices: true, # 如果为新装置则重建 provisioning profile
      keychain_name: ENV['KEYCHAIN_NAME'], # default value: nil
      keychain_password: ENV['MATCH_PASSWORD'] # default value: nil
    )
#...
这样 Match 在拉取凭证的时候就会改存到指定的 Keychain,而非共用的 login keychain。
结语
Fastlane 的文章范围太大了,这边就只记录使用 Fastlane Match 的过程;其他关于 Fastlane 跑测试、打包发布…等等 Lane 有机会再写一篇新的补充;其他 Match 相关的问题,有想到什么案例会再来补充!也欢迎留言提问!
延伸阅读
敬请移步阅览。🤞🏻
有任何问题及指教欢迎 与我联络 。
本文首次发表于 Medium (点击查看原始版本),由 ZMediumToMarkdown 提供自动转换与同步技术。