
手工打造 HTML 解析器的那些事
ZMarkupParser HTML to NSAttributedString 渲染引擎的开发实录
HTML String 的 Tokenization 转换、Normalization 处理、Abstract Syntax Tree 的产生、Visitor Pattern / Builder Pattern 的应用, 还有一些杂谈…
接续
去年发表了篇「[ TL;DR] 自行实现 iOS NSAttributedString HTML Render 」的文章,粗浅的介绍可以使用 XMLParser 去剖析 HTML 再将其转换成 NSAttributedString.Key,文中的程式架构及思路都很零乱,因是过水纪录一下之前遇到的问题及当初并没有花太多时间研究此议题。
Convert HTML String to NSAttributedString
再次重新探讨此议题,我们需要能将 API 给的 HTML 字串转换成 NSAttributedString ,并套用对应样式放到 UITextView/UILabel 中显示。
e.g. <b>Test<a>Link</a></b> 要能显示成 Test Link
-
注1 不建议使用 HTML 做为 App 与资料间的沟通渲染媒介,因 HTML 规格过于弹性,App 无法支援所有 HTML 样式,也没有官方的 HTML 转换渲染引擎。
-
注2 iOS 14 开始可使用官方原生的 AttributedString 解析 Markdown或引入 apple/swift-markdown Swift Package 解析 Markdown。
-
注3 因敝司专案庞大且已应用 HTML 做为媒介多年,所以暂时无法全面更换为 Markdown 或其他 Markup。
-
注4 这边的 HTML 并不是要用来显示整个 HTML 网页,只是把 HTML 做为样式 Markdown 渲染字串样式。 (要渲染整页、复杂包含图片表格的 HTML,依然要使用 WevView loadHTML)
强烈建议使用 Markdown 做为字串渲染媒介语言,如果您的专案跟我有一样困扰不得不使用 HTML 并苦无优雅的 to NSAttributedString 转换工具, 再请使用。
还记得上一篇文章的朋友也可以直接跳到 ZhgChgLi / ZMarkupParser 章节。
NSAttributedString.DocumentType.html
网路上能找到的 HTML to NSAttributedString 的做法都是要我们直接使用 NSAttributedString 自带的 options 渲染 HTML,范例如下:
let htmlString = "<b>Test<a>Link</a></b>"
let data = htmlString.data(using: String.Encoding.utf8)!
let attributedOptions:[NSAttributedString.DocumentReadingOptionKey: Any] = [
  .documentType :NSAttributedString.DocumentType.html,
  .characterEncoding: String.Encoding.utf8.rawValue
]
let attributedString = try! NSAttributedString(data: data, options: attributedOptions, documentAttributes: nil)
此做法的问题:
-
效能差:此方法是透过 WebView Core 去渲染出样式,再切回 Main Thread 给 UI 显示;渲染 300 多个字元就需 0.03 Sec。
-
会吃字:例如行销文案可能会使用
<Congratulation!>会被当成 HTML Tag 被去除掉。 -
无法客制化:例如无法指定 HTML 的粗体在 NSAttributedString 中对应的粗体程度。
-
在 iOS 15 出现 大量闪退 ,测试发现低电量情况下会 100% 闪退 (iOS ≥ 15.2 已修正)
-
字串太长会闪退,实测输入超过 54,600+ 长度字串就会 100% 闪退 (EXC_BAD_ACCESS)
对与我们最痛的还是闪退问题,iOS 15 发布到 15.2 修正之前,App 始终被此问题霸榜,从数据来看,2022/03/11~2022/06/08 就造成了 2.4K+ 次闪退、影响 1.4K+ 位使用者。
此闪退问题自 iOS 12 开始就有,iOS 15 只是踩到更大的坑,但我猜 iOS 15.2 的修正也只是补洞,官方无法根除。
其次问题是效能,因为做为字串样式 Markup Language,会大量应用在 App 上的 UILabel/UITextView,如同前述一个 Label 就需要 0.03 Sec,列表*UILabel/UITextView 乘下来就会对使用者操作手感上产生卡顿。
XMLParser
第二个方案是 上篇文章 介绍的,使用 XMLParser 解析成对应的 NSAttributedString Key 并套用样式。
可参考 SwiftRichString 的实现及 上一篇文章内容 。
上一篇也只是探究出可以使用 XMLParser 解析 HTML 并做对应转换,然后完成实验性的实作,但并没有把它设计成一个有架构好扩充的「工具」。
此做法的问题:
-
容错率 0:
<br>/<Congratulation!>/<b>Bold<i>Bold+Italic</b>Italic</i>以上三种 HTML 有可能出现的情境,在 XMLParser 解析都会出错直接 Throw Error 显示空白。 -
使用 XMLParser,HTML 字串必须完全符合 XML 规则,无法像浏览器或 NSAttributedString.DocumentType.html 容错正常显示。
站在巨人的肩膀上
以上两个方案都不能完美优雅的解决 HTML 问题,于是开始搜寻有无现成的解决方案。
-
johnxnguyen / Down 只支援输入 Markdown 转换成 Any (XML/NSAttributedString…),但不支援输入 HTML 转换。
-
malcommac / SwiftRichString 底层是使用 XMLParser,实测前述案例也会有一样容错率 0 的问题。
-
scinfu / SwiftSoup 只支援 HTML Parser(Selector) 不支援转换成 NSAttributedString 。
找了一大圈结果都类似上方的专案 Orz,没有巨人的肩膀可以站。
ZhgChgLi/ZMarkupParser
没有巨人的肩膀,只好自己当巨人了,于是自行开发了 HTML String to NSAttributedString 工具。
使用纯 Swift 开发,透过 Regex 剖析出 HTML Tag 并经过 Tokenization,分析修正 Tag 正确性(修正没有 end 的 tag & 错位 tag),再转换成 abstract syntax tree,最终使用 Visitor Pattern 将 HTML Tag 与抽象样式对应,得到最终 NSAttributedString 结果;其中不依赖任何 Parser Lib。
特色
-
支援 HTML Render (to NSAttributedString) / Stripper (剥离 HTML Tag) / Selector 功能
-
比
NSAttributedString.DocumentType.html更高的效能 -
自动分析修正 Tag 正确性(修正没有 end 的 tag & 错位 tag)
-
支援从
style=”color:red…”动态设定样式 -
支援客制化样式指定,例如粗体要多 粗
-
支援弹性可扩充标签或自订标签及属性
详细介绍、安装使用可参考此篇文章:「 ZMarkupParser HTML String 转换 NSAttributedString 工具 」
可直接 git clone 专案 后,打开 ZMarkupParser.xcworkspace Project 选择 ZMarkupParser-Demo Target 直接 Build & Run 起来玩玩。
技术细节
再来才是本篇文章想分享的,关于开发这个工具上的技术细节。
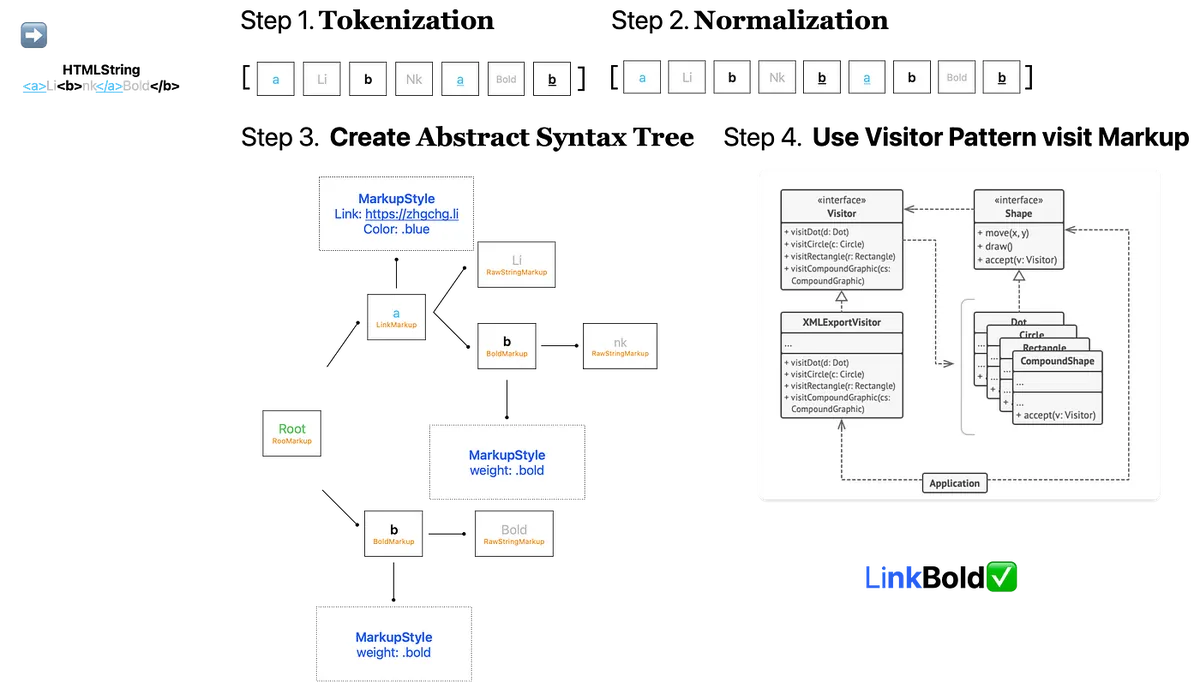
运作流程总览
上图为大概的运作流程,后面文章会一步一步介绍及附上程式码。
⚠️️️️️️ 本文会尽量简化 Demo Code、减少抽象跟效能考量,尽量把重心放在解释运作原理上;如需了解最终结果请参考专案 Source Code 。
程式码化 — Tokenization
a.k.a parser, 解析
谈到 HTML 渲染最重要的就是解析的环节,以往是透过 XMLParser 将 HTML 做为 XML 解析;但是无法克服 HTML 日常用法并不是 100% 的 XML 会造成解析器错误,且无法动态修正。
排除掉使用 XMLParser 这条路之后,在 Swift 上留给我们的就只剩使用 Regex 正则来做匹配解析了。
最一开始没想太多,想说可以直接用正则挖出「成对」的 HTML Tag,再递回往里面一层一层找 HTML Tag,直到结束;但是这样没有办法解决 HTML Tag 可以嵌套,或想支援错位容错的问题,因此我们把策略改成挖成出「单个」 HTML Tag,并记录是 Start Tag, Close Tag or Self-Closing Tag,及其他字串组合成解析结果阵列。
Tokenization 结构如下:
enum HTMLParsedResult {
    case start(StartItem) // <a>
    case close(CloseItem) // </a>
    case selfClosing(SelfClosingItem) // <br/>
    case rawString(NSAttributedString)
}

extension HTMLParsedResult {
    class SelfClosingItem {
        let tagName: String
        let tagAttributedString: NSAttributedString
        let attributes: [String: String]?

        init(tagName: String, tagAttributedString: NSAttributedString, attributes: [String : String]?) {
            self.tagName = tagName
            self.tagAttributedString = tagAttributedString
            self.attributes = attributes
        }
    }

    class StartItem {
        let tagName: String
        let tagAttributedString: NSAttributedString
        let attributes: [String: String]?

        // Start Tag 有可能是异常 HTML Tag 也有可能是正常文字 e.g. <Congratulation!>, 后续 Normalization 后如果发现是孤立 Start Tag 则标记为 True。
        var isIsolated: Bool = false

        init(tagName: String, tagAttributedString: NSAttributedString, attributes: [String : String]?) {
            self.tagName = tagName
            self.tagAttributedString = tagAttributedString
            self.attributes = attributes
        }

        // 后续 Normalization 自动补位修正使用
        func convertToCloseParsedItem() -> CloseItem {
            return CloseItem(tagName: self.tagName)
        }

        // 后续 Normalization 自动补位修正使用
        func convertToSelfClosingParsedItem() -> SelfClosingItem {
            return SelfClosingItem(tagName: self.tagName, tagAttributedString: self.tagAttributedString, attributes: self.attributes)
        }
    }

    class CloseItem {
        let tagName: String
        init(tagName: String) {
            self.tagName = tagName
        }
    }
}
使用的正则如下:
<(?:(?<closeTag>\/)?(?<tagName>[A-Za-z0-9]+)(?<tagAttributes>(?:\s*(\w+)\s*=\s*(["\\|']).*?\5)*)\s*(?<selfClosingTag>\/)?>)
-
closeTag: 匹配 <
/a> -
tagName: 匹配 <
a> or , </a> -
tagAttributes: 匹配 <a
href=”https://zhgchg.li” style=”color:red”> -
selfClosingTag: 匹配 <br
/>
*此正则还可以再优化,之后再来做
文章后半段有提供关于正则的附加资料,有兴趣的朋友可以参考。
组合起来就是:
var tokenizationResult: [HTMLParsedResult] = []
let expression = try? NSRegularExpression(pattern: pattern, options: expressionOptions)
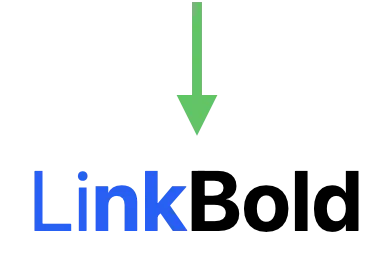
let attributedString = NSAttributedString(string: "<a>Li<b>nk</a>Bold</b>")
let totalLength = attributedString.string.utf16.count // utf-16 support emoji
var lastMatch: NSTextCheckingResult?
// Start Tags Stack, 先进后出(FILO First In Last Out)
// 检测 HTML 字串是否需要后续 Normalization 修正错位或补 Self-Closing Tag
var stackStartItems: [HTMLParsedResult.StartItem] = []
var needForamatter: Bool = false
expression.enumerateMatches(in: attributedString.string, range: NSMakeRange(0, totoalLength)) { match, _, _ in
if let match = match {
// 检查 Tag 之间或是到第一个 Tag 之间的字串
// e.g. Test<a>Link</a>zzz<b>bold</b>Test2 - > Test,zzz
let lastMatchEnd = lastMatch?.range.upperBound ?? 0
let currentMatchStart = match.range.lowerBound
if currentMatchStart > lastMatchEnd {
let rawStringBetweenTag = attributedString.attributedSubstring(from: NSMakeRange(lastMatchEnd, (currentMatchStart - lastMatchEnd)))
tokenizationResult.append(.rawString(rawStringBetweenTag))
}
// <a href="https://zhgchg.li">, </a>
let matchAttributedString = attributedString.attributedSubstring(from: match.range)
// a, a
let matchTag = attributedString.attributedSubstring(from: match.range(withName: "tagName"))?.string.trimmingCharacters(in: .whitespacesAndNewlines).lowercased()
// false, true
let matchIsEndTag = matchResult.attributedString(from: match.range(withName: "closeTag"))?.string.trimmingCharacters(in: .whitespacesAndNewlines) == "/"
// href="https://zhgchg.li", nil
// 用正则再拆出 HTML Attribute, to [String: String], 请参考 Source Code
let matchTagAttributes = parseAttributes(matchResult.attributedString(from: match.range(withName: "tagAttributes")))
// false, false
let matchIsSelfClosingTag = matchResult.attributedString(from: match.range(withName: "selfClosingTag"))?.string.trimmingCharacters(in: .whitespacesAndNewlines) == "/"
if let matchAttributedString = matchAttributedString,
let matchTag = matchTag {
if matchIsSelfClosingTag {
// e.g. <br/>
tokenizationResult.append(.selfClosing(.init(tagName: matchTag, tagAttributedString: matchAttributedString, attributes: matchTagAttributes)))
} else {
// e.g. <a> or </a>
if matchIsEndTag {
// e.g. </a>
// 从 Stack 取出出现相同 TagName 的位置,从最后开始
if let index = stackStartItems.lastIndex(where: { $0.tagName == matchTag }) {
// 如果不是最后一个,代表有错位或遗漏关闭的 Tag
if index != stackStartItems.count - 1 {
needForamatter = true
}
tokenizationResult.append(.close(.init(tagName: matchTag)))
stackStartItems.remove(at: index)
} else {
// 多余的 close tag e.g </a>
// 不影响后续,直接忽略
}
} else {
// e.g. <a>
let startItem: HTMLParsedResult.StartItem = HTMLParsedResult.StartItem(tagName: matchTag, tagAttributedString: matchAttributedString, attributes: matchTagAttributes)
tokenizationResult.append(.start(startItem))
// 塞到 Stack
stackStartItems.append(startItem)
}
}
}
lastMatch = match
}
}
// 检查结尾的 RawString
// e.g. Test<a>Link</a>Test2 - > Test2
if let lastMatch = lastMatch {
let currentIndex = lastMatch.range.upperBound
if totoalLength > currentIndex {
// 还有剩余字串
let resetString = attributedString.attributedSubstring(from: NSMakeRange(currentIndex, (totoalLength - currentIndex)))
tokenizationResult.append(.rawString(resetString))
}
} else {
// lastMatch = nil, 代表没找到任何标签,全都是纯文字
let resetString = attributedString.attributedSubstring(from: NSMakeRange(0, totoalLength))
tokenizationResult.append(.rawString(resetString))
}
// 检查 Stack 是否已经清空,如果还有代表有 Start Tag 没有对应的 End
// 标记成孤立 Start Tag
for stackStartItem in stackStartItems {
stackStartItem.isIsolated = true
needForamatter = true
}
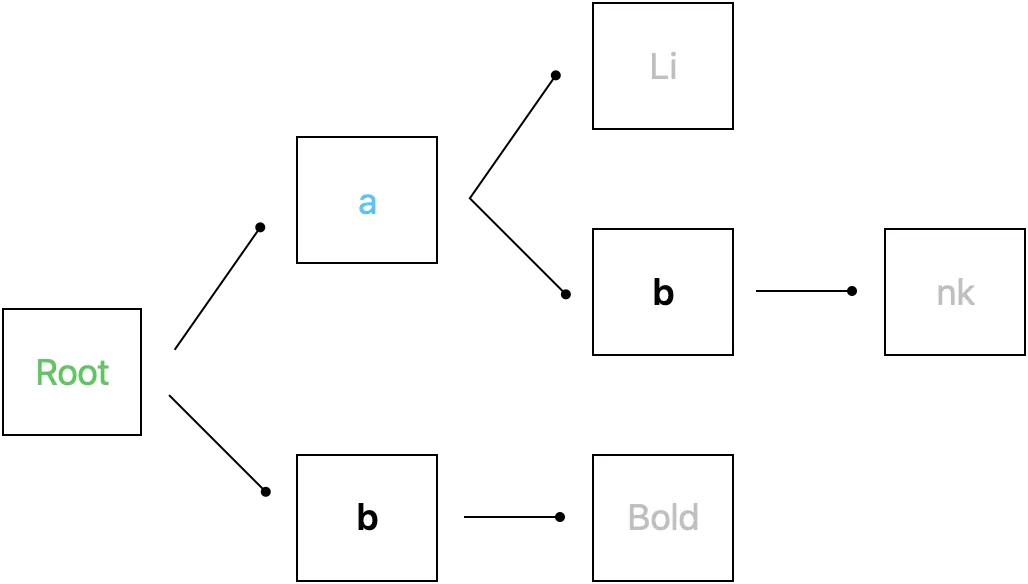
print(tokenizationResult)
// [
// .start("a",["href":"https://zhgchg.li"])
// .rawString("Li")
// .start("b",nil)
// .rawString("nk")
// .close("a")
// .rawString("Bold")
// .close("b")
// ]
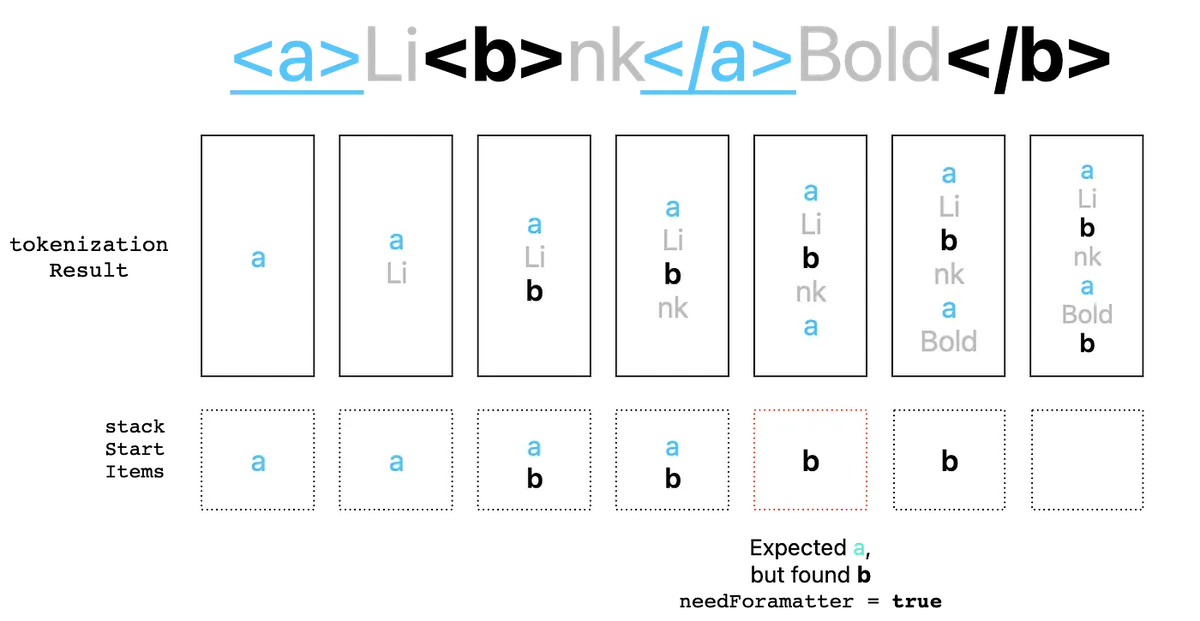
运作流程如上图
最终会得到一个 Tokenization 结果阵列。
对应原始码中的 HTMLStringToParsedResultProcessor.swift 实作
标准化 — Normalization
a.k.a Formatter, 正规化
继上一步取得初步解析结果后,解析中如果发现还需要 Normalization,则需要此步骤,自动修正 HTML Tag 问题。
HTML Tag 问题有以下三种:
-
HTML Tag 但遗漏 Close Tag: 例如
<br> -
一般文字被当成 HTML Tag: 例如
<Congratulation!> -
HTML Tag 存在错位问题: 例如
<a>Li<b>nk</a>Bold</b>
修正方式也很简单,我们需要遍历 Tokenization 结果的元素,尝试补齐缺漏。
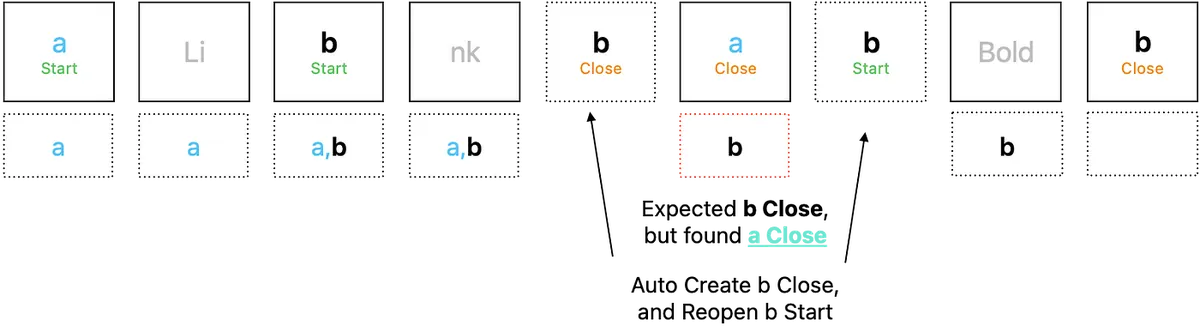
运作流程如上图
var normalizationResult = tokenizationResult

// Start Tags Stack, 先进后出(FILO First In Last Out)
var stackExpectedStartItems: [HTMLParsedResult.StartItem] = []
var itemIndex = 0
while itemIndex < newItems.count {
    switch newItems[itemIndex] {
    case .start(let item):
        if item.isIsolated {
            // 如果为孤立 Start Tag
            if WC3HTMLTagName(rawValue: item.tagName) == nil && (item.attributes?.isEmpty ?? true) {
                // 如果不是 WCS 定义的 HTML Tag & 没有任何 HTML Attribute
                // WC3HTMLTagName Enum 可参考 Source Code
                // 判定为 一般文字被当成 HTML Tag
                // 改成 raw string type
                normalizationResult[itemIndex] = .rawString(item.tagAttributedString)
            } else {
                // 否则,改成 self-closing tag, e.g. <br> -> <br/>
                normalizationResult[itemIndex] = .selfClosing(item.convertToSelfClosingParsedItem())
            }
            itemIndex += 1
        } else {
            // 正常 Start Tag, 加入 Stack
            stackExpectedStartItems.append(item)
            itemIndex += 1
        }
    case .close(let item):
        // 遇到 Close Tag
        // 取得 Start Stack Tag 到此 Close Tag 中间隔的 Tags
        // e.g <a><u><b>[CurrentIndex]</a></u></b> -> 间隔 0
        // e.g <a><u><b>[CurrentIndex]</a></u></b> -> 间隔 b,u

        let reversedStackExpectedStartItems = Array(stackExpectedStartItems.reversed())
        guard let reversedStackExpectedStartItemsOccurredIndex = reversedStackExpectedStartItems.firstIndex(where: { $0.tagName == item.tagName }) else {
            itemIndex += 1
            continue
        }

        let reversedStackExpectedStartItemsOccurred = Array(reversedStackExpectedStartItems.prefix(upTo: reversedStackExpectedStartItemsOccurredIndex))

        // 间隔 0, 代表 tag 没错位
        guard reversedStackExpectedStartItemsOccurred.count != 0 else {
            // is pair, pop
            stackExpectedStartItems.removeLast()
            itemIndex += 1
            continue
        }

        // 有其他间隔,自动在前候补期间格 Tag
        // e.g <a><u><b>[CurrentIndex]</a></u></b> ->
        // e.g <a><u><b>[CurrentIndex]</b></u></a><b></u></u></b>
        let stackExpectedStartItemsOccurred = Array(reversedStackExpectedStartItemsOccurred.reversed())
        let afterItems = stackExpectedStartItemsOccurred.map({ HTMLParsedResult.start($0) })
        let beforeItems = reversedStackExpectedStartItemsOccurred.map({ HTMLParsedResult.close($0.convertToCloseParsedItem()) })
        normalizationResult.insert(contentsOf: afterItems, at: newItems.index(after: itemIndex))
        normalizationResult.insert(contentsOf: beforeItems, at: itemIndex)

        itemIndex = newItems.index(after: itemIndex) + stackExpectedStartItemsOccurred.count

        // 更新 Start Stack Tags
        // e.g. -> b,u
        stackExpectedStartItems.removeAll { startItem in
            return reversedStackExpectedStartItems.prefix(through: reversedStackExpectedStartItemsOccurredIndex).contains(where: { $0 === startItem })
        }
    case .selfClosing, .rawString:
        itemIndex += 1
    }
}

print(normalizationResult)
// [
//    .start("a",["href":"https://zhgchg.li"])
//    .rawString("Li")
//    .start("b",nil)
//    .rawString("nk")
//    .close("b")
//    .close("a")
//    .start("b",nil)
//    .rawString("Bold")
//    .close("b")
// ]
对应原始码中的 HTMLParsedResultFormatterProcessor.swift 实作
Abstract Syntax Tree
a.k.a AST, 抽象树
经过 Tokenization & Normalization 资料预处理完成后,再来要将结果转换成抽象树🌲。
如上图
转换成抽象树可以方便我们日后的操作及扩充,例如实现 Selector 功能或是做其他转换,例如 HTML To Markdown;亦或是日后想增加 Markdown to NSAttributedString,只需实现 Markdown 的 Tokenization & Normalization 就能完成。
首先我们定义一个 Markup Protocol,有 Child & Parent 属性,纪录叶子跟树枝的资讯:
protocol Markup: AnyObject {
    var parentMarkup: Markup? { get set }
    var childMarkups: [Markup] { get set }

    func appendChild(markup: Markup)
    func prependChild(markup: Markup)
    func accept<V: MarkupVisitor>(_ visitor: V) -> V.Result
}

extension Markup {
    func appendChild(markup: Markup) {
        markup.parentMarkup = self
        childMarkups.append(markup)
    }

    func prependChild(markup: Markup) {
        markup.parentMarkup = self
        childMarkups.insert(markup, at: 0)
    }
}
另外搭配使用 Visitor Pattern ,将每种样式属性都定义成一个物件 Element,再透过不同的 Visit 策略取得个别的套用结果。
protocol MarkupVisitor {
    associatedtype Result

    func visit(markup: Markup) -> Result

    func visit(_ markup: RootMarkup) -> Result
    func visit(_ markup: RawStringMarkup) -> Result

    func visit(_ markup: BoldMarkup) -> Result
    func visit(_ markup: LinkMarkup) -> Result
    //...
}

extension MarkupVisitor {
    func visit(markup: Markup) -> Result {
        return markup.accept(self)
    }
}
基本 Markup 节点:
// 根节点
final class RootMarkup: Markup {
    weak var parentMarkup: Markup? = nil
    var childMarkups: [Markup] = []

    func accept<V>(_ visitor: V) -> V.Result where V : MarkupVisitor {
        return visitor.visit(self)
    }
}

// 叶节点
final class RawStringMarkup: Markup {
    let attributedString: NSAttributedString

    init(attributedString: NSAttributedString) {
        self.attributedString = attributedString
    }

    weak var parentMarkup: Markup? = nil
    var childMarkups: [Markup] = []

    func accept<V>(_ visitor: V) -> V.Result where V : MarkupVisitor {
        return visitor.visit(self)
    }
}
定义 Markup 样式节点:
// 树枝节点:

// 连结样式
final class LinkMarkup: Markup {
    weak var parentMarkup: Markup? = nil
    var childMarkups: [Markup] = []

    func accept<V>(_ visitor: V) -> V.Result where V : MarkupVisitor {
        return visitor.visit(self)
    }
}

// 粗体样式
final class BoldMarkup: Markup {
    weak var parentMarkup: Markup? = nil
    var childMarkups: [Markup] = []

    func accept<V>(_ visitor: V) -> V.Result where V : MarkupVisitor {
        return visitor.visit(self)
    }
}
对应原始码中的 Markup 实作
转换成抽象树之前我们还需要…
MarkupComponent
因为我们的树结构不与任何资料结构有依赖(例如 a 节点/LinkMarkup,应该要有 url 资讯才能做后续 Render)。 对此我们另外定义一个容器存放树节点与节点相关的资料资讯:
protocol MarkupComponent {
    associatedtype T
    var markup: Markup { get }
    var value: T { get }

    init(markup: Markup, value: T)
}

extension Sequence where Iterator.Element: MarkupComponent {
    func value(markup: Markup) -> Element.T? {
        return self.first(where:{ $0.markup === markup })?.value as? Element.T
    }
}
对应原始码中的 MarkupComponent 实作
也可将 Markup 宣告 Hashable ,直接使用 Dictionary 存放值 [Markup: Any] ,但是这样 Markup 就不能被当一般 type 使用,要加上 any Markup 。
HTMLTag & HTMLTagName & HTMLTagNameVisitor
HTML Tag Name 部分我们也做了一层的抽象,让使用者能自行决定有哪些 Tag 需要被处理,也能方便日后的扩充,例如: <strong> Tag Name 同样可对应到 BoldMarkup 。
public protocol HTMLTagName {
    var string: String { get }
    func accept<V: HTMLTagNameVisitor>(_ visitor: V) -> V.Result
}

public struct A_HTMLTagName: HTMLTagName {
    public let string: String = WC3HTMLTagName.a.rawValue

    public init() {

    }

    public func accept<V>(_ visitor: V) -> V.Result where V : HTMLTagNameVisitor {
        return visitor.visit(self)
    }
}

public struct B_HTMLTagName: HTMLTagName {
    public let string: String = WC3HTMLTagName.b.rawValue

    public init() {

    }

    public func accept<V>(_ visitor: V) -> V.Result where V : HTMLTagNameVisitor {
        return visitor.visit(self)
    }
}
对应原始码中的 HTMLTagNameVisitor 实作
另外参考 W3C wiki 列举了 HTML tag name enum: WC3HTMLTagName.swift
HTMLTag 则是单纯一个容器物件,因为我们希望能让外部指定 HTML Tag 对应到的样式,所以宣告一个容器放在一起:
struct HTMLTag {
    let tagName: HTMLTagName
    let customStyle: MarkupStyle? // 后面介绍 Render 会解释

    init(tagName: HTMLTagName, customStyle: MarkupStyle? = nil) {
        self.tagName = tagName
        self.customStyle = customStyle
    }
}
对应原始码中的 HTMLTag 实作
HTMLTagNameToHTMLMarkupVisitor
struct HTMLTagNameToMarkupVisitor: HTMLTagNameVisitor {
    typealias Result = Markup

    let attributes: [String: String]?

    func visit(_ tagName: A_HTMLTagName) -> Result {
        return LinkMarkup()
    }

    func visit(_ tagName: B_HTMLTagName) -> Result {
        return BoldMarkup()
    }
    //...
}
对应原始码中的 HTMLTagNameToHTMLMarkupVisitor 实作
转换成抽象树 with HTML 资料
我们要将 Normalization 后的 HTML 资料结果转换成抽象树,首先宣告一个能存放 HTML 资料的 MarkupComponent 资料结构:
struct HTMLElementMarkupComponent: MarkupComponent {
    struct HTMLElement {
        let tag: HTMLTag
        let tagAttributedString: NSAttributedString
        let attributes: [String: String]?
    }

    typealias T = HTMLElement

    let markup: Markup
    let value: HTMLElement
    init(markup: Markup, value: HTMLElement) {
        self.markup = markup
        self.value = value
    }
}
转换成 Markup 抽象树:
var htmlElementComponents: [HTMLElementMarkupComponent] = []
let rootMarkup = RootMarkup()
var currentMarkup: Markup = rootMarkup

let htmlTags: [String: HTMLTag]
init(htmlTags: [HTMLTag]) {
  self.htmlTags = Dictionary(uniqueKeysWithValues: htmlTags.map{ ($0.tagName.string, $0) })
}

// Start Tags Stack, 确保有正确 pop tag
// 前面已经做过 Normalization 了, 应该不会出错, 只是确保而已
var stackExpectedStartItems: [HTMLParsedResult.StartItem] = []
for thisItem in from {
    switch thisItem {
    case .start(let item):
        let visitor = HTMLTagNameToMarkupVisitor(attributes: item.attributes)
        let htmlTag = self.htmlTags[item.tagName] ?? HTMLTag(tagName: ExtendTagName(item.tagName))
        // 用 Visitor 问对应的 Markup
        let markup = visitor.visit(tagName: htmlTag.tagName)

        // 把自己加入当前枝的叶节点
        // 自己变成当前枝节点
        htmlElementComponents.append(.init(markup: markup, value: .init(tag: htmlTag, tagAttributedString: item.tagAttributedString, attributes: item.attributes)))
        currentMarkup.appendChild(markup: markup)
        currentMarkup = markup

        stackExpectedStartItems.append(item)
    case .selfClosing(let item):
        // 直接加入当前枝的叶节点
        let visitor = HTMLTagNameToMarkupVisitor(attributes: item.attributes)
        let htmlTag = self.htmlTags[item.tagName] ?? HTMLTag(tagName: ExtendTagName(item.tagName))
        let markup = visitor.visit(tagName: htmlTag.tagName)
        htmlElementComponents.append(.init(markup: markup, value: .init(tag: htmlTag, tagAttributedString: item.tagAttributedString, attributes: item.attributes)))
        currentMarkup.appendChild(markup: markup)
    case .close(let item):
        if let lastTagName = stackExpectedStartItems.popLast()?.tagName,
           lastTagName == item.tagName {
            // 遇到 Close Tag, 就回到上一层
            currentMarkup = currentMarkup.parentMarkup ?? currentMarkup
        }
    case .rawString(let attributedString):
        // 直接加入当前枝的叶节点
        currentMarkup.appendChild(markup: RawStringMarkup(attributedString: attributedString))
    }
}

// print(htmlElementComponents)
// [(markup: LinkMarkup, (tag: a, attributes: ["href":"zhgchg.li"]...)]
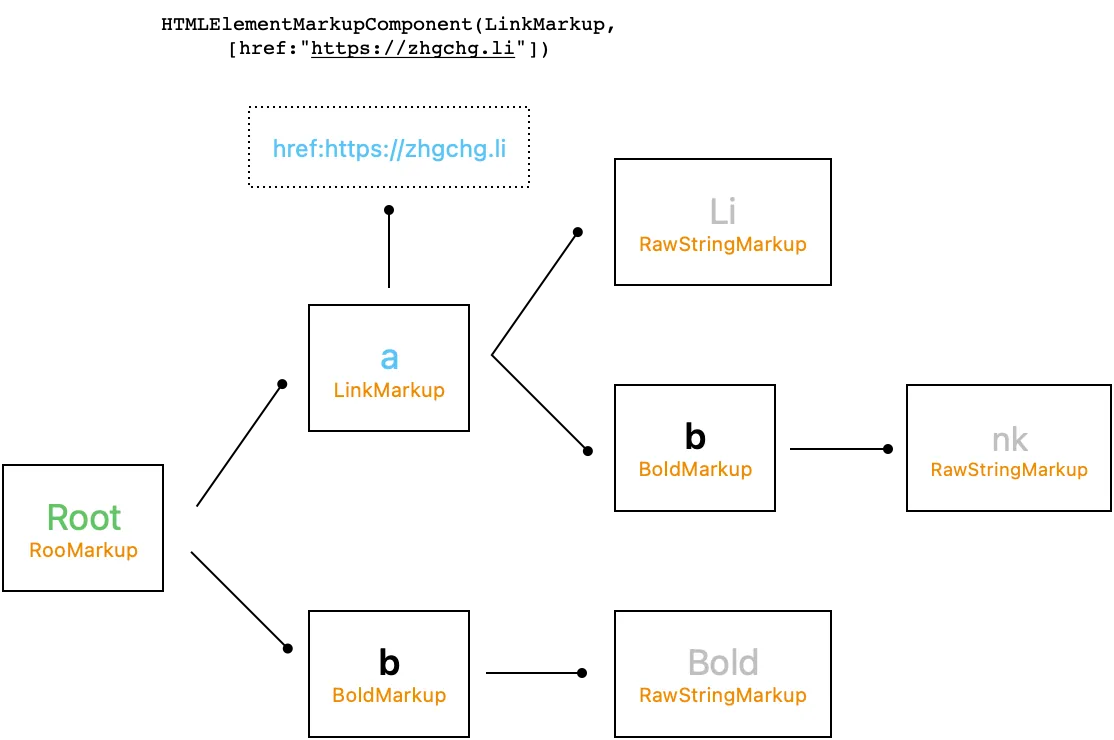
运作结果如上图
对应原始码中的 HTMLParsedResultToHTMLElementWithRootMarkupProcessor.swift 实作
此时,其实我们就完成 Selector 的功能了 🎉
public class HTMLSelector: CustomStringConvertible {

    let markup: Markup
    let componets: [HTMLElementMarkupComponent]
    init(markup: Markup, componets: [HTMLElementMarkupComponent]) {
        self.markup = markup
        self.componets = componets
    }

    public func filter(_ htmlTagName: String) -> [HTMLSelector] {
        let result = markup.childMarkups.filter({ componets.value(markup: $0)?.tag.tagName.isEqualTo(htmlTagName) ?? false })
        return result.map({ .init(markup: $0, componets: componets) })
    }

    //...
}
我们可以一层一层 Filter 叶节点物件。
对应原始码中的 HTMLSelector 实作
Parser — HTML to MarkupSyle (Abstract of NSAttributedString.Key)
再来我们要先完成将 HTML 转换成 MarkupStyle (NSAttributedString.Key)。
NSAttributedString 是透过 NSAttributedString.Key Attributes 来设定字的样式,我们抽象出 NSAttributedString.Key 的所有栏位对应到 MarkupStyle,MarkupStyleColor,MarkupStyleFont,MarkupStyleParagraphStyle。
目的:
-
原本的 Attributes 的资料结构是
[NSAttributedString.Key: Any?],如果直接暴露出去,我们很难控制使用者带入的值,如果带错还会造成闪退,例如.font: 123 -
样式需要可继承,例如
<a><b>test</b></a>,test 字串的样式就是继承自 link 的 bold (bold+linke);如果直接暴露 Dictionary 出去很难控制好继承规 -
封装 iOS/macOS (UIKit/Appkit) 所属物件
MarkupStyle Struct
public struct MarkupStyle {
    public var font:MarkupStyleFont
    public var paragraphStyle:MarkupStyleParagraphStyle
    public var foregroundColor:MarkupStyleColor? = nil
    public var backgroundColor:MarkupStyleColor? = nil
    public var ligature:NSNumber? = nil
    public var kern:NSNumber? = nil
    public var tracking:NSNumber? = nil
    public var strikethroughStyle:NSUnderlineStyle? = nil
    public var underlineStyle:NSUnderlineStyle? = nil
    public var strokeColor:MarkupStyleColor? = nil
    public var strokeWidth:NSNumber? = nil
    public var shadow:NSShadow? = nil
    public var textEffect:String? = nil
    public var attachment:NSTextAttachment? = nil
    public var link:URL? = nil
    public var baselineOffset:NSNumber? = nil
    public var underlineColor:MarkupStyleColor? = nil
    public var strikethroughColor:MarkupStyleColor? = nil
    public var obliqueness:NSNumber? = nil
    public var expansion:NSNumber? = nil
    public var writingDirection:NSNumber? = nil
    public var verticalGlyphForm:NSNumber? = nil
    //...

    // 继承自...
    // 预设: 栏位为 nil 时,从 from 填入当前资料物件
    mutating func fillIfNil(from: MarkupStyle?) {
        guard let from = from else { return }

        var currentFont = self.font
        currentFont.fillIfNil(from: from.font)
        self.font = currentFont

        var currentParagraphStyle = self.paragraphStyle
        currentParagraphStyle.fillIfNil(from: from.paragraphStyle)
        self.paragraphStyle = currentParagraphStyle
        //..
    }

    // MarkupStyle to NSAttributedString.Key: Any
    func render() -> [NSAttributedString.Key: Any] {
        var data: [NSAttributedString.Key: Any] = [:]

        if let font = font.getFont() {
            data[.font] = font
        }

        if let ligature = self.ligature {
            data[.ligature] = ligature
        }
        //...
        return data
    }
}

public struct MarkupStyleFont: MarkupStyleItem {
    public enum FontWeight {
        case style(FontWeightStyle)
        case rawValue(CGFloat)
    }
    public enum FontWeightStyle: String {
        case ultraLight, light, thin, regular, medium, semibold, bold, heavy, black
        // ...
    }

    public var size: CGFloat?
    public var weight: FontWeight?
    public var italic: Bool?
    //...
}

public struct MarkupStyleParagraphStyle: MarkupStyleItem {
    public var lineSpacing:CGFloat? = nil
    public var paragraphSpacing:CGFloat? = nil
    public var alignment:NSTextAlignment? = nil
    public var headIndent:CGFloat? = nil
    public var tailIndent:CGFloat? = nil
    public var firstLineHeadIndent:CGFloat? = nil
    public var minimumLineHeight:CGFloat? = nil
    public var maximumLineHeight:CGFloat? = nil
    public var lineBreakMode:NSLineBreakMode? = nil
    public var baseWritingDirection:NSWritingDirection? = nil
    public var lineHeightMultiple:CGFloat? = nil
    public var paragraphSpacingBefore:CGFloat? = nil
    public var hyphenationFactor:Float? = nil
    public var usesDefaultHyphenation:Bool? = nil
    public var tabStops: [NSTextTab]? = nil
    public var defaultTabInterval:CGFloat? = nil
    public var textLists: [NSTextList]? = nil
    public var allowsDefaultTighteningForTruncation:Bool? = nil
    public var lineBreakStrategy: NSParagraphStyle.LineBreakStrategy? = nil
    //...
}

public struct MarkupStyleColor {
    let red: Int
    let green: Int
    let blue: Int
    let alpha: CGFloat
    //...
}
对应原始码中的 MarkupStyle 实作
另外也参考 W3c wiki, browser predefined color name 列举了对应 color name text & color R,G,B enum: MarkupStyleColorName.swift
HTMLTagStyleAttribute & HTMLTagStyleAttributeVisitor
这边多提一下这两个物件,因为 HTML Tag 是允许搭配从 CSS 设定样式的;对此我们同 HTMLTagName 的抽象,再套用一次在 HTML Style Attribute 上。
例如 HTML 可能会给: <a style=”color:red;font-size:14px”>RedLink</a> ,代表这个连结要设定成红色、大小 14px。
public protocol HTMLTagStyleAttribute {
    var styleName: String { get }

    func accept<V: HTMLTagStyleAttributeVisitor>(_ visitor: V) -> V.Result
}

public protocol HTMLTagStyleAttributeVisitor {
    associatedtype Result

    func visit(styleAttribute: HTMLTagStyleAttribute) -> Result
    func visit(_ styleAttribute: ColorHTMLTagStyleAttribute) -> Result
    func visit(_ styleAttribute: FontSizeHTMLTagStyleAttribute) -> Result
    //...
}

public extension HTMLTagStyleAttributeVisitor {
    func visit(styleAttribute: HTMLTagStyleAttribute) -> Result {
        return styleAttribute.accept(self)
    }
}
对应原始码中的 HTMLTagStyleAttribute 实作
HTMLTagStyleAttributeToMarkupStyleVisitor
struct HTMLTagStyleAttributeToMarkupStyleVisitor: HTMLTagStyleAttributeVisitor {
    typealias Result = MarkupStyle?

    let value: String

    func visit(_ styleAttribute: ColorHTMLTagStyleAttribute) -> Result {
        // 正则挖取 Color Hex or Mapping from HTML Pre-defined Color Name, 请参考 Source Code
        guard let color = MarkupStyleColor(string: value) else { return nil }
        return MarkupStyle(foregroundColor: color)
    }

    func visit(_ styleAttribute: FontSizeHTMLTagStyleAttribute) -> Result {
        // 正则挖取 10px -> 10, 请参考 Source Code
        guard let size = self.convert(fromPX: value) else { return nil }
        return MarkupStyle(font: MarkupStyleFont(size: CGFloat(size)))
    }
    // ...
}
对应原始码中的 HTMLTagAttributeToMarkupStyleVisitor.swift 实作
init 的 value = attribute 的值,依照 visit 类型转换到对应 MarkupStyle 栏位。
HTMLElementMarkupComponentMarkupStyleVisitor
介绍完 MarkupStyle 物件后,我们要从 Normalization 的 HTMLElementComponents 结果转换成 MarkupStyle。
// MarkupStyle 策略
public enum MarkupStylePolicy {
    case respectMarkupStyleFromCode // 从 Code 来的为主, 用 HTML Style Attribute 来的填空
    case respectMarkupStyleFromHTMLStyleAttribute // 从 HTML Style Attribute 来的为主, 用 Code 来的填空
}

struct HTMLElementMarkupComponentMarkupStyleVisitor: MarkupVisitor {

    typealias Result = MarkupStyle?

    let policy: MarkupStylePolicy
    let components: [HTMLElementMarkupComponent]
    let styleAttributes: [HTMLTagStyleAttribute]

    func visit(_ markup: BoldMarkup) -> Result {
        // .bold 只是定义在 MarkupStyle 中的预设样式, 请参考 Source Code
        return defaultVisit(components.value(markup: markup), defaultStyle: .bold)
    }

    func visit(_ markup: LinkMarkup) -> Result {
        // .link 只是定义在 MarkupStyle 中的预设样式, 请参考 Source Code
        var markupStyle = defaultVisit(components.value(markup: markup), defaultStyle: .link) ?? .link

        // 从 HtmlElementComponents 取得 LinkMarkup 对应的 HtmlElement
        // 从 HtmlElement 中的 attributes 找 href 参数 (HTML 带 URL String 的方式)
        if let href = components.value(markup: markup)?.attributes?["href"] as? String,
           let url = URL(string: href) {
            markupStyle.link = url
        }
        return markupStyle
    }

    // ...
}

extension HTMLElementMarkupComponentMarkupStyleVisitor {
    // 取得 HTMLTag 容器中指定想客制化的 MarkupStyle
    private func customStyle(_ htmlElement: HTMLElementMarkupComponent.HTMLElement?) -> MarkupStyle? {
        guard let customStyle = htmlElement?.tag.customStyle else {
            return nil
        }
        return customStyle
    }

    // 预设动作
    func defaultVisit(_ htmlElement: HTMLElementMarkupComponent.HTMLElement?, defaultStyle: MarkupStyle? = nil) -> Result {
        var markupStyle: MarkupStyle? = customStyle(htmlElement) ?? defaultStyle
        // 从 HtmlElementComponents 取得 LinkMarkup 对应的 HtmlElement
        // 看看 HtmlElement 中的 attributes 有没有 `Style` Attribute
        guard let styleString = htmlElement?.attributes?["style"],
              styleAttributes.count > 0 else {
            // 没有
            return markupStyle
        }

        // 有 Style Attributes
        // 切割 Style Value 字串成阵列
        // font-size:14px;color:red -> ["font-size":"14px","color":"red"]
        let styles = styleString.split(separator: ";").filter { $0.trimmingCharacters(in: .whitespacesAndNewlines) != "" }.map { $0.split(separator: ":") }

        for style in styles {
            guard style.count == 2 else {
                continue
            }
            // e.g font-szie
            let key = style[0].trimmingCharacters(in: .whitespacesAndNewlines)
            // e.g. 14px
            let value = style[1].trimmingCharacters(in: .whitespacesAndNewlines)

            if let styleAttribute = styleAttributes.first(where: { $0.isEqualTo(styleName: key) }) {
                // 使用上文中的 HTMLTagStyleAttributeToMarkupStyleVisitor 换回 MarkupStyle
                let visitor = HTMLTagStyleAttributeToMarkupStyleVisitor(value: value)
                if var thisMarkupStyle = visitor.visit(styleAttribute: styleAttribute) {
                    // Style Attribute 有换回值时..
                    // 合并上一个 MarkupStyle 结果
                    thisMarkupStyle.fillIfNil(from: markupStyle)
                    markupStyle = thisMarkupStyle
                }
            }
        }

        // 如果有预设 Style
        if var defaultStyle = defaultStyle {
            switch policy {
                case .respectMarkupStyleFromHTMLStyleAttribute:
                  // Style Attribute MarkupStyle 为主,然后
                  // 合并 defaultStyle 结果
                    markupStyle?.fillIfNil(from: defaultStyle)
                case .respectMarkupStyleFromCode:
                  // defaultStyle 为主,然后
                  // 合并 Style Attribute MarkupStyle 结果
                  defaultStyle.fillIfNil(from: markupStyle)
                  markupStyle = defaultStyle
            }
        }

        return markupStyle
    }
}
对应原始码中的 HTMLTagAttributeToMarkupStyleVisitor.swift 实作
我们会定义部分预设样式在 MarkupStyle 中,部分 Markup 如果没有从 Code 外部指定 Tag 想要的样式时会使用预设样式。
样式继承策略有两种:
-
respectMarkupStyleFromCode: 使用预设样式为主;再看 Style Attributes 中能补上什么样式,如果本来就有值则忽略。
-
respectMarkupStyleFromHTMLStyleAttribute: 看 Style Attributes 为主;再看 预设样式 中能补上什么样式,如果本来就有值则忽略。
HTMLElementWithMarkupToMarkupStyleProcessor
将 Normalization 结果转换成 AST & MarkupStyleComponent。
新宣告一个 MarkupComponent 这次要存放对应 MarkupStyle:
struct MarkupStyleComponent: MarkupComponent {
    typealias T = MarkupStyle

    let markup: Markup
    let value: MarkupStyle
    init(markup: Markup, value: MarkupStyle) {
        self.markup = markup
        self.value = value
    }
}
简单遍历个 Markup Tree & HTMLElementMarkupComponent 结构:
let styleAttributes: [HTMLTagStyleAttribute]
let policy: MarkupStylePolicy

func process(from: (Markup, [HTMLElementMarkupComponent])) -> [MarkupStyleComponent] {
  var components: [MarkupStyleComponent] = []
  let visitor = HTMLElementMarkupComponentMarkupStyleVisitor(policy: policy, components: from.1, styleAttributes: styleAttributes)
  walk(markup: from.0, visitor: visitor, components: &components)
  return components
}

func walk(markup: Markup, visitor: HTMLElementMarkupComponentMarkupStyleVisitor, components: inout [MarkupStyleComponent]) {

  if let markupStyle = visitor.visit(markup: markup) {
    components.append(.init(markup: markup, value: markupStyle))
  }

  for markup in markup.childMarkups {
    walk(markup: markup, visitor: visitor, components: &components)
  }
}

// print(components)
// [(markup: LinkMarkup, MarkupStyle(link: https://zhgchg.li, color: .blue)]
// [(markup: BoldMarkup, MarkupStyle(font: .init(weight: .bold))]
对应原始码中的 HTMLElementWithMarkupToMarkupStyleProcessor.swift 实作
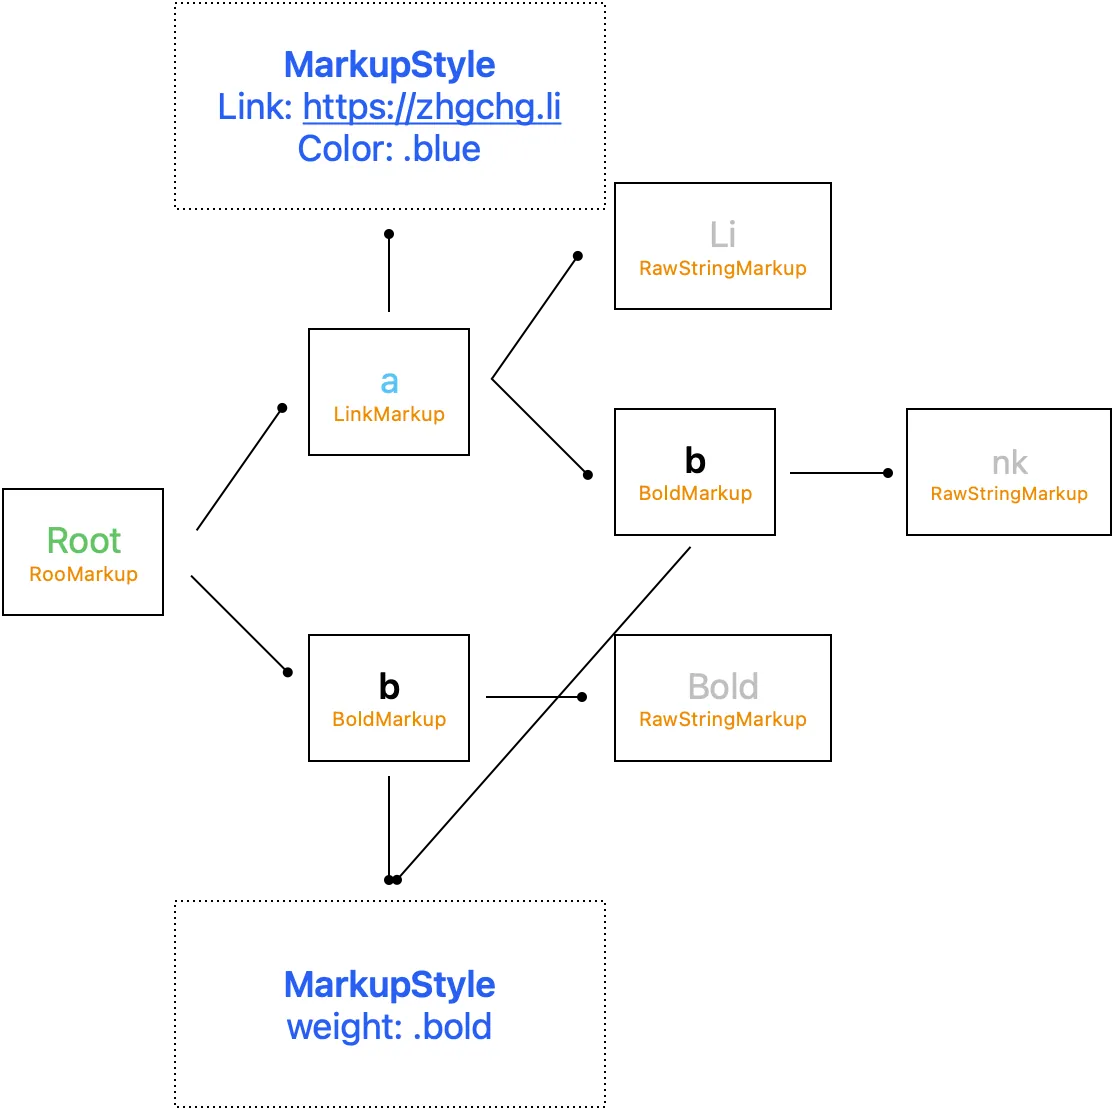
流程结果如上图
Render — Convert To NSAttributedString
现在我们有了 HTML Tag 抽象树结构、HTML Tag 对应的 MarkupStyle 后;最后一步我们就能来产出最后的 NSAttributedString 渲染结果。
MarkupNSAttributedStringVisitor
visit markup to NSAttributedString
struct MarkupNSAttributedStringVisitor: MarkupVisitor {
    typealias Result = NSAttributedString

    let components: [MarkupStyleComponent]
    // root / base 的 MarkupStyle, 外部指定,例如可指定整串字的大小
    let rootStyle: MarkupStyle?

    func visit(_ markup: RootMarkup) -> Result {
        // 往下看 RawString 物件
        return collectAttributedString(markup)
    }

    func visit(_ markup: RawStringMarkup) -> Result {
        // 回传 Raw String
        // 搜集链上的所有 MarkupStyle
        // 套用 Style 到 NSAttributedString
        return applyMarkupStyle(markup.attributedString, with: collectMarkupStyle(markup))
    }

    func visit(_ markup: BoldMarkup) -> Result {
        // 往下看 RawString 物件
        return collectAttributedString(markup)
    }

    func visit(_ markup: LinkMarkup) -> Result {
        // 往下看 RawString 物件
        return collectAttributedString(markup)
    }
    // ...
}

private extension MarkupNSAttributedStringVisitor {
    // 套用 Style 到 NSAttributedString
    func applyMarkupStyle(_ attributedString: NSAttributedString, with markupStyle: MarkupStyle?) -> NSAttributedString {
        guard let markupStyle = markupStyle else { return attributedString }
        let mutableAttributedString = NSMutableAttributedString(attributedString: attributedString)
        mutableAttributedString.addAttributes(markupStyle.render(), range: NSMakeRange(0, mutableAttributedString.string.utf16.count))
        return mutableAttributedString
    }

    func collectAttributedString(_ markup: Markup) -> NSMutableAttributedString {
        // collect from downstream
        // Root -> Bold -> String("Bold")
        //      \
        //       > String("Test")
        // Result: Bold Test
        // 一层一层往下找 raw string, 递回 visit 并组合出最终 NSAttributedString
        return markup.childMarkups.compactMap({ visit(markup: $0) }).reduce(NSMutableAttributedString()) { partialResult, attributedString in
            partialResult.append(attributedString)
            return partialResult
        }
    }

    func collectMarkupStyle(_ markup: Markup) -> MarkupStyle? {
        // collect from upstream
        // String("Test") -> Bold -> Italic -> Root
        // Result: style: Bold+Italic
        // 一层一层网上找 parent tag 的 markupstyle
        // 然后一层一层继承样式
        var currentMarkup: Markup? = markup.parentMarkup
        var currentStyle = components.value(markup: markup)
        while let thisMarkup = currentMarkup {
            guard let thisMarkupStyle = components.value(markup: thisMarkup) else {
                currentMarkup = thisMarkup.parentMarkup
                continue
            }

            if var thisCurrentStyle = currentStyle {
                thisCurrentStyle.fillIfNil(from: thisMarkupStyle)
                currentStyle = thisCurrentStyle
            } else {
                currentStyle = thisMarkupStyle
            }

            currentMarkup = thisMarkup.parentMarkup
        }

        if var currentStyle = currentStyle {
            currentStyle.fillIfNil(from: rootStyle)
            return currentStyle
        } else {
            return rootStyle
        }
    }
}
对应原始码中的 MarkupNSAttributedStringVisitor.swift 实作
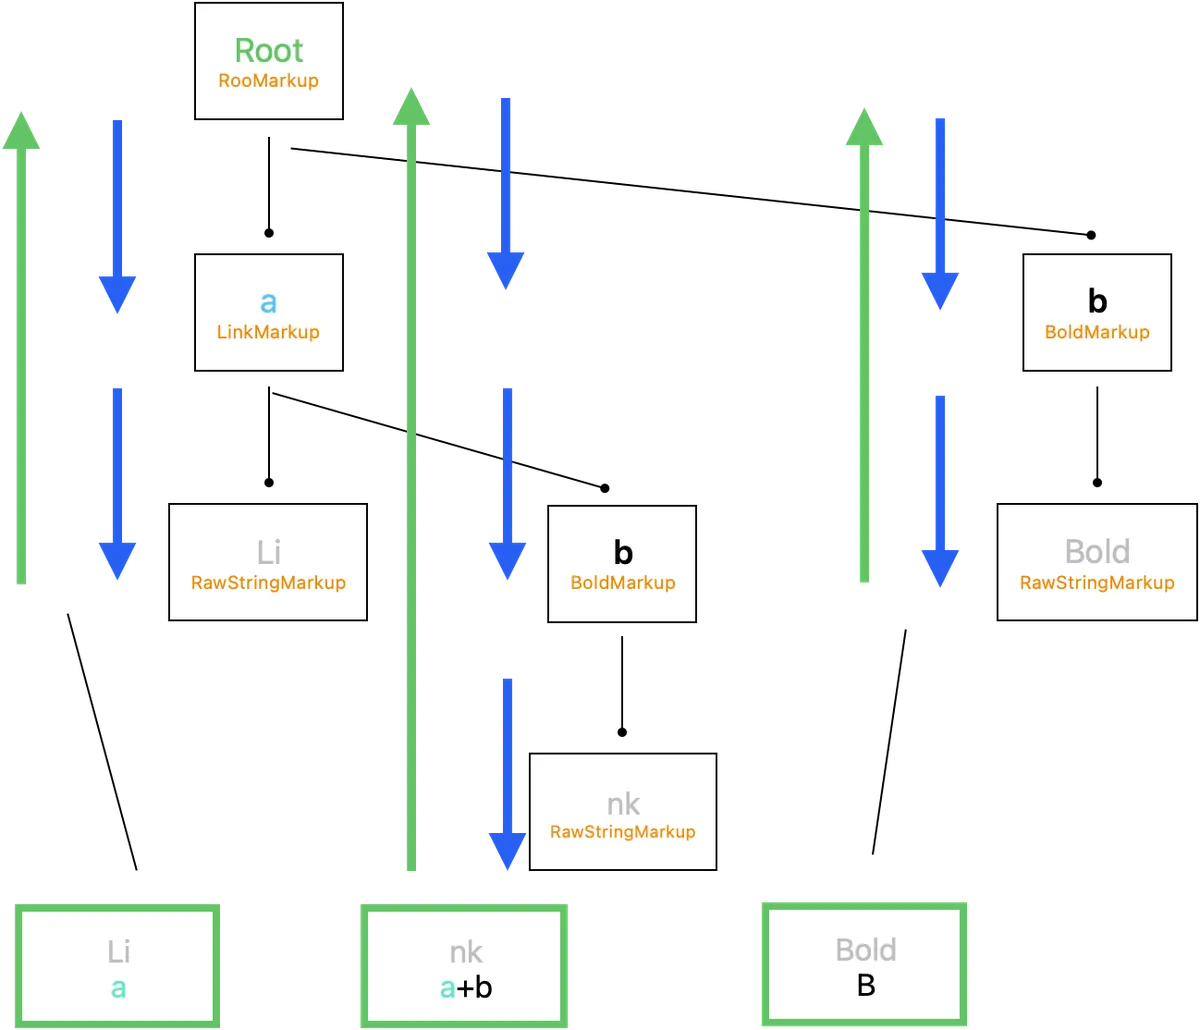
运作流程及结果如上图
最终我们可以得到:
Li{
    NSColor = "Blue";
    NSFont = "<UICTFont: 0x145d17600> font-family: \".SFUI-Regular\"; font-weight: normal; font-style: normal; font-size: 13.00pt";
    NSLink = "https://zhgchg.li";
}nk{
    NSColor = "Blue";
    NSFont = "<UICTFont: 0x145d18710> font-family: \".SFUI-Semibold\"; font-weight: bold; font-style: normal; font-size: 13.00pt";
    NSLink = "https://zhgchg.li";
}Bold{
    NSFont = "<UICTFont: 0x145d18710> font-family: \".SFUI-Semibold\"; font-weight: bold; font-style: normal; font-size: 13.00pt";
}
🎉🎉🎉🎉完成🎉🎉🎉🎉
到此我们就完成了 HTML String to NSAttributedString 的整个转换过程。
Stripper — 剥离 HTML Tag
剥离 HTML Tag 的部分相对简单,只需要:
func attributedString(_ markup: Markup) -> NSAttributedString {
  if let rawStringMarkup = markup as? RawStringMarkup {
    return rawStringMarkup.attributedString
  } else {
    return markup.childMarkups.compactMap({ attributedString($0) }).reduce(NSMutableAttributedString()) { partialResult, attributedString in
      partialResult.append(attributedString)
      return partialResult
    }
  }
}
对应原始码中的 MarkupStripperProcessor.swift 实作
类似 Render,但纯粹找到 RawStringMarkup 后返回内容。
Extend — 动态扩充
为了能扩充涵盖所有 HTMLTag/Style Attribute 所以开了一个动态扩充的口,方便直接从 Code 动态扩充物件。
public struct ExtendTagName: HTMLTagName {
    public let string: String

    public init(_ w3cHTMLTagName: WC3HTMLTagName) {
        self.string = w3cHTMLTagName.rawValue
    }

    public init(_ string: String) {
        self.string = string.trimmingCharacters(in: .whitespacesAndNewlines).lowercased()
    }

    public func accept<V>(_ visitor: V) -> V.Result where V : HTMLTagNameVisitor {
        return visitor.visit(self)
    }
}
// to
final class ExtendMarkup: Markup {
    weak var parentMarkup: Markup? = nil
    var childMarkups: [Markup] = []

    func accept<V>(_ visitor: V) -> V.Result where V : MarkupVisitor {
        return visitor.visit(self)
    }
}

//----

public struct ExtendHTMLTagStyleAttribute: HTMLTagStyleAttribute {
    public let styleName: String
    public let render: ((String) -> (MarkupStyle?)) // 动态用 clourse 变更 MarkupStyle

    public init(styleName: String, render: @escaping ((String) -> (MarkupStyle?))) {
        self.styleName = styleName
        self.render = render
    }

    public func accept<V>(_ visitor: V) -> V.Result where V : HTMLTagStyleAttributeVisitor {
        return visitor.visit(self)
    }
}
ZHTMLParserBuilder
最后我们使用 Builder Pattern 让外部 Module 可以快速构建 ZMarkupParser 所需的物件,并做好 Access Level Control。
public final class ZHTMLParserBuilder {

    private(set) var htmlTags: [HTMLTag] = []
    private(set) var styleAttributes: [HTMLTagStyleAttribute] = []
    private(set) var rootStyle: MarkupStyle?
    private(set) var policy: MarkupStylePolicy = .respectMarkupStyleFromCode

    public init() {

    }

    public static func initWithDefault() -> Self {
        var builder = Self.init()
        for htmlTagName in ZHTMLParserBuilder.htmlTagNames {
            builder = builder.add(htmlTagName)
        }
        for styleAttribute in ZHTMLParserBuilder.styleAttributes {
            builder = builder.add(styleAttribute)
        }
        return builder
    }

    public func set(_ htmlTagName: HTMLTagName, withCustomStyle markupStyle: MarkupStyle?) -> Self {
        return self.add(htmlTagName, withCustomStyle: markupStyle)
    }

    public func add(_ htmlTagName: HTMLTagName, withCustomStyle markupStyle: MarkupStyle? = nil) -> Self {
        // 同个 tagName 只能存在一个
        htmlTags.removeAll { htmlTag in
            return htmlTag.tagName.string == htmlTagName.string
        }

        htmlTags.append(HTMLTag(tagName: htmlTagName, customStyle: markupStyle))

        return self
    }

    public func add(_ styleAttribute: HTMLTagStyleAttribute) -> Self {
        styleAttributes.removeAll { thisStyleAttribute in
            return thisStyleAttribute.styleName == styleAttribute.styleName
        }

        styleAttributes.append(styleAttribute)

        return self
    }

    public func set(rootStyle: MarkupStyle) -> Self {
        self.rootStyle = rootStyle
        return self
    }

    public func set(policy: MarkupStylePolicy) -> Self {
        self.policy = policy
        return self
    }

    public func build() -> ZHTMLParser {
        // ZHTMLParser init 只开放 internal, 外部无法直接 init
        // 只能透过 ZHTMLParserBuilder init
        return ZHTMLParser(htmlTags: htmlTags, styleAttributes: styleAttributes, policy: policy, rootStyle: rootStyle)
    }
}
对应原始码中的 ZHTMLParserBuilder.swift 实作
initWithDefault 预设会加入所有已经实现的 HTMLTagName/Style Attribute
public extension ZHTMLParserBuilder {
    static var htmlTagNames: [HTMLTagName] {
        return [
            A_HTMLTagName(),
            B_HTMLTagName(),
            BR_HTMLTagName(),
            DIV_HTMLTagName(),
            HR_HTMLTagName(),
            I_HTMLTagName(),
            LI_HTMLTagName(),
            OL_HTMLTagName(),
            P_HTMLTagName(),
            SPAN_HTMLTagName(),
            STRONG_HTMLTagName(),
            U_HTMLTagName(),
            UL_HTMLTagName(),
            DEL_HTMLTagName(),
            TR_HTMLTagName(),
            TD_HTMLTagName(),
            TH_HTMLTagName(),
            TABLE_HTMLTagName(),
            IMG_HTMLTagName(handler: nil),
            // ...
        ]
    }
}

public extension ZHTMLParserBuilder {
    static var styleAttributes: [HTMLTagStyleAttribute] {
        return [
            ColorHTMLTagStyleAttribute(),
            BackgroundColorHTMLTagStyleAttribute(),
            FontSizeHTMLTagStyleAttribute(),
            FontWeightHTMLTagStyleAttribute(),
            LineHeightHTMLTagStyleAttribute(),
            WordSpacingHTMLTagStyleAttribute(),
            // ...
        ]
    }
}
ZHTMLParser init 只开放 internal,外部无法直接 init,只能透过 ZHTMLParserBuilder init。
ZHTMLParser 封装了 Render/Selector/Stripper 操作:
public final class ZHTMLParser: ZMarkupParser {
    let htmlTags: [HTMLTag]
    let styleAttributes: [HTMLTagStyleAttribute]
    let rootStyle: MarkupStyle?

    internal init(...) {
    }

    // 取得 link style attributes
    public var linkTextAttributes: [NSAttributedString.Key: Any] {
        // ...
    }

    public func selector(_ string: String) -> HTMLSelector {
        // ...
    }

    public func selector(_ attributedString: NSAttributedString) -> HTMLSelector {
        // ...
    }

    public func render(_ string: String) -> NSAttributedString {
        // ...
    }

    // 允许使用 HTMLSelector 结果渲染出节点内的 NSAttributedString
    public func render(_ selector: HTMLSelector) -> NSAttributedString {
        // ...
    }

    public func render(_ attributedString: NSAttributedString) -> NSAttributedString {
        // ...
    }

    public func stripper(_ string: String) -> String {
        // ...
    }

    public func stripper(_ attributedString: NSAttributedString) -> NSAttributedString {
        // ...
    }

  // ...
}
对应原始码中的 ZHTMLParser.swift 实作
UIKit 问题
NSAttributedString 的结果我们最常的就是放到 UITextView 中显示,但是要注意:
-
UITextView 里的连结样式是统一看
linkTextAttributes设定连结样式,不会看 NSAttributedString.Key 的设定,且无法个别设定样式;因此才会有ZMarkupParser.linkTextAttributes这个开口。 -
UILabel 暂时没有方式改变连结样式,且因 UILabel 没有 TextStroage,若要拿来载入 NSTextAttachment 图片;需要另外抓住 UILabel。
public extension UITextView {
    func setHtmlString(_ string: String, with parser: ZHTMLParser) {
        self.setHtmlString(NSAttributedString(string: string), with: parser)
    }

    func setHtmlString(_ string: NSAttributedString, with parser: ZHTMLParser) {
        self.attributedText = parser.render(string)
        self.linkTextAttributes = parser.linkTextAttributes
    }
}
public extension UILabel {
    func setHtmlString(_ string: String, with parser: ZHTMLParser) {
        self.setHtmlString(NSAttributedString(string: string), with: parser)
    }

    func setHtmlString(_ string: NSAttributedString, with parser: ZHTMLParser) {
        let attributedString = parser.render(string)
        attributedString.enumerateAttribute(NSAttributedString.Key.attachment, in: NSMakeRange(0, attributedString.string.utf16.count), options: []) { (value, effectiveRange, nil) in
            guard let attachment = value as? ZNSTextAttachment else {
                return
            }

            attachment.register(self)
        }

        self.attributedText = attributedString
    }
}
因此多 Extension 了 UIKit,外部只需无脑 setHTMLString() 即可完成绑定。
复杂的渲染项目— 项目清单
关于项目清单的实现纪录。
在 HTML 中使用 <ol> / <ul> 包装 <li> 表示项目清单:
<ul>
    <li>ItemA</li>
    <li>ItemB</li>
    <li>ItemC</li>
    //...
</ul>
使用同前文解析方式,我们可以在 visit(_ markup: ListItemMarkup) 取得其他 list item 知道当前 list index (得利于有转换成 AST)。
func visit(_ markup: ListItemMarkup) -> Result {
  let siblingListItems = markup.parentMarkup?.childMarkups.filter({ $0 is ListItemMarkup }) ?? []
  let position = (siblingListItems.firstIndex(where: { $0 === markup }) ?? 0)
}
NSParagraphStyle 有一个 NSTextList 物件可以用来显示 list item,但是在实作上无法客制化空白的宽度 (个人觉得空白太大),如果项目符号与字串中间有空白会让换行触发在此,显示会有点奇怪,如下图:
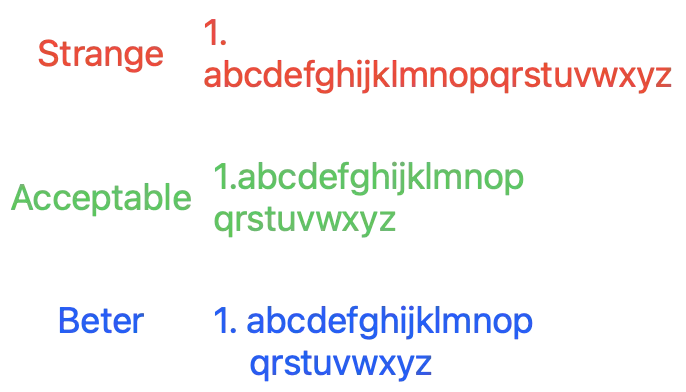
Beter 部分有机会透过 设定 headIndent, firstLineHeadIndent, NSTextTab 实现,但是测试发现字串太长、大小有变还是无法完美呈现结果。
目前只做到 Acceptable,自己组合项目清单字串 insert 到字串前。
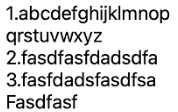
我们只使用到 NSTextList.MarkerFormat 用来产项目清单符号,而不是直接使用 NSTextList。
清单符号支援列表可参考: MarkupStyleList.swift
最终显示结果:( <ol><li> )
复杂的渲染项目 — Table
类似 清单项目的实现,但是是表格。
在 HTML 中使用 <table> 表格->包装 <tr> 表格列->包装 <td>/<th> 表示表格栏位:
<table>
  <tr>
    <th>Company</th>
    <th>Contact</th>
    <th>Country</th>
  </tr>
  <tr>
    <td>Alfreds Futterkiste</td>
    <td>Maria Anders</td>
    <td>Germany</td>
  </tr>
  <tr>
    <td>Centro comercial Moctezuma</td>
    <td>Francisco Chang</td>
    <td>Mexico</td>
  </tr>
</table>
实测原生的 NSAttributedString.DocumentType.html 是用 Private macOS API NSTextBlock 来完成显示,因此能完整显示 HTML 表格样式及内容。
有点作弊!我们无法用 Private API 🥲
    func visit(_ markup: TableColumnMarkup) -> Result {
        let attributedString = collectAttributedString(markup)
        let siblingColumns = markup.parentMarkup?.childMarkups.filter({ $0 is TableColumnMarkup }) ?? []
        let position = (siblingColumns.firstIndex(where: { $0 === markup }) ?? 0)

        // 有无从外部指定想要的宽度, 可设 .max 不 truncated string
        var maxLength: Int? = markup.fixedMaxLength
        if maxLength == nil {
            // 没指定则找到第一行同一栏的 String length 做为 max length
            if let tableRowMarkup = markup.parentMarkup as? TableRowMarkup,
               let firstTableRow = tableRowMarkup.parentMarkup?.childMarkups.first(where: { $0 is TableRowMarkup }) as? TableRowMarkup {
                let firstTableRowColumns = firstTableRow.childMarkups.filter({ $0 is TableColumnMarkup })
                if firstTableRowColumns.indices.contains(position) {
                    let firstTableRowColumnAttributedString = collectAttributedString(firstTableRowColumns[position])
                    let length = firstTableRowColumnAttributedString.string.utf16.count
                    maxLength = length
                }
            }
        }

        if let maxLength = maxLength {
            // 栏位超过 maxLength 则 truncated string
            if attributedString.string.utf16.count > maxLength {
                attributedString.mutableString.setString(String(attributedString.string.prefix(maxLength))+"...")
            } else {
                attributedString.mutableString.setString(attributedString.string.padding(toLength: maxLength, withPad: " ", startingAt: 0))
            }
        }

        if position < siblingColumns.count - 1 {
            // 新增空白做为 spacing, 外部可指定 spacing 宽度几个空白字
            attributedString.append(makeString(in: markup, string: String(repeating: " ", count: markup.spacing)))
        }

        return attributedString
    }

    func visit(_ markup: TableRowMarkup) -> Result {
        let attributedString = collectAttributedString(markup)
        attributedString.append(makeBreakLine(in: markup)) // 新增换行, 详细请参考 Source Code
        return attributedString
    }

    func visit(_ markup: TableMarkup) -> Result {
        let attributedString = collectAttributedString(markup)
        attributedString.append(makeBreakLine(in: markup)) // 新增换行, 详细请参考 Source Code
        attributedString.insert(makeBreakLine(in: markup), at: 0) // 新增换行, 详细请参考 Source Code
        return attributedString
    }
最终呈现效果如下图:
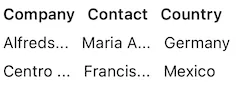
not perfect, but acceptable.
复杂的渲染项目 — Image
最终来讲一个最大的魔王,载入远端图片到 NSAttributedString。
在 HTML 中使用 <img> 表示图片:
<img src="https://user-images.githubusercontent.com/33706588/219608966-20e0c017-d05c-433a-9a52-091bc0cfd403.jpg" width="300" height="125"/>
并可透过 width / height HTML Attribute 指定想要的显示大小。
在 NSAttributedString 中显示图片,比想像中复杂很多;且没有很好的实现,之前做 UITextView 文绕图 时有稍微踩过坑,但这次在研究一轮发现还是没有一个完美的解决方案。
目前先忽略 NSTextAttachment 原生不能 reuse 释放记忆体的问题,先只实现从远端下载图片放到 NSTextAttachment 在放到 NSAttributedString 中,并实现自动更新内容。
此系列操作又再拆到另一个小的 Project 实现,想说日后比较好优化跟复用到其他 Project:
主要是参考 Asynchronous NSTextAttachments 这系列文章实现,但是替换了最后的更新内容部分(下载完后要刷新 UI 才会呈现)还有增加 Delegate/DataSource 给外部扩充使用。
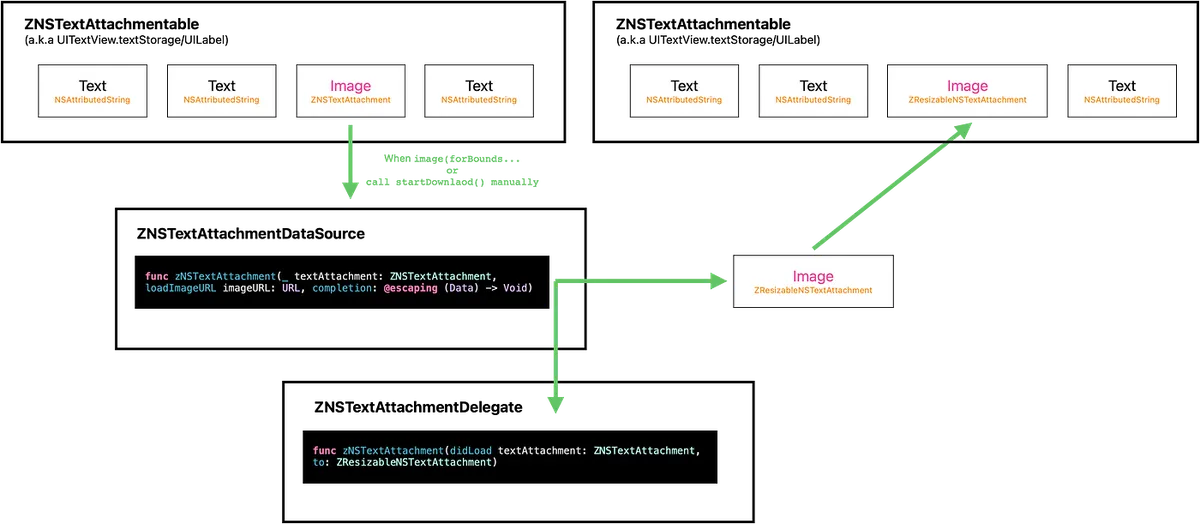
运做流程与关系如上图
-
宣告 ZNSTextAttachmentable 物件,封装 NSTextStorage 物件(UITextView自带)及 UILabel 本身 (UILabel 无 NSTextStorage) 操作方法仅为实现 replace attributedString from NSRange. (
func replace(attachment: ZNSTextAttachment, to: ZResizableNSTextAttachment)) -
实现原理是先使用
ZNSTextAttachment包装 imageURL、PlaceholderImage、显要显示的大小资讯,然后先用 placeHolder 直接显示图片 -
当 系统需要此图片在画面时会呼叫
image(forBounds…方法,此时我们开始下载 Image Data -
DataSource 出去让外部可决定怎么下载或实现 Image Cache Policy,预设直接使用 URLSession 请求图片 Data
-
下载完成后 new 一个新的
ZResizableNSTextAttachment并在attachmentBounds(for…实现自定图片大小的逻辑 -
呼叫
replace(attachment: ZNSTextAttachment, to: ZResizableNSTextAttachment)方法,将ZNSTextAttachment位置替换为ZResizableNSTextAttachment -
发出 didLoad Delegate 通知,让外部有需要时可串接
-
完成
详细程式码可参考 Source Code 。
不使用 NSLayoutManager.invalidateLayout(forCharacterRange: range, actualCharacterRange: nil) 、 NSLayoutManager.invalidateDisplay(forCharacterRange: range) 刷新 UI 的原因是发现 UI 没有正确的显示更新;既然都知道所在 Range 了,直接触发取代 NSAttributedString,能确保 UI 正确更新。
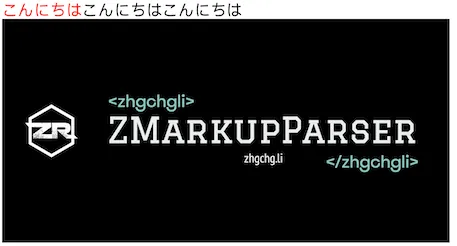
最终显示结果如下:
<span style="color:red">こんにちは</span>こんにちはこんにちは <br />
<img src="https://user-images.githubusercontent.com/33706588/219608966-20e0c017-d05c-433a-9a52-091bc0cfd403.jpg"/>
Testing & Continuous Integration
这次专案除了撰写 Unit Test 单元测试之外还建立了 Snapshot Test 做整合测试方便对最终的 NSAttributedString 做综观的测试比较。
主要功能逻辑都有 UnitTests 并加上整合测试,最终 Test Coverage 在 85% 左右。
![]()
Snapshot Test
直接引入框架使用:
import SnapshotTesting
// ...
func testShouldKeppNSAttributedString() {
  let parser = ZHTMLParserBuilder.initWithDefault().build()
  let textView = UITextView()
  textView.frame.size.width = 390
  textView.isScrollEnabled = false
  textView.backgroundColor = .white
  textView.setHtmlString("html string...", with: parser)
  textView.layoutIfNeeded()
  assertSnapshot(matching: textView, as: .image, record: false)
}
// ...
直接比对最终结果是否符合预期,确保调整整合起来没有异常。
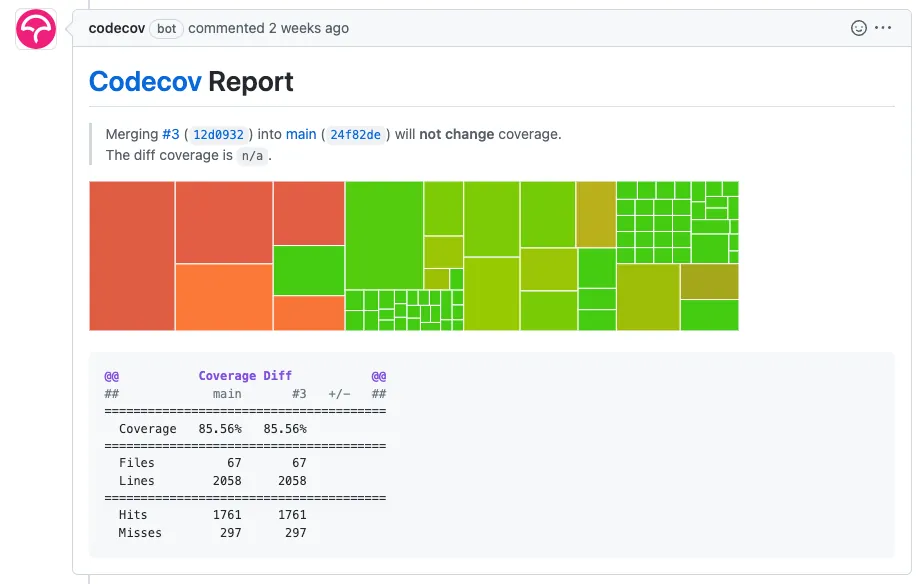
Codecov Test Coverage
串接 Codecov.io (free for Public Repo) 评估 Test Coverage,只需安装 Codecov Github App & 设计即可。
![]()
Codecov <-> Github Repo 设定好后,也可以在专案根目录加上 codecov.yml
comment:                  # this is a top-level key
  layout: "reach, diff, flags, files"
  behavior: default
  require_changes: false  # if true: only post the comment if coverage changes
  require_base: no        # [yes :: must have a base report to post]
  require_head: yes       # [yes :: must have a head report to post]
设定档,这样可以启用每个 PR 发出后,自动把 CI 跑的结果 Comment 到内容。
Continuous Integration
Github Action, CI 整合: ci.yml
name: CI

on:
  workflow_dispatch:
  pull_request:
    types: [opened, reopened]
  push:
    branches:
    - main

jobs:
  build:
    runs-on: self-hosted
    steps:
      - uses: actions/checkout@v3
      - name: spm build and test
        run: \\|
          set -o pipefail
          xcodebuild test -workspace ZMarkupParser.xcworkspace -testPlan ZMarkupParser -scheme ZMarkupParser -enableCodeCoverage YES -resultBundlePath './scripts/TestResult.xcresult' -destination 'platform=iOS Simulator,name=iPhone 14,OS=16.1' build test \\| xcpretty
      - name: Codecov
        uses: codecov/[email protected]
        with:
          xcode: true
          xcode_archive_path: './scripts/TestResult.xcresult'
此设定是在 PR opened/reopend or push main branch 时跑 build and test 最后把 test coverage 报告上传到 codecov.
Regex
关于正规表示法,每用到一次就又再精进一次;这次实际没用到太多,但是因为本来想用一个正则挖出成对的 HTML Tag 所以也多研究过要怎么撰写。
一些这次新学习的 cheat sheet 笔记…
-
?:可以让 ( ) 匹配 group 结果,但不会捕获返回 e.g.(?:https?:\/\/)?(?:www\.)?example\.com在https://www,example.com会返回整个网址而不是https://,www -
.+?非贪婪的匹配 (找到最近的就返回) e.g.<.+?>在<a>test</a>会返回<a>,</a>而非整个字串 -
(?=XYZ)任何字串直到XYZ字串出现;要注意,另一个与之相似的[^XYZ]是代表任何字串直到X or Y or Z字元出现 e.g.(?:__)(.+?(?=__))(?:__)(任何字串直到__) 会匹配出test -
?R递回往内找一样规则的值 e.g.\((?:[^()]\\|((?R)))+\)在(simple) (and(nested))会匹配出(simple),(and(nested)),(nested) -
?<GroupName>…\k<GroupName>匹配前面的 Group Name e.g.(?<tagName><a>).*(\k<GroupName>) -
(?(X)yes\\|no)第X个匹配结果有值(也可以用 Group Name)时则匹配后面条件yes否则匹配noSwift 暂时不支援
其他 Regex 好文:
-
正则表达式是如何运作的? -> 后续优化此专案的正则效能时可参考
Swift Package Manager & Cocoapods
这也是我第一次开发 SPM & Cocoapods…蛮有趣的,SPM 真的方便;但是踩到同时两个专案依赖同个套件的话,同时开两个专案会有其中一个找不到该套件然后 Build 不起来。。。
Cocoapods 有上传 ZMarkupParser 但没测试正不正常,因为我是用 SPM 😝。
ChatGPT
实际搭配开发体验下来,觉得只有在协助润稿 Readme 时最有用;在开发上目前没体会到有感的地方;因为询问 mid-senior 以上的问题,他也给不出个确切答案甚是是错误的答案 (有遇到问他一些正则规则,答案不太正确),所以最后还是回到 Google 人工找正确解答。
更不要说请他写 Code 了,除非是简单的 Code Gen Object;不然不要幻想他能直接完成整个工具架构。 (至少目前是这样,感觉写 Code 这块 Copilot 可能更有帮助)
但他可以给一些知识盲区的大方向,让我们能快速大略知道某些地方应该会怎么做;有的时候掌握度太低,在 Google 反而很难快速定位到正确的方向,这时候 ChatGPT 就蛮有帮助的。
声明
历经三个多月的研究及开发,已疲惫不堪,但还是要声明一下此做法仅为我研究后得到的可行结果,不一定是最佳解,或还有可优化的地方,这专案更像是一个抛砖引玉,希望能得到一个 Markup Language to NSAttributedString 的完美解答, 非常欢迎大家贡献;有许多事项还需要群众的力量才能完善 。
Contributing

这边先列一些此时此刻(2023/03/12)想到能更好的地方,之后会在 Repo 上纪录:
-
效能/算法的优化,虽然比原生
NSAttributedString.DocumentType.html快速且稳定;但还有需多优化空间,我相信效能绝对不如 XMLParser;希望有朝一日能有同样的效能但又能保持客制化及自动修正容错 -
支援更多 HTML Tag、Style Attribute 转换解析
-
ZNSTextAttachment 再优化,实现 reuse 能,释放记忆体;可能要研究 CoreText
-
支援 Markdown 解析,因底层抽象其实不局限于 HTML;所以只要建好前面的 Markdown 转 Markup 物件就能完成 Markdown 解析;因此我取名叫 ZMarkupParser,而不是 ZHTMLParser,就是希望有朝一日也能支援 Markdown to NSAttributedString
-
支援 Any to Any, e.g. HTML To Markdown, Markdown To HTML,因我们有原始的 AST 树(Markup 物件),所以实现任意 Markup 间的转换是有机会的
-
实现 css
!important功能,加强抽象 MarkupStyle 的继承策略 -
加强 HTML Selector 功能,目前只是最粗浅的 filter 功能
-
好多好多, 欢迎开 issue
如果您心有余而力不足,也可以透过给我一颗 ⭐ 让 Repo 可以被更多人看见,进而让 Github 大神有机会协助贡献!
总结

以上就是我开发 ZMarkupParser 的所有技术细节及心路历程,花费了我快三个月的下班及假日时间,无数的研究及实践过程,到撰写测试、提升 Test Coverage、建立 CI;最后才有一个看起来有点样子的成果;希望这个工具有解决掉有相同困扰的朋友,也希望大家能一起让这个工具变得更好。

目前有应用在敝司 pinkoi.com 的 iOS 版 App 上,没有发现问题。😄


留言 · Comments