
无痛转移 Medium 到自架网站
将 Medium 内容搬迁至 Github Pages (with Jekyll/Chirpy)
背景
经营 Medium 的第四年,已累积超过 65 篇文章,将近 1000+ 小时的时间心血;当初会选择 Medium 的原因是简单方便,可以很好的把心思放在撰写文章上,不需要去管其他的事;在此之前曾经尝试过自架 Wordpress,但都把心思放在弄环境、样式、Plguin 这些事情上,感觉怎么调整都不满意,调整好后又发现载入太慢、阅读体验不佳、后台撰写文章介面也不够人性化,然后就没怎么在更新了。
随著在 Medium 撰写的文章越来越多、累积了一些流量与追踪者后,又开始想自己掌握著这些成果,而不是被第三方平台掌控 (e.g Medium 关站心血全没),所以从前年开始就一直在寻觅第二备份网站,会持续经营 Medium 但也会同步把内容发布到自己能掌控的网站上;当时找到的解决方案是 — Google Site 但老实说只能当成个人「入口网站」使用,文章撰写界面功能有限,无法真的把所有文章心血搬过去。
最终还是走回自架的的道路,不同的是采用的并非动态网站(e.g. wordpress),而是静态网站;相较之下能支援的功能较少,但是我要的就是文章撰写功能跟简洁流畅可客制化的浏览体验,其他都不需要!
静态网站的工作流程是:在本地使用 Markdown 格式撰写好文章,然后将其透过静态网站引擎转换为 静态网页 上传到伺服器,即完成;静态网页,浏览体验快速!
使用 Markdown 格式写作,可以让文章兼容更多不同平台;如不习惯,也可以找线上或线下的 Markdown 撰写工具,体验就跟直接在 Medium 撰写一样!。
综合以上,这个方案可以达成我希望流畅的浏览体验及方便的撰写界面两个维度的需求。
成果
-
支援客制化显示样式
-
支援客制化页面调整 (e.g. 插入广告、js widget)
-
支援自订页面
-
支援自订域名
-
静态化页面载入快速、浏览体验佳
-
使用 Git 版本控制,文章所有的历史版本都能保留恢复
-
全自动定时自动同步 Medium 文章到网站
2025/01/18 Update 🎉🎉🎉
环境及工具
-
环境语言 :Ruby
-
依赖管理工具 : RubyGems.org 、 Bundler
-
静态网站引擎 : Jekyll (Based on Ruby)
-
文章格式 :Markdown
-
伺服器 : Github Page (免费、无限流量/容量 静态网站伺服器)
-
CI/CD : Github Action (免费 2,000 mins+/月)
-
Medium 文章转换 Markdown 工具 : ZMediumToMarkdown (Based on Ruby)
-
版本控制 : Git
-
(可选) Git GUI : Git Fork
-
(可选) 网域服务 : Namecheap
安装 Ruby
这边只以我的环境为例,其他作业系统版本请 Google 如何安装 Ruby 。
-
macOS Monterey 12.1
-
rbenv
-
ruby 2.6.5
安装 Brew
/bin/bash -c "$(curl -fsSL https://raw.githubusercontent.com/Homebrew/install/HEAD/install.sh)"
在 Terminal 输入以上指令安装 Brew。
安装 rbenv
brew install rbenv ruby-build
MacOS 虽自带 Ruby 但建议使用 rbenv 安装另一个 Ruby 与系统自带的区隔开来,在 Terminal 输入以上指令安装 rbenv。
rbenv init
在 Terminal 输入以上指令初始化 rbenv
- 关闭&重新打开 Terminal。
在 Terminal 输入 rbenv 检查是否安装成功!
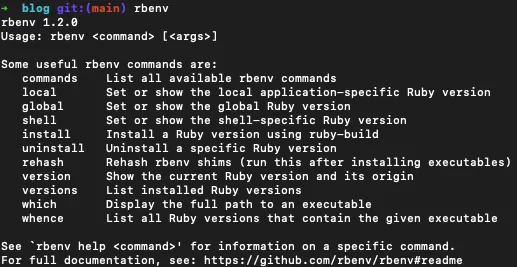
成功!
使用 rbenv 安装 Ruby
rbenv install 2.6.5
在 Terminal 输入以上指令安装 Ruby 2.6.5 版本。
rbenv global 2.6.5
在 Terminal 输入以上指令将 Terminal 所使用的 Ruby 版本从系统自带的切换到 rbenv 的版本。
在 Terminal 输入 rbenv versions 查看当前设定:

在 Terminal 输入 ruby -v 查看当前 Ruby、 gem -v 查看当前 RubyGems 状况:

*Ruby 安装完后理应也安装好 RubyGems 了。
成功!
安装 Jekyll & Bundler & ZMediumToMarkdown
gem install jekyll bundler ZMediumToMarkdown
在 Terminal 输入以上指令安装 Jekyll & Bundler & ZMediumToMarkdown。
完成!
从模版建立 Jekyll Blog
预设的 Jekyll Blog 样式非常简洁,我们可以从以下网站找到自己喜欢的样式并套用:
安装方式一般使用 gem-based themes ,也有的 Repo 提供 Fork 方式安装;甚至是提供直接一键安装方式;总之每个模板的安装方式可能有所不同,请参阅模板的教学使用。
另外要注意,因我们要部署到 Github Pages 上,依据官方文件所说并非所有模板都能适用。
Chirpy 模版
这边就以我 Blog 采用的模版 Chirpy 为示范,此模版提供最傻瓜的一键安装方式,可以直接使用。
其他模版比较少有提供类似的一键安装,在不熟悉 Jeklly、Github Pages 的情况下先使用此模版是比较好入门的方式;日后有机会再更新文章讲其他的模版安装方式。
另外在 Github 上找可以直接 Fork 的模版也可以(e.g. al-folio )直接使用,如果都不是,是需要自己手动安装的模版就要自行研究如何设定 Github Pages 部署,这边我稍微研究了一下没成功,待日后有结果再回来文章补充分享。
从 Git Template 建立 Git Repo
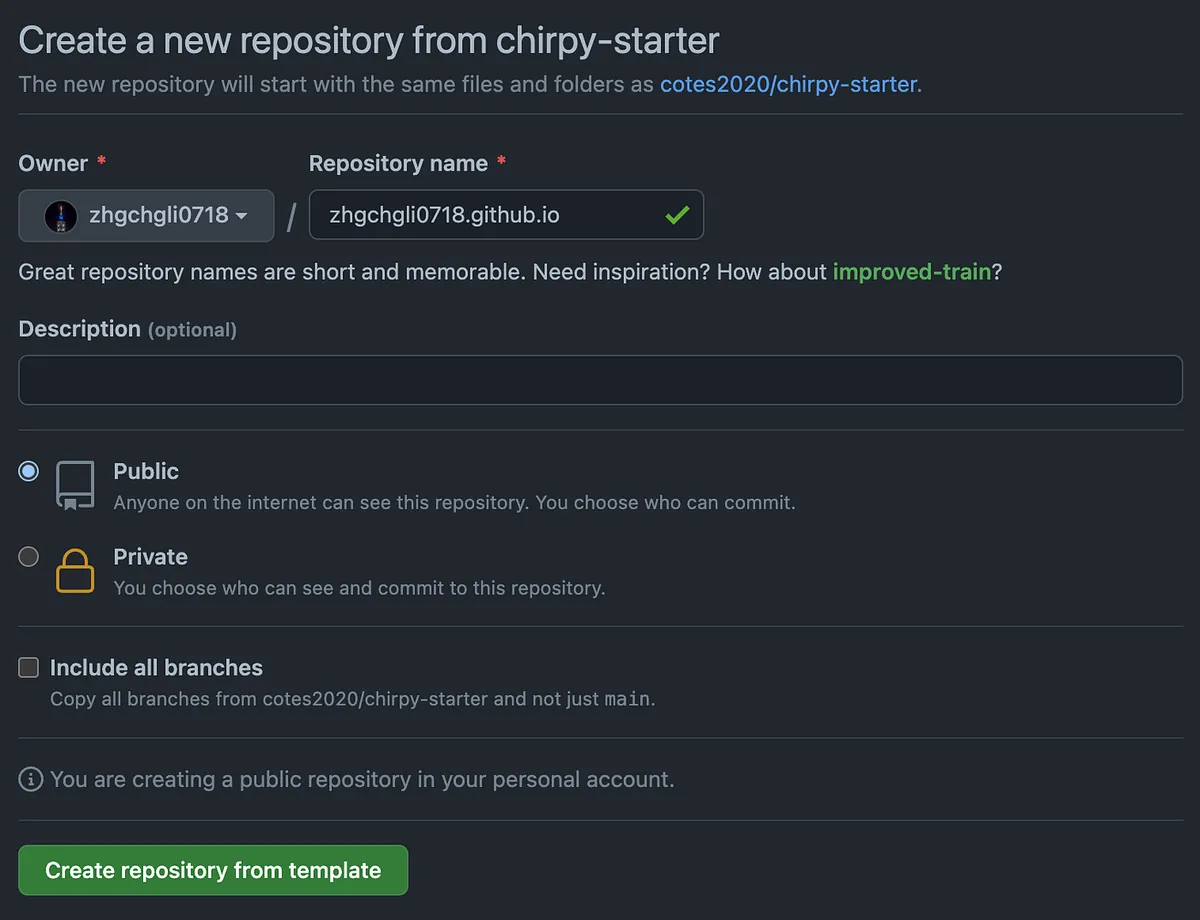
https://github.com/cotes2020/chirpy-starter/generate
-
Repository name:
Github帐号/组织名称.github.io( 务必使用这个格式 ) -
务必选择「Public」公开 Repo
点击「Create repository from template」
完成 Repo 建立。
Git Clone 专案
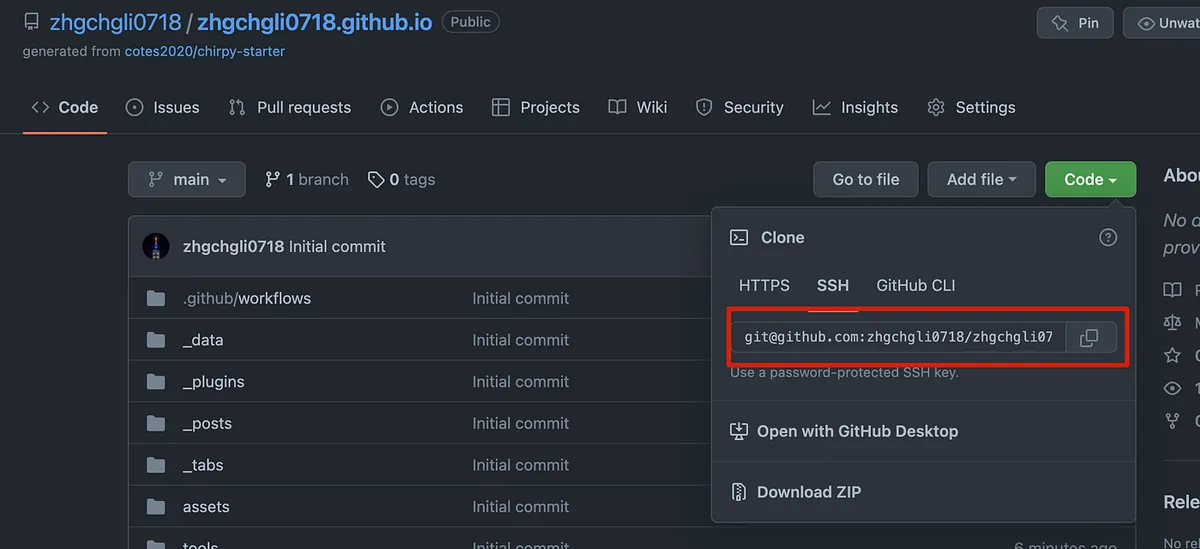
git clone [email protected]:zhgchgli0718/zhgchgli0718.github.io.git
git clone 刚刚建立的 Repo。
执行 bundle 安装依赖:
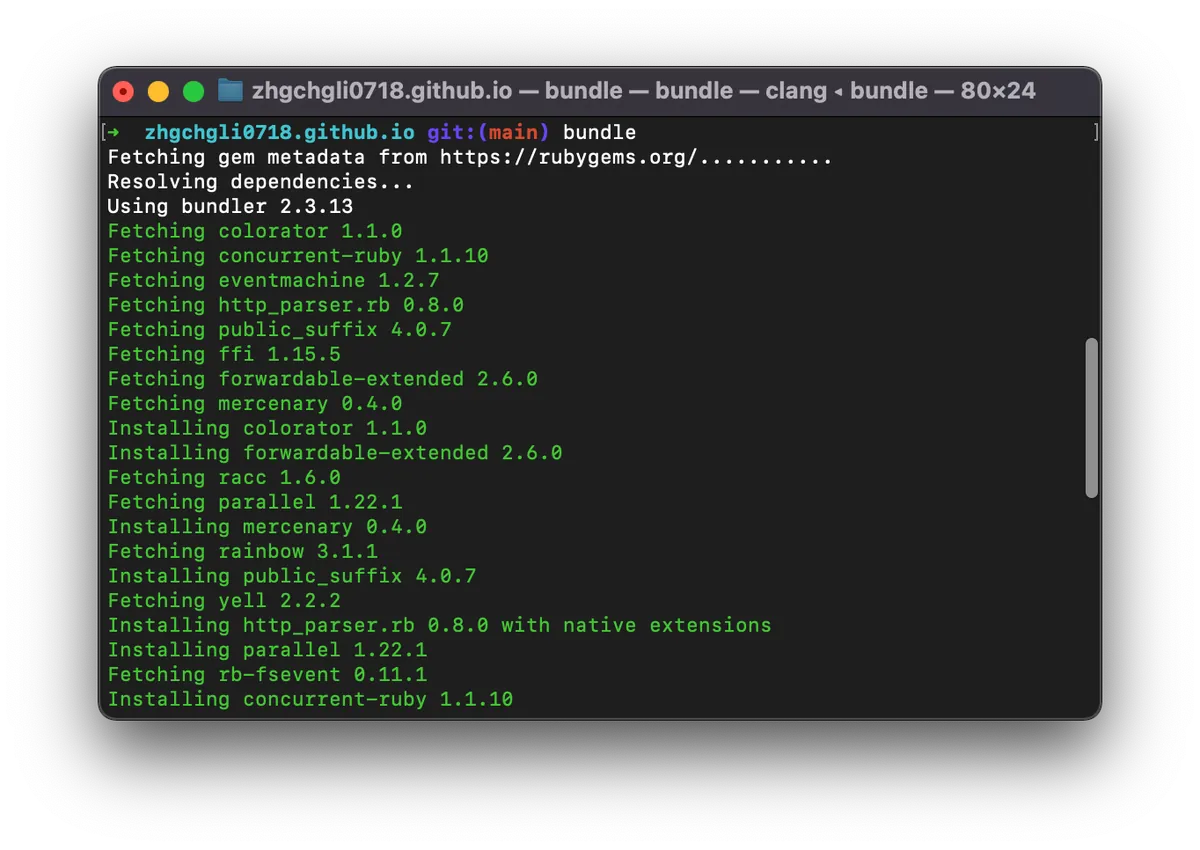
执行 bundle lock — add-platform x86_64-linux 锁定版本

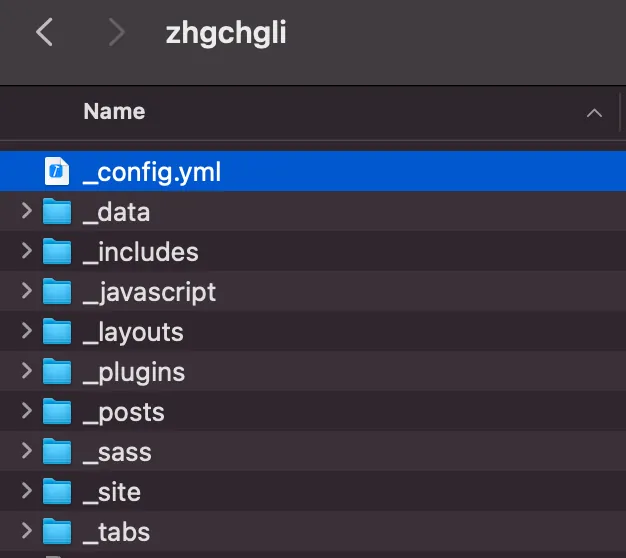
修改网站设定
打开 _config.yml 设定档案进行设定:
# The Site Configuration

# Import the theme
theme: jekyll-theme-chirpy

# Change the following value to '/PROJECT_NAME' ONLY IF your site type is GitHub Pages Project sites
# and doesn't have a custom domain.
# baseurl: ''

# The language of the webpage › http://www.lingoes.net/en/translator/langcode.htm
# If it has the same name as one of the files in folder `_data/locales`, the layout language will also be changed,
# otherwise, the layout language will use the default value of 'en'.
lang: en

# Additional parameters for datetime localization, optional. › https://github.com/iamkun/dayjs/tree/dev/src/locale
prefer_datetime_locale:

# Change to your timezone › http://www.timezoneconverter.com/cgi-bin/findzone/findzone
timezone:

# jekyll-seo-tag settings › https://github.com/jekyll/jekyll-seo-tag/blob/master/docs/usage.md
# ↓ --------------------------

title: ZhgChgLi                          # the main title

tagline: Live a life you will remember.   # it will display as the sub-title

description: >-                        # used by seo meta and the atom feed
    ZhgChgLi iOS Developer 求知若渴 教学相长 更爱电影/美剧/西音/运动/生活

# fill in the protocol & hostname for your site, e.g., 'https://username.github.io'
url: 'https://zhgchg.li'

github:
  username: ZhgChgLi             # change to your github username

twitter:
  username: zhgchgli            # change to your twitter username

social:
  # Change to your full name.
  # It will be displayed as the default author of the posts and the copyright owner in the Footer
  name: ZhgChgLi
  email: [email protected]             # change to your email address
  links:
    - https://medium.com/@zhgchgli
    - https://github.com/ZhgChgLi
    - https://www.linkedin.com/in/zhgchgli

google_site_verification:               # fill in to your verification string

# ↑ --------------------------
# The end of `jekyll-seo-tag` settings

google_analytics:
  id: G-6WZJENT8WR                 # fill in your Google Analytics ID
  # Google Analytics pageviews report settings
  pv:
    proxy_endpoint:   # fill in the Google Analytics superProxy endpoint of Google App Engine
    cache_path:       # the local PV cache data, friendly to visitors from GFW region

# Prefer color scheme setting.
#
# Note: Keep empty will follow the system prefer color by default,
# and there will be a toggle to switch the theme between dark and light
# on the bottom left of the sidebar.
#
# Available options:
#
#     light  - Use the light color scheme
#     dark   - Use the dark color scheme
#
theme_mode:   # [light\\|dark]

# The CDN endpoint for images.
# Notice that once it is assigned, the CDN url
# will be added to all image (site avatar & posts' images) paths starting with '/'
#
# e.g. 'https://cdn.com'
img_cdn:

# the avatar on sidebar, support local or CORS resources
avatar: '/assets/images/zhgchgli.jpg'

# boolean type, the global switch for ToC in posts.
toc: true

comments:
  active: disqus        # The global switch for posts comments, e.g., 'disqus'.  Keep it empty means disable
  # The active options are as follows:
  disqus:
    shortname: zhgchgli    # fill with the Disqus shortname. › https://help.disqus.com/en/articles/1717111-what-s-a-shortname
  # utterances settings › https://utteranc.es/
  utterances:
    repo:         # <gh-username>/<repo>
    issue_term:   # < url \\| pathname \\| title \\| ...>
  # Giscus options › https://giscus.app
  giscus:
    repo:             # <gh-username>/<repo>
    repo_id:
    category:
    category_id:
    mapping:          # optional, default to 'pathname'
    input_position:   # optional, default to 'bottom'
    lang:             # optional, default to the value of `site.lang`

# Self-hosted static assets, optional › https://github.com/cotes2020/chirpy-static-assets
assets:
  self_host:
    enabled:      # boolean, keep empty means false
    # specify the Jekyll environment, empty means both
    # only works if `assets.self_host.enabled` is 'true'
    env:          # [development\\|production]

paginate: 10

# ------------ The following options are not recommended to be modified ------------------

kramdown:
  syntax_highlighter: rouge
  syntax_highlighter_opts:   # Rouge Options › https://github.com/jneen/rouge#full-options
    css_class: highlight
    # default_lang: console
    span:
      line_numbers: false
    block:
      line_numbers: true
      start_line: 1

collections:
  tabs:
    output: true
    sort_by: order

defaults:
  - scope:
      path: ''          # An empty string here means all files in the project
      type: posts
    values:
      layout: post
      comments: true    # Enable comments in posts.
      toc: true         # Display TOC column in posts.
      # DO NOT modify the following parameter unless you are confident enough
      # to update the code of all other post links in this project.
      permalink: /posts/:title/
  - scope:
      path: _drafts
    values:
      comments: false
  - scope:
      path: ''
      type: tabs             # see `site.collections`
    values:
      layout: page
      permalink: /:title/
  - scope:
      path: assets/img/favicons
    values:
      swcache: true
  - scope:
      path: assets/js/dist
    values:
      swcache: true

sass:
  style: compressed

compress_html:
  clippings: all
  comments: all
  endings: all
  profile: false
  blanklines: false
  ignore:
    envs: [development]

exclude:
  - '*.gem'
  - '*.gemspec'
  - tools
  - README.md
  - LICENSE
  - gulpfile.js
  - node_modules
  - package*.json

jekyll-archives:
  enabled: [categories, tags]
  layouts:
    category: category
    tag: tag
  permalinks:
    tag: /tags/:name/
    category: /categories/:name/
请依照注解将设定替换成您的内容。
⚠️ _config.yml 有调整都需要重新启动本地网站!才会套用效果
预览网站
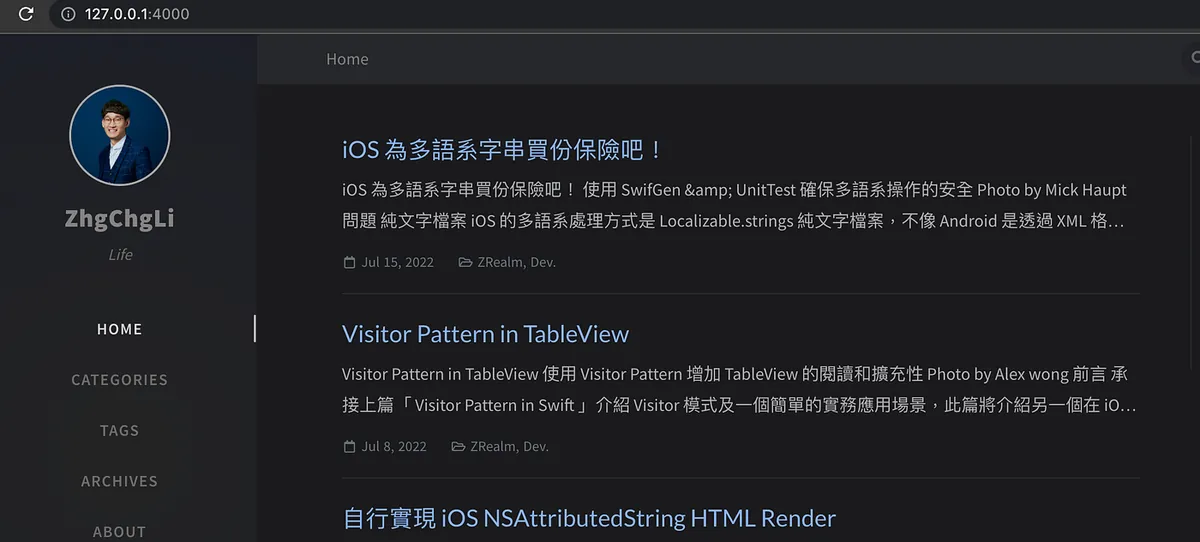
依赖安装完成后,
可以下 bundle exec jekyll s 启动本地网站:
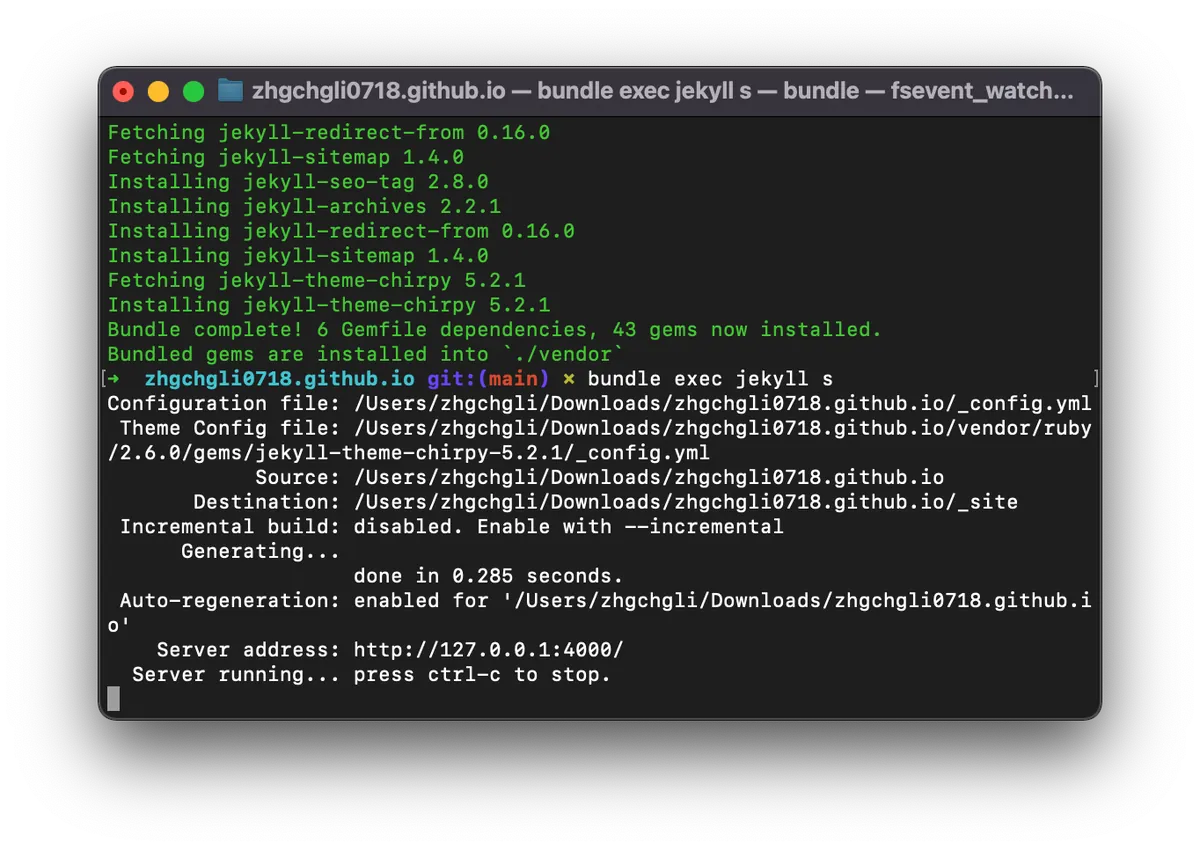
复制其中的网址 http://127.0.0.1:4000/ 贴到浏览器打开

本地预览成功!
此 Terminal 开著,本地网站就开著,Terminal 会持续更新网站存取纪录,方便我们除错。
我们可以再开一个新的 Termnial 做后续的其他操作。
Jeklly 目录结构
依照样板不同可能会有不同的资料夹跟设定档案,文章目录在:
-
_posts/ :文章会放在这个目录下 文章档案命名规则:
YYYY–MM–DD-文章档案名称.md -
assets/ : 网站资源目录,网站用图片或 文章内的图片 都要放置于此
其他目录 _incloudes、_layouts、_sites、_tabs… 都可让你做进阶的扩充修改。
Jeklly 使用 Liquid 做为页面模板引擎,页面模板是类似继承方式组成:
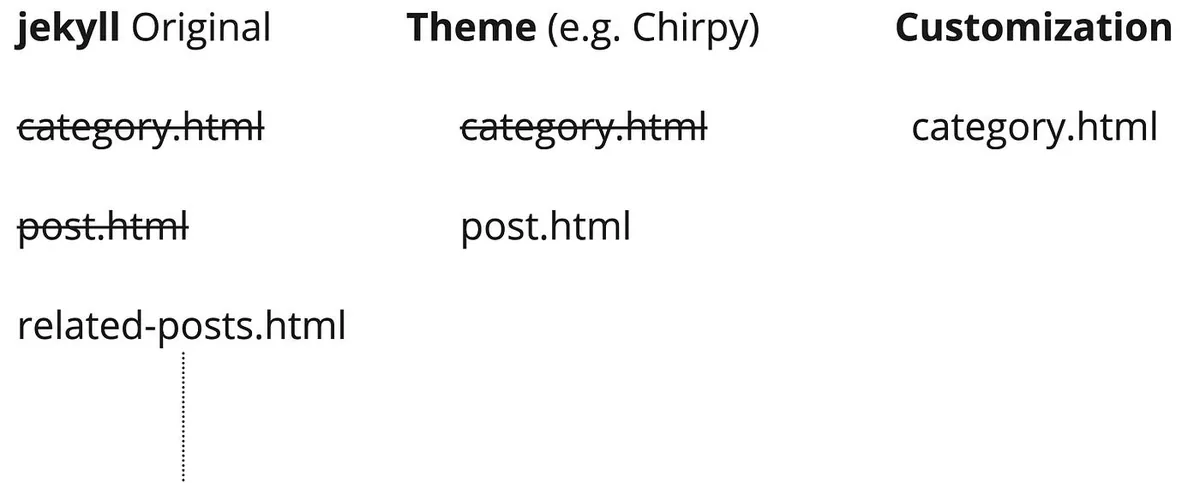
使用者可自由客制化页面,引擎会先看使用者有没有建立对应页面的客制化档案 -> 如果没有则看样板有没有 -> 如果没有就用原始的 Jekyll 样式呈现。
所以我们可以很轻易地对任何页面做客制化,只需要在相对应的目录建立一样的档案名称即可!
建立/编辑文章
- 我们可以先把
_posts/目录下的范例文章档案全数删除。
使用 Visual Code (免费) 或 Typora (付费) 建立 Markdown 档案,这边以 Visual Code 为例:
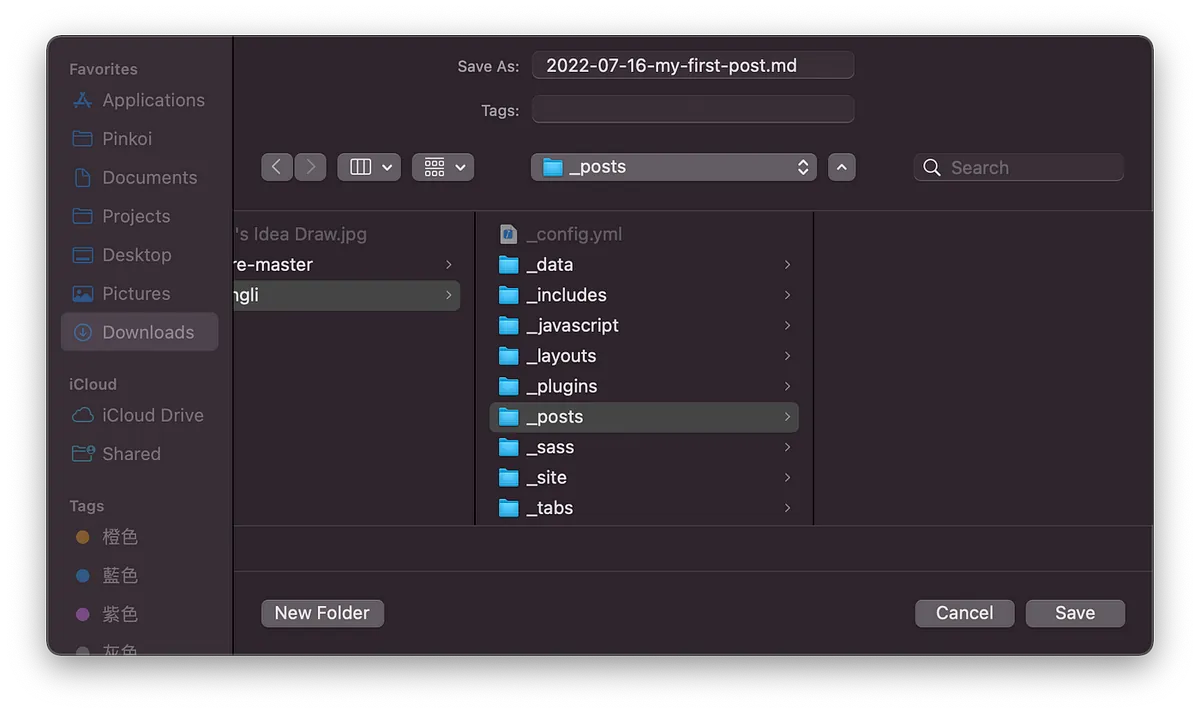
-
文章档案命名规则:
YYYY–MM–DD-文章档案名称.md -
建议以英文为档案名称 (SEO 最佳化),这个名称就会是网址的路径
文章 内容顶部 Meta :
---
layout: post
title:  "安安"
description: ZhgChgLi 的第一篇文章
date:   2022-07-16 10:03:36 +0800
categories: Jeklly Life
author: ZhgChgLi
tags: [ios]
---
-
layout: post
-
title: 文章标题 (og:title)
-
description: 文章描述 (og:description)
-
date: 文章发表时间 (不可以是未来)
-
author: 作者 (meta:author)
-
tags: 标签 (可多个)
-
categories: 分类 (单个,用空格区分子母分类
Jeklly Life-> Jeklly 目录下的 Life 目录)
文章内容 :
使用 Markdown 格式撰写:
---
layout: post
title: "安安"
description: ZhgChgLi 的第一篇文章
date: 2022-07-16 10:03:36 +0800
categories: Jeklly Life
author: ZhgChgLi
tags: [ios]
---
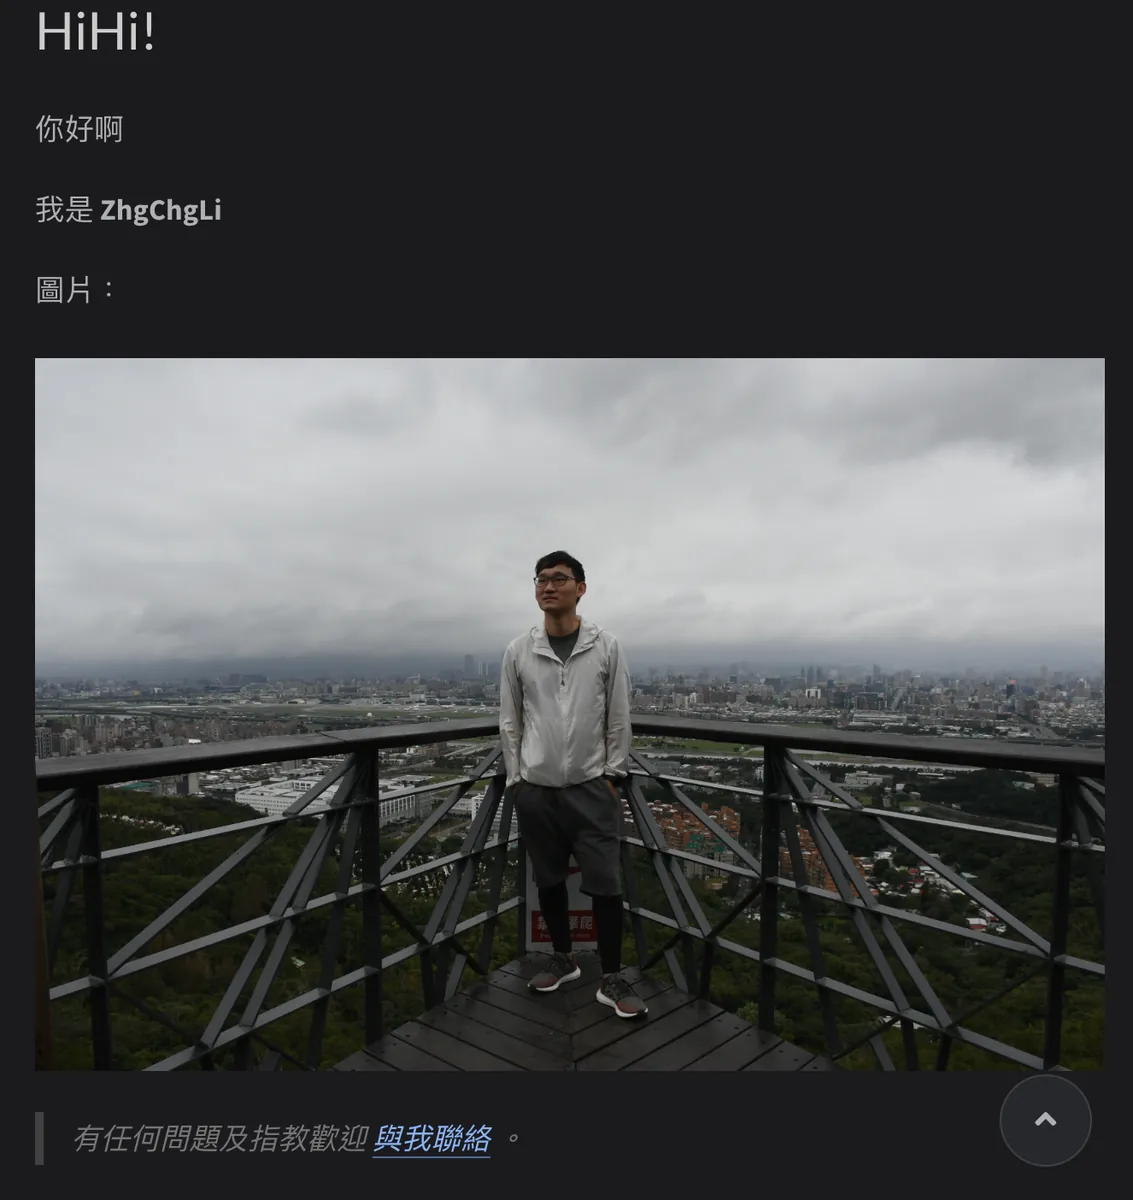
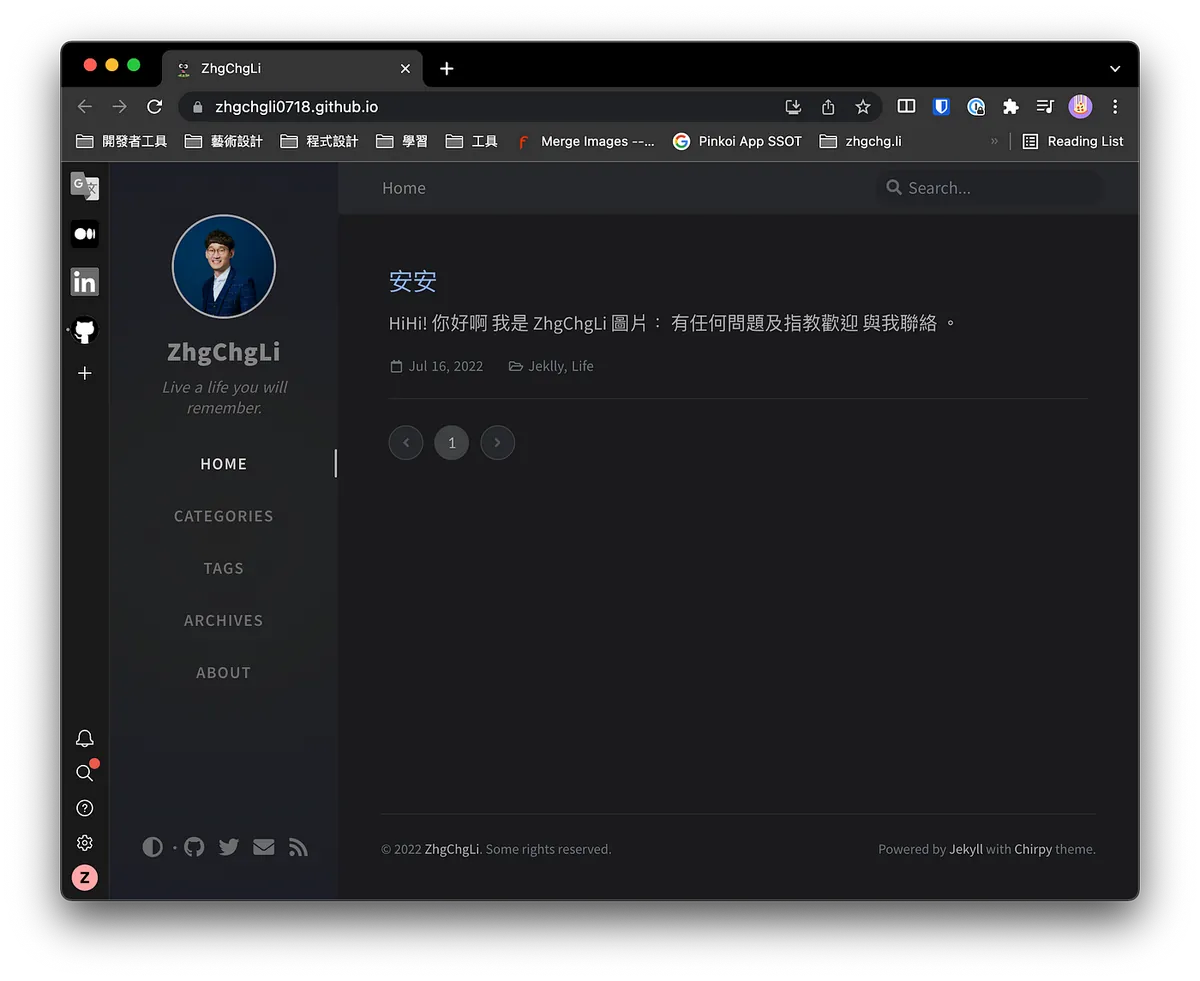
# HiHi!
你好啊
我是 **ZhgChgLi**
图片:
{: loading="lazy" decoding="async" width="1200" height="800" lqip="data:image/svg+xml;base64,PHN2ZyB4bWxucz0iaHR0cDovL3d3dy53My5vcmcvMjAwMC9zdmciIHdpZHRoPSIxMjAwIiBoZWlnaHQ9IjgwMCI+PHJlY3Qgd2lkdGg9IjEwMCUiIGhlaWdodD0iMTAwJSIgZmlsbD0iI2VkZTJjZiIvPjwvc3ZnPg==" }
> _有任何问题及指教欢迎 [与我联络](https://www.zhgchg.li/contact) 。_
成果:
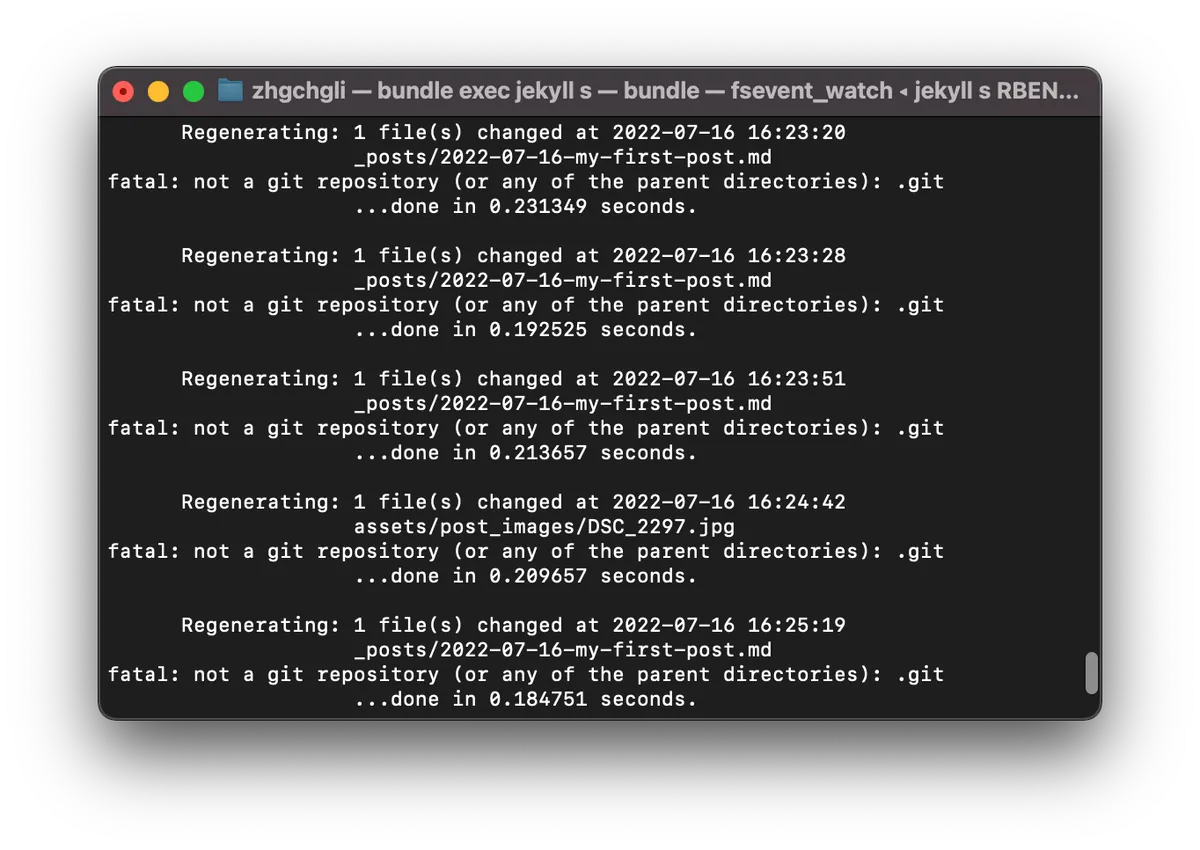
⚠️ 文章调整不需要重新启动网站,档案变更后会直接渲染显示,如果过一阵子都没出现修改内容,可能是文章内容格式有误导致渲染失败,可回到 Terminal 查看原因。
从 Medium 下载文章并转成 Markdown 放入 Jekyll
有了基本的 Jekyll 知识后我们继续向前迈进,使用 ZMediumToMarkdown 工具将现有在 Medium 网站上的文章下载并转换成 Markdwon 格式放到我们的 Blog 资料夹中。
cd 到 blog 目录下后,下以下指令将 Medium 上的该使用者所有文章都下载下来:
ZMediumToMarkdown -j 你的 Meidum 帐号
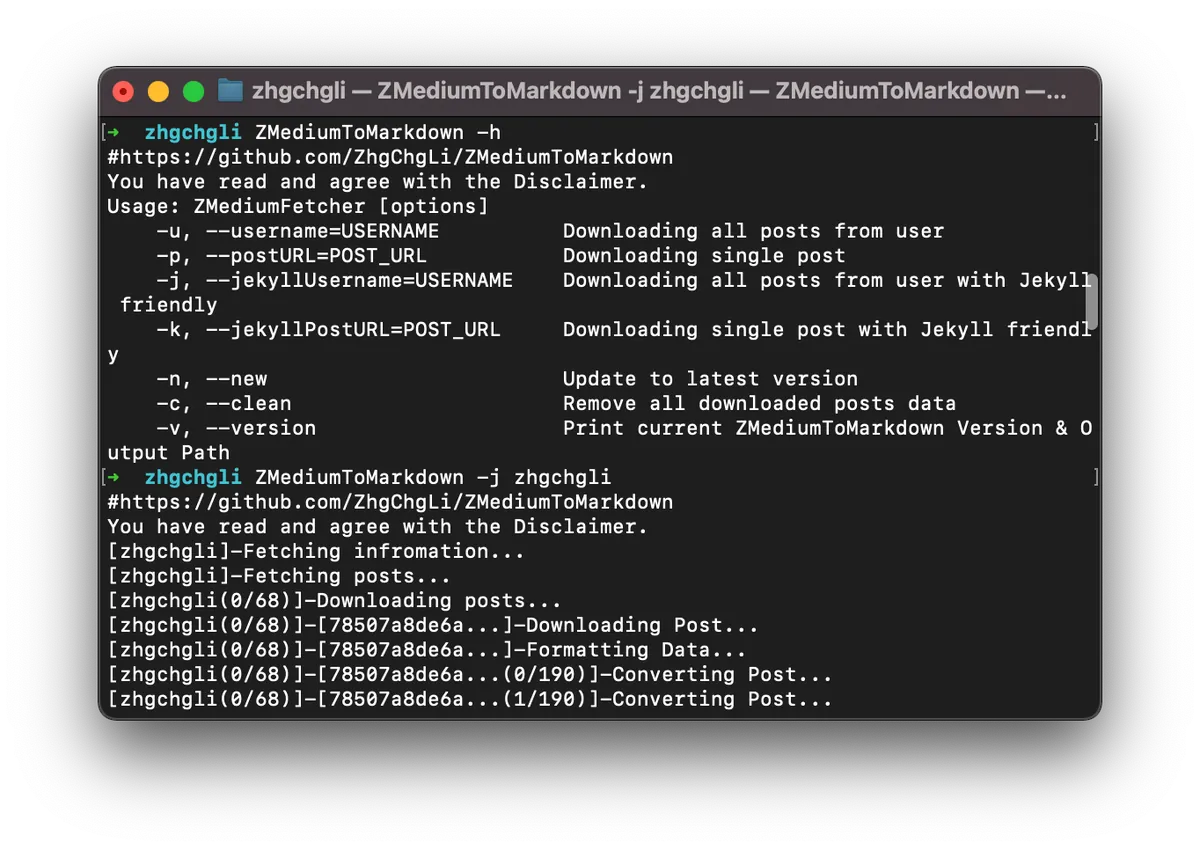
等待所有文章下载完成。。。

下载完成后,回到本地网站就能预览成果啰。
完成!!我们已经无痛地将 Medium 文章导入到 Jekyll 啰!
可以检查一下文章有无跑版、图片有无缺失,如果有一样欢迎 回报给我 协助修复。
上传内容到 Repo
本地预览内容没问题后,我们就要将内容 Push 到 Github Repo 啰。
依序使用以下 Git 指令操作:
git add .
git commit -m "update post"
git push
Push 完成后回到 Github 上,可以看到 Actions 有 CD 再跑:
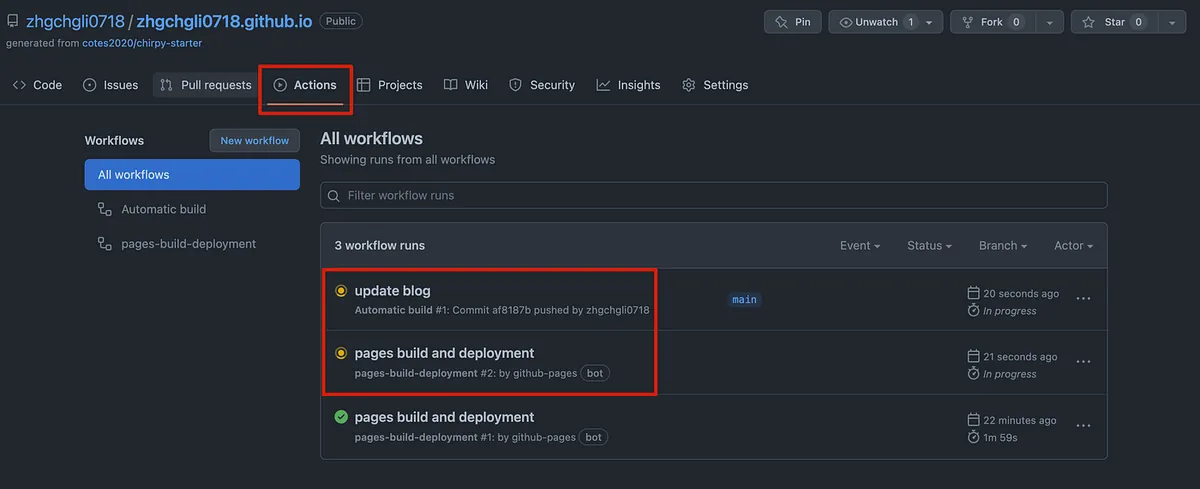
约等待 5 分钟…
部署完成!
首次部署完成设定
首次部署完成要更改以下设定:

否则前往网站只会出现:
--- layout: home # Index page ---
「Save」后不会马上生效,要回到「Actions」页面再一次重新等待部署。
重新部署完成后,就能成功进入网站了:
Demo -> zhgchg.li
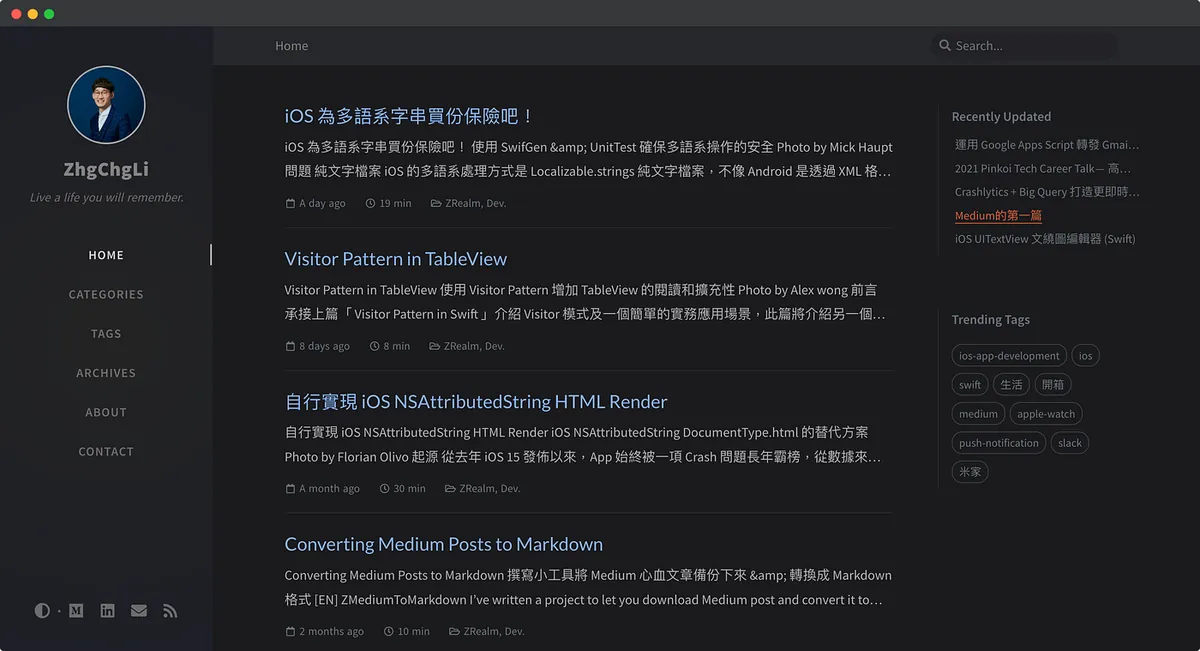
现在你也拥有一个免费的 Jekyll 个人 Blog 啰!!
关于部署
每次 Push 内容到 Repo 都会触发重新部署,要等到部署成功,更改才会真正生效。
绑定自订网域
如果不喜欢 zhgchgli0718.github.io Github 网址,可以从 Namecheap 购买您喜欢的网域或是使用 Dot.tk 注册免费 .tk 结尾的网域。
购买网域后进到网域后台:
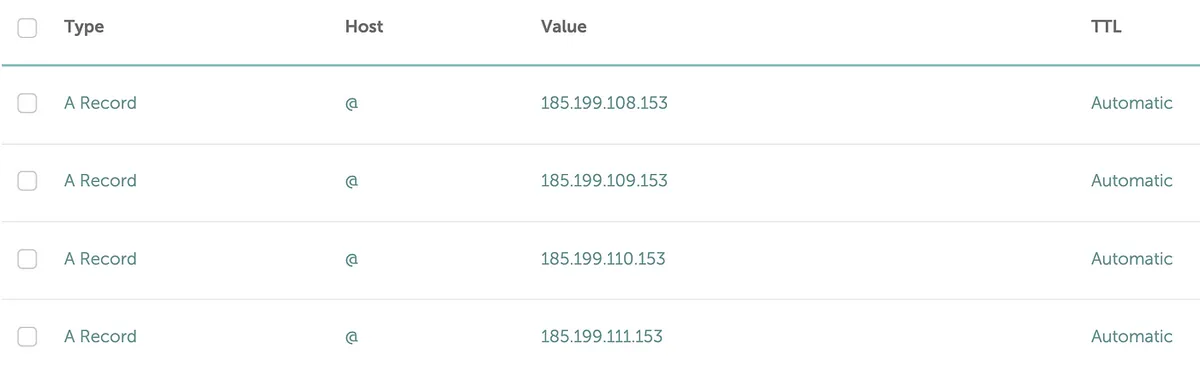
加上以下四个 Type A Record 纪录
A Record @ 185.199.108.153
A Record @ 185.199.109.153
A Record @ 185.199.110.153
A Record @ 185.199.111.153
网域后台新增好设定后,回到 Github Repo Settings:
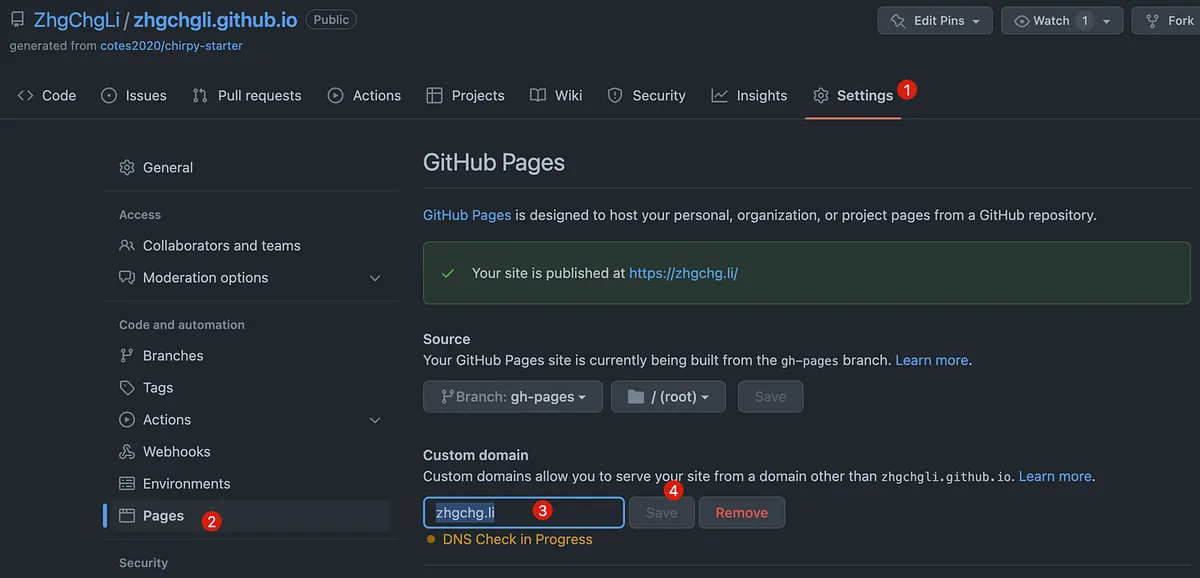
在 Custom domain 的地方填入你的网域,然后按「Save」。

等待 DNS 通了之后,就可以用 zhgchg.li 取代掉原本的 github.io 网址。
⚠️ DNS 设定至少需要 5 分钟 ~ 72 小时才会生效,如果一直无法认证过;请稍后再试。
云端、全自动 Medium 同步机制
每次有新文章都要用电脑手动跑 ZMediumToMarkdown 然后再 Push 到专案,嫌麻烦吗?
ZMediumToMarkdown 其实还提供贴心的 Github Action 功能 ,可以让你解放电脑、全自动帮你同步 Medium 文章到你的网站上。
前往 Repo 的 Actions 设定:
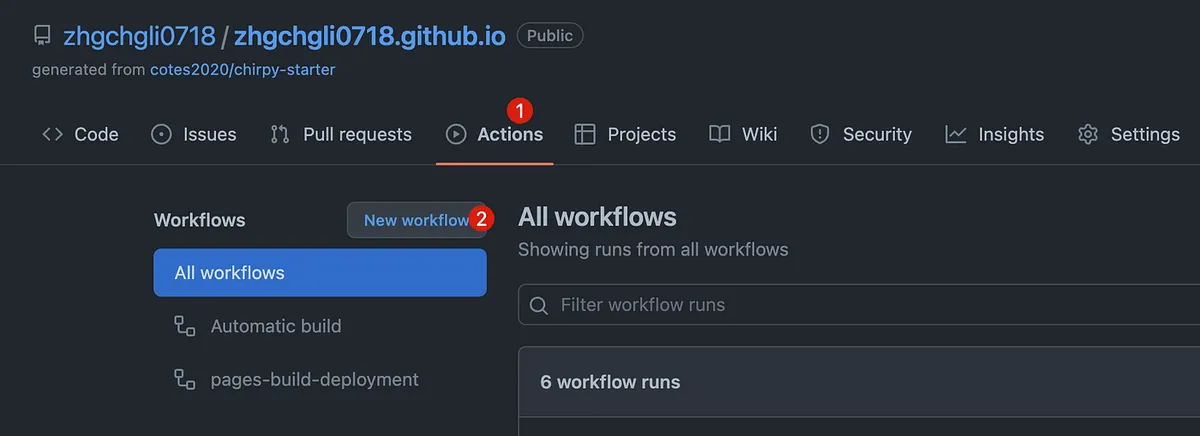
点击「New workflow」

点击「set up a workflow yourself」
-
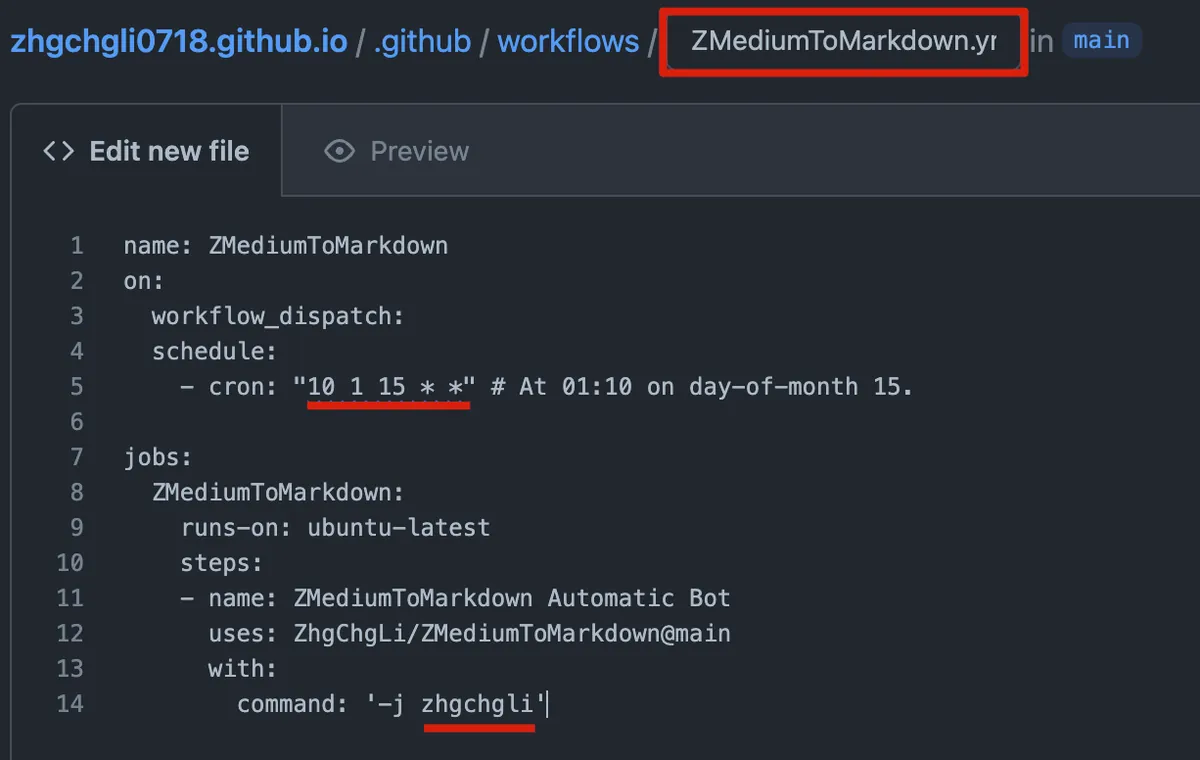
档案名称修改为:
ZMediumToMarkdown.yml -
档案内容如下:
name: ZMediumToMarkdown
on:
  workflow_dispatch:
  schedule:
    - cron: "10 1 15 * *" # At 01:10 on day-of-month 15.

jobs:
  ZMediumToMarkdown:
    runs-on: ubuntu-latest
    steps:
    - name: ZMediumToMarkdown Automatic Bot
      uses: ZhgChgLi/ZMediumToMarkdown@main
      with:
        command: '-j 你的 Meidum 帐号'
-
cron : 设定执行周期 (每周?每个月?每天?),这边是设定每个月 15 号凌晨 1:15 会自动执行
-
command: 填入你的 Medium 帐号在 -j 后面
点击右上方「Start commit」->「Commit new file」
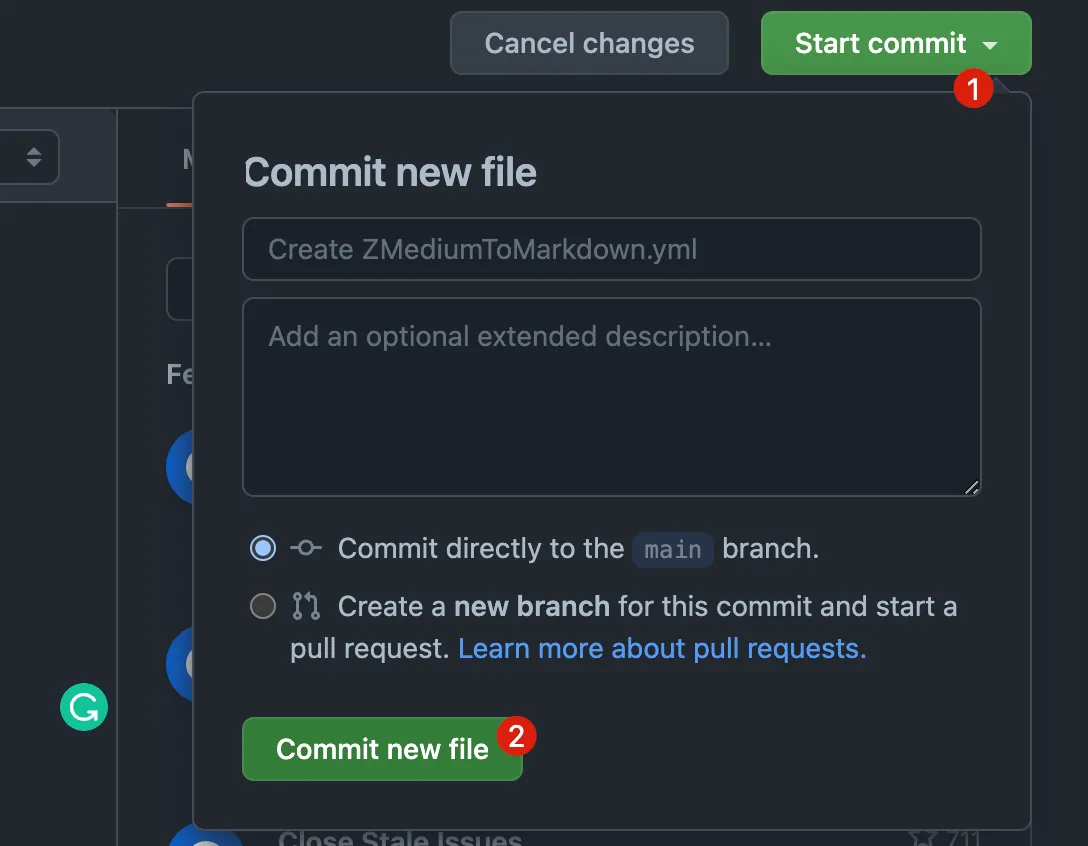
完成 Github Action 建立。
建立完成后回到 Actions 就会出现 ZMediumToMarkdown Action。
除了时间到自动执行外还可以依照以下步骤,手动触发执行:
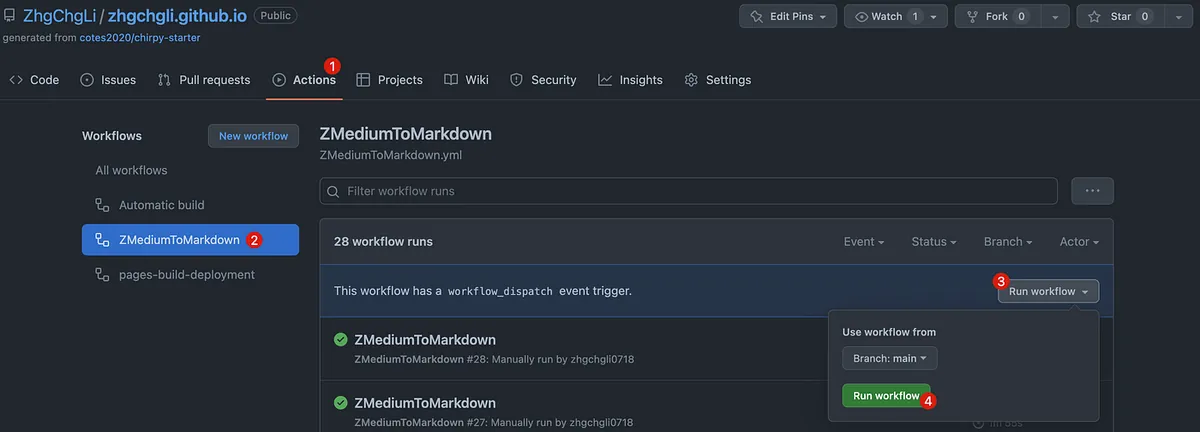
Actions -> ZMediumToMarkdown -> Run workflow -> Run workflow。
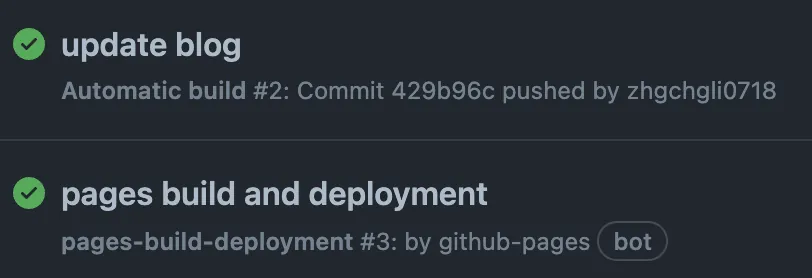
执行后,ZMediumToMarkdown 就会直接透过 Github Action 的机器跑同步 Medium 文章到 Repo 的脚本:

跑完后同样会触发重新部署,重新部署完成后到网站就会出现最新的内容了。🚀
完全无需人工操作!也就是说未来你还是可以继续更新 Medium 文章,脚本都会贴心地自动帮你从云端同步内容到你自己的网站上!

留言 · Comments